Verifying a repair after replacing a component using DTS Monaco involves clearing diagnostic trouble codes (DTCs), checking live data, and running routine tests to ensure the new component is functioning correctly, and at DTS-MONACO.EDU.VN, we offer comprehensive resources to guide you through this process seamlessly. This methodical approach guarantees the vehicle operates as expected, confirms the success of the repair, and restores confidence in the vehicle’s performance. By using the right validation steps, you can improve the dependability of car maintenance, make sure customers are happy, and keep your garage at the top of the repair business.
Contents
- 1. Understanding DTS Monaco for Automotive Repair Verification
- 1.1 What is DTS Monaco?
- 1.2 Why Use DTS Monaco for Repair Verification?
- 1.3 Key Steps in Repair Verification with DTS Monaco
- 2. Preparing for Repair Verification with DTS Monaco
- 2.1 Software and Hardware Requirements
- 2.2 Setting Up DTS Monaco
- 2.3 Best Practices Before Starting
- 3. Clearing Diagnostic Trouble Codes (DTCs) with DTS Monaco
- 3.1 Connecting to the Relevant ECU
- 3.2 Identifying and Clearing DTCs
- 3.3 Troubleshooting DTC Clearing Issues
- 4. Checking Live Data with DTS Monaco
- 4.1 Accessing Live Data Parameters
- 4.2 Interpreting Live Data Values
- 4.3 Identifying and Addressing Issues
- 5. Running Routines with DTS Monaco
- 5.1 Selecting and Executing Diagnostic Routines
- 5.2 Interpreting Routine Results
- 5.3 Examples of Useful Routines for Repair Verification
- 6. Variant Coding with DTS Monaco After Component Replacement
- 6.1 When is Variant Coding Necessary?
- 6.2 Performing Variant Coding in DTS Monaco
- 6.3 Common Coding Issues and Solutions
- 7. Post-Verification Steps and Final Checks
- 7.1 Rechecking DTCs and Live Data
- 7.2 Performing a Road Test
- 7.3 Documenting the Verification Process
- 8. Advanced Tips and Troubleshooting for DTS Monaco
- 8.1 Dealing with Communication Errors
- 8.2 Resolving Security Access Issues
- 8.3 Utilizing Online Resources and Communities
- 9. Staying Updated with DTS Monaco and Automotive Technology
- 9.1 Keeping DTS Monaco Software Up to Date
- 9.2 Following Industry Trends and Training
- 9.3 Adapting to New Vehicle Technologies
- 10. Conclusion: Ensuring Successful Repairs with DTS Monaco
- 10.1 Recap of Key Steps
- 10.2 Benefits of Proper Verification
- 10.3 Call to Action
- FAQ: Verifying Repairs with DTS Monaco
- 1. What is DTS Monaco, and why is it used for repair verification?
- 2. What are the main steps to verify a repair after replacing a component using DTS Monaco?
- 3. How do I clear DTCs using DTS Monaco?
- 4. What is live data, and how do I interpret it using DTS Monaco?
- 5. How do I run diagnostic routines with DTS Monaco?
- 6. What is variant coding, and when is it necessary after replacing a component?
- 7. How can I troubleshoot communication errors in DTS Monaco?
- 8. What should I do if I encounter security access issues while using DTS Monaco?
- 9. Why is it important to perform a road test after verifying a repair with DTS Monaco?
- 10. How can I stay updated with DTS Monaco and new automotive technologies?
1. Understanding DTS Monaco for Automotive Repair Verification
DTS Monaco is a diagnostic and coding software widely used in the automotive industry for advanced diagnostics, ECU flashing, and variant coding. After replacing a component in a vehicle, it’s crucial to verify that the repair was successful and that the new component is functioning correctly. DTS Monaco provides the tools necessary to perform this verification effectively. Let’s explore how to use DTS Monaco to confirm a repair, focusing on clearing codes, checking live data, and running routines.
1.1 What is DTS Monaco?
DTS Monaco, which stands for “Diagnostic Tool Set for Monaco,” is a powerful diagnostic software used extensively by automotive technicians and engineers. It’s designed for in-depth diagnostics, ECU (Engine Control Unit) programming, and vehicle configuration. DTS Monaco allows users to communicate directly with vehicle ECUs, read diagnostic information, perform advanced coding, and run diagnostic routines. The software is particularly valuable for working on Mercedes-Benz vehicles but can be adapted for use with other car brands as well. Technicians at DTS-MONACO.EDU.VN use DTS Monaco for car coding.
1.2 Why Use DTS Monaco for Repair Verification?
Using DTS Monaco for repair verification offers several advantages. Here are some key benefits:
- Comprehensive Diagnostics: DTS Monaco provides detailed diagnostic information, allowing technicians to identify and address issues effectively.
- ECU Communication: The software allows direct communication with vehicle ECUs, ensuring accurate and reliable data.
- Coding Capabilities: DTS Monaco enables technicians to perform variant coding, which is essential for configuring new components and ensuring compatibility with the vehicle’s systems.
- Routine Testing: The software can run diagnostic routines to verify the functionality of the new component and the overall system.
- Live Data Monitoring: Technicians can monitor live data parameters to ensure that the new component is operating within specified ranges.
1.3 Key Steps in Repair Verification with DTS Monaco
When verifying a repair after replacing a component, focus on these key steps:
- Clearing Diagnostic Trouble Codes (DTCs): Remove any stored error codes related to the replaced component.
- Checking Live Data: Monitor relevant parameters to ensure the new component is functioning correctly.
- Running Routines: Perform diagnostic routines to test the functionality of the component and system.
2. Preparing for Repair Verification with DTS Monaco
Before starting the repair verification process, it’s essential to have the necessary tools and software set up correctly. Here’s how to prepare:
2.1 Software and Hardware Requirements
To use DTS Monaco effectively, ensure you have the following:
- DTS Monaco Software: A licensed and correctly installed version of the DTS Monaco software. You can find more information and resources at DTS-MONACO.EDU.VN.
- Diagnostic Interface: A compatible diagnostic interface, such as a Mercedes-Benz XENTRY Connect or a third-party interface that supports the necessary communication protocols (e.g., CAN, K-Line).
- Laptop: A laptop with sufficient processing power, memory, and storage to run the software smoothly.
- Vehicle Connection: Ensure a stable connection between the diagnostic interface and the vehicle’s OBD-II port.
2.2 Setting Up DTS Monaco
Follow these steps to set up DTS Monaco:
- Install the Software: Install DTS Monaco on your laptop according to the software vendor’s instructions.
- Configure the Interface: Configure the diagnostic interface in DTS Monaco settings. Select the correct interface type and communication protocol.
- Create a Workspace: Create a new workspace in DTS Monaco for the vehicle you are working on. This workspace will store all the relevant data and settings for the diagnostic session.
- Import SMR-D Files: Import the necessary SMR-D (System Matrix Data) files for the vehicle’s ECUs. These files contain the data required for communication and diagnostics.
2.3 Best Practices Before Starting
Before beginning the verification process, consider these best practices:
- Backup Vehicle Data: Always back up the vehicle’s ECU data before making any changes. This ensures you can restore the original settings if needed.
- Review Repair Records: Review the repair records to understand what component was replaced and any specific instructions or notes from the repair technician.
- Ensure Stable Power Supply: Connect a battery stabilizer to the vehicle to maintain a stable voltage during the diagnostic session.
- Disable Unnecessary Systems: Turn off any unnecessary electrical systems (e.g., lights, radio) to minimize power consumption.
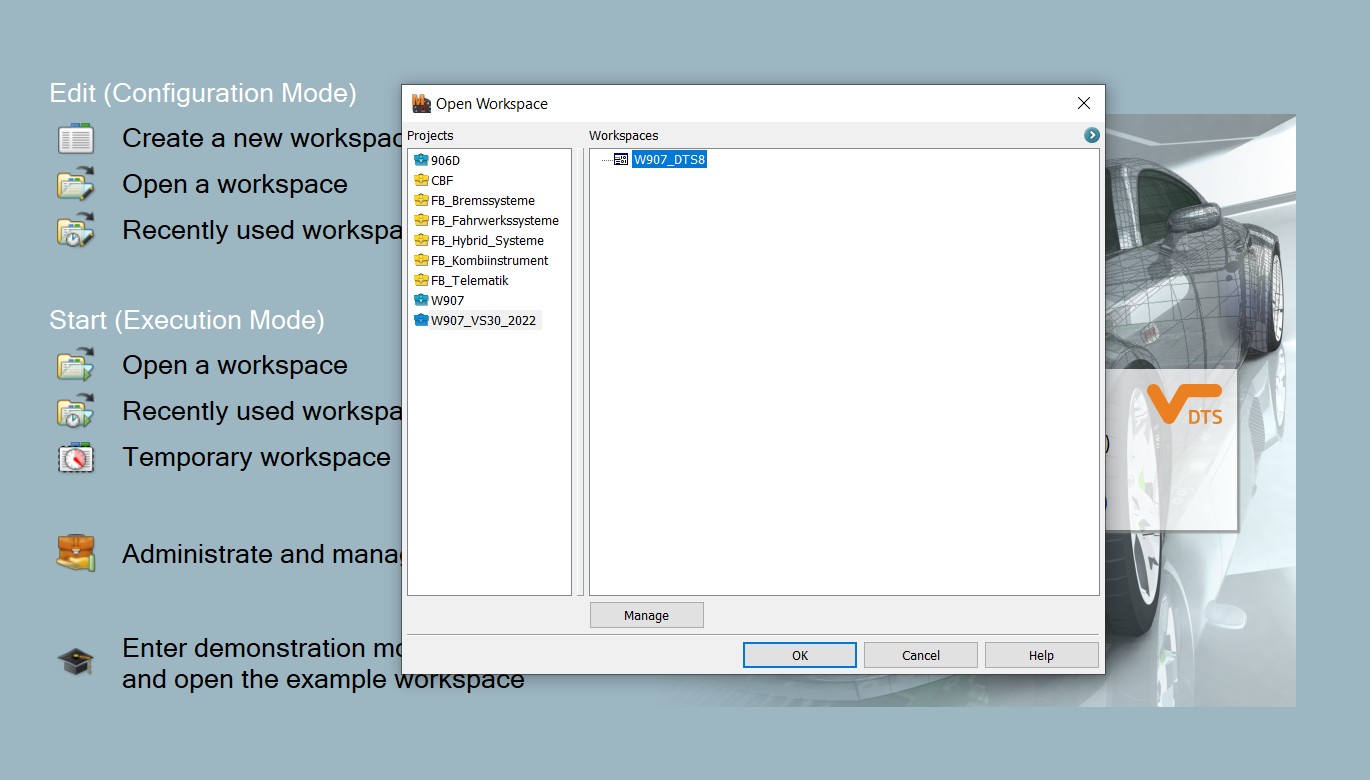 DTS Monaco Open Workspace
3. Clearing Diagnostic Trouble Codes (DTCs) with DTS Monaco
One of the first steps in verifying a repair is to clear any diagnostic trouble codes (DTCs) related to the replaced component. This helps ensure that any remaining codes are new and relevant to the current state of the vehicle.
3.1 Connecting to the Relevant ECU
To clear DTCs, you must first connect to the relevant ECU. Here’s how:
- Open DTS Monaco: Launch the DTS Monaco software and open your workspace for the vehicle.
- Select the ECU: In the workspace, select the ECU that controls the replaced component. For example, if you replaced an ABS sensor, select the ABS ECU.
- Establish Connection: Establish a connection with the ECU by double-clicking it in the workspace. Ensure that the connection is stable and that DTS Monaco is communicating with the ECU.
3.2 Identifying and Clearing DTCs
Once connected to the ECU, follow these steps to identify and clear DTCs:
- Read Fault Memory: In DTS Monaco, navigate to the “Fault Memory” or “Read DTC” function. This will retrieve a list of all stored DTCs in the ECU.
- Identify Relevant Codes: Review the list of DTCs and identify any codes related to the replaced component. Make a note of these codes for reference.
- Clear Fault Memory: Use the “Clear DTC” or “Clear Fault Memory” function to erase the stored DTCs. Confirm that the codes have been successfully cleared.
- Verify Clearing: After clearing the DTCs, read the fault memory again to ensure that the codes have been removed. If any codes persist, investigate further.
3.3 Troubleshooting DTC Clearing Issues
If you encounter issues while clearing DTCs, consider the following troubleshooting steps:
- Check Connection: Ensure that the connection between DTS Monaco and the ECU is stable. A poor connection can prevent DTCs from being cleared.
- Verify Security Access: Some ECUs require security access before DTCs can be cleared. Use the “Security Access” function in DTS Monaco to unlock the ECU.
- Address Underlying Issues: If a DTC reappears immediately after being cleared, there may be an underlying issue that needs to be addressed. Investigate the cause of the DTC and resolve the problem.
- Refer to Vehicle Documentation: Consult the vehicle’s service manual or repair information for specific instructions on clearing DTCs for the particular ECU.
4. Checking Live Data with DTS Monaco
After clearing DTCs, the next step is to check live data to ensure that the new component is functioning correctly. Live data provides real-time information about the component’s performance and can help identify any issues.
4.1 Accessing Live Data Parameters
To access live data parameters, follow these steps:
- Connect to the ECU: Connect to the relevant ECU in DTS Monaco, as described in the previous section.
- Select Live Data Function: Navigate to the “Live Data,” “Actual Values,” or “Data Stream” function in DTS Monaco. This will open a window displaying various live data parameters.
- Choose Relevant Parameters: Select the parameters that are relevant to the replaced component. For example, if you replaced a mass airflow (MAF) sensor, select parameters such as “MAF sensor voltage,” “air flow rate,” and “intake air temperature.”
4.2 Interpreting Live Data Values
Interpreting live data values involves comparing the readings to the expected ranges specified by the vehicle manufacturer. Here are some tips:
- Consult Specifications: Refer to the vehicle’s service manual or repair information for the correct specifications for each parameter.
- Compare to Known Good Values: Compare the live data values to those from a known good vehicle or component, if available.
- Look for Anomalies: Watch for any unusual or erratic readings. This can indicate a problem with the component or its wiring.
- Consider Operating Conditions: Take into account the vehicle’s operating conditions when interpreting live data. For example, some parameters may vary depending on engine temperature or load.
4.3 Identifying and Addressing Issues
If you identify any issues based on the live data readings, take the following steps:
- Verify Wiring and Connections: Check the wiring and connections to the component to ensure they are secure and free from damage.
- Test Component Functionality: Use a multimeter or other diagnostic tools to test the component’s functionality directly.
- Check for Software Updates: Ensure that the ECU has the latest software updates. Outdated software can sometimes cause incorrect readings or performance issues.
- Replace Component if Necessary: If the component is faulty, replace it with a new one and repeat the verification process.
5. Running Routines with DTS Monaco
In addition to clearing DTCs and checking live data, running diagnostic routines is an essential part of verifying a repair. Routines are pre-programmed tests that can help assess the functionality of a component or system.
5.1 Selecting and Executing Diagnostic Routines
To select and execute diagnostic routines, follow these steps:
- Connect to the ECU: Connect to the relevant ECU in DTS Monaco.
- Navigate to Routines: Look for the “Routines,” “Tests,” or “Actuations” function in DTS Monaco. This will open a list of available diagnostic routines.
- Choose Relevant Routine: Select the routine that is relevant to the replaced component. For example, if you replaced an oxygen sensor, select a routine that tests the sensor’s response and heater function.
- Execute the Routine: Follow the on-screen instructions to execute the routine. Monitor the results and look for any errors or warnings.
5.2 Interpreting Routine Results
Interpreting routine results involves understanding the expected outcomes and comparing them to the actual results. Here are some tips:
- Consult Documentation: Refer to the vehicle’s service manual or repair information for the expected results of each routine.
- Look for Pass/Fail Indicators: Many routines will provide a pass/fail indicator to indicate whether the component or system is functioning correctly.
- Analyze Data Output: Some routines will output data that needs to be analyzed. Compare the data to the specifications to ensure it is within the correct range.
- Address Errors or Warnings: If the routine generates any errors or warnings, investigate the cause and address the issue.
5.3 Examples of Useful Routines for Repair Verification
Here are some examples of useful routines for verifying repairs:
- ABS Sensor Test: Tests the functionality of ABS sensors by monitoring their output signals while the wheels are rotated.
- Oxygen Sensor Test: Evaluates the response and heater function of oxygen sensors to ensure they are providing accurate feedback to the ECU.
- Fuel Injector Test: Tests the operation of fuel injectors by measuring their resistance and monitoring their spray pattern.
- Throttle Position Sensor Test: Verifies the output signal of the throttle position sensor to ensure it is accurately reflecting the position of the throttle.
- EGR Valve Test: Tests the operation of the EGR valve by monitoring its position and flow rate.
6. Variant Coding with DTS Monaco After Component Replacement
Variant coding is the process of configuring a vehicle’s ECUs to match the specific options and equipment installed in the vehicle. After replacing a component, variant coding may be necessary to ensure that the new component is correctly integrated into the vehicle’s systems.
6.1 When is Variant Coding Necessary?
Variant coding is typically necessary in the following situations:
- ECU Replacement: When replacing an ECU, the new ECU may need to be coded to match the vehicle’s specific configuration.
- Component Replacement: When replacing certain components, such as control modules or sensors, variant coding may be required to ensure compatibility with the vehicle’s systems.
- Retrofitting Equipment: When adding new equipment to the vehicle, such as navigation systems or driver assistance features, variant coding is often necessary to enable the new functionality.
6.2 Performing Variant Coding in DTS Monaco
To perform variant coding in DTS Monaco, follow these steps:
- Connect to the ECU: Connect to the relevant ECU in DTS Monaco.
- Enter Variant Coding Mode: Navigate to the “Variant Coding” or “SCN Coding” function in DTS Monaco.
- Read Current Coding: Read the current coding data from the ECU. This will provide a baseline for making changes.
- Modify Coding Data: Modify the coding data to match the vehicle’s specific configuration. Refer to the vehicle’s service manual or repair information for the correct coding values.
- Write Coding Data: Write the modified coding data back to the ECU. Confirm that the coding has been successfully written.
- Verify Coding: Verify that the coding has been correctly written by reading the coding data again and comparing it to the desired values.
6.3 Common Coding Issues and Solutions
When performing variant coding, you may encounter the following issues:
- Incorrect Coding Values: Using incorrect coding values can cause the component or system to malfunction. Always refer to the vehicle’s service manual or repair information for the correct values.
- Coding Not Accepted: Some ECUs may not accept the coding data if certain conditions are not met (e.g., security access not granted, voltage too low). Ensure that all requirements are met before attempting to write the coding data.
- Communication Errors: Communication errors can prevent the coding data from being written correctly. Check the connection between DTS Monaco and the ECU and try again.
7. Post-Verification Steps and Final Checks
After completing the repair verification process, there are several post-verification steps and final checks to ensure the repair is successful.
7.1 Rechecking DTCs and Live Data
After performing the initial verification steps, it’s essential to recheck DTCs and live data to confirm that no new issues have arisen.
- Recheck DTCs: Read the fault memory again to ensure that no new DTCs have been stored. If any new codes appear, investigate and address them.
- Recheck Live Data: Monitor the live data parameters again to ensure that the values are still within the correct ranges. Verify that the component is functioning correctly under various operating conditions.
7.2 Performing a Road Test
A road test is a valuable way to verify the repair under real-world conditions.
- Simulate Driving Conditions: Drive the vehicle under various conditions, such as city driving, highway driving, and acceleration/deceleration.
- Monitor Performance: Pay attention to the vehicle’s performance, including engine smoothness, transmission shifting, braking, and handling.
- Check for Issues: Watch for any unusual noises, vibrations, or other issues that may indicate a problem.
7.3 Documenting the Verification Process
Proper documentation is essential for maintaining accurate records and ensuring accountability.
- Record Verification Steps: Document all the steps taken during the verification process, including the DTCs cleared, live data values, routines performed, and coding changes made.
- Note Results: Note the results of each step, including any errors or warnings encountered and how they were addressed.
- Save Data Logs: Save any data logs generated by DTS Monaco for future reference.
- Update Repair Records: Update the vehicle’s repair records with the verification information.
8. Advanced Tips and Troubleshooting for DTS Monaco
Working with DTS Monaco can sometimes present challenges. Here are some advanced tips and troubleshooting steps to help you overcome common issues.
8.1 Dealing with Communication Errors
Communication errors can occur for various reasons. Here’s how to troubleshoot them:
- Check the Interface: Ensure that the diagnostic interface is properly connected to the vehicle and the laptop. Verify that the interface is powered on and functioning correctly.
- Verify Protocol Settings: Check the communication protocol settings in DTS Monaco to ensure they match the vehicle’s requirements.
- Restart the Software: Sometimes, simply restarting DTS Monaco can resolve communication errors.
- Update Interface Drivers: Ensure that the drivers for the diagnostic interface are up to date.
- Try a Different Interface: If possible, try using a different diagnostic interface to rule out a problem with the original interface.
8.2 Resolving Security Access Issues
Security access issues can prevent you from performing certain functions in DTS Monaco. Here’s how to address them:
- Use Correct Security Key: Ensure that you are using the correct security key for the ECU. Refer to the vehicle’s service manual or repair information for the correct key.
- Follow Security Access Procedure: Follow the correct security access procedure in DTS Monaco. This may involve sending a specific sequence of commands to the ECU.
- Check Key Validity: Verify that the security key is still valid. Some keys may expire after a certain period of time.
- Contact Support: If you are unable to obtain security access, contact the software vendor or vehicle manufacturer for assistance.
8.3 Utilizing Online Resources and Communities
There are many online resources and communities where you can find help and information about using DTS Monaco.
- Forums: Participate in online forums dedicated to automotive diagnostics and coding. These forums can be a valuable source of information and support.
- Online Databases: Utilize online databases that contain coding data, diagnostic information, and repair procedures.
- Training Courses: Consider taking a training course on DTS Monaco to improve your skills and knowledge. DTS-MONACO.EDU.VN offers comprehensive training resources.
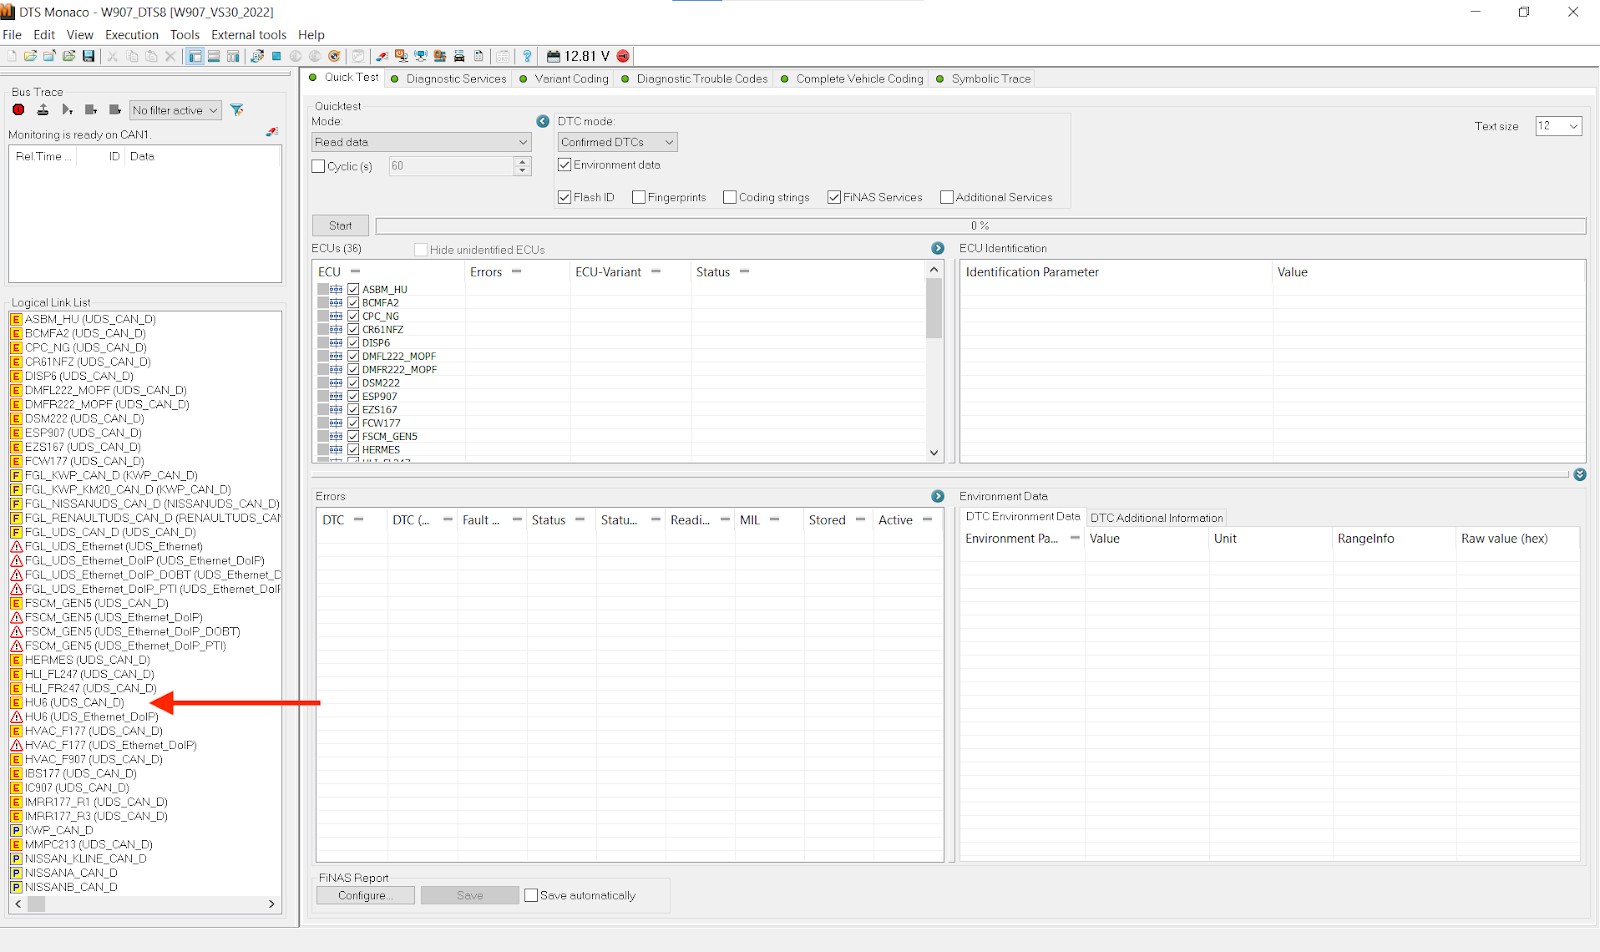 DTS Monaco ECU Selection
9. Staying Updated with DTS Monaco and Automotive Technology
The automotive industry is constantly evolving, and it’s essential to stay updated with the latest technologies and software updates.
9.1 Keeping DTS Monaco Software Up to Date
Regularly updating your DTS Monaco software ensures you have the latest features, bug fixes, and compatibility with new vehicle models.
- Check for Updates: Periodically check for software updates from the software vendor.
- Install Updates: Install the updates as soon as they are available.
- Review Release Notes: Review the release notes to understand what changes have been made in the update.
9.2 Following Industry Trends and Training
Staying informed about industry trends and participating in training opportunities can help you improve your skills and knowledge.
- Read Industry Publications: Subscribe to industry publications and follow automotive news websites to stay informed about the latest trends.
- Attend Conferences and Trade Shows: Attend automotive conferences and trade shows to learn about new technologies and network with other professionals.
- Take Training Courses: Enroll in training courses on new technologies and diagnostic techniques.
- Join Professional Organizations: Join professional organizations to connect with other technicians and access resources and training opportunities.
9.3 Adapting to New Vehicle Technologies
New vehicle technologies are constantly being introduced, and it’s essential to adapt to these changes.
- Learn About New Systems: Take the time to learn about new vehicle systems, such as electric vehicles, advanced driver assistance systems (ADAS), and connected car technologies.
- Update Your Skills: Update your skills to be able to diagnose and repair these new systems.
- Invest in New Tools: Invest in new diagnostic tools and equipment that are required to work on these new systems.
10. Conclusion: Ensuring Successful Repairs with DTS Monaco
Using DTS Monaco to verify a repair after replacing a component involves a systematic approach that includes clearing DTCs, checking live data, and running diagnostic routines. By following these steps, you can ensure that the repair is successful and that the vehicle is functioning correctly.
10.1 Recap of Key Steps
To recap, here are the key steps in verifying a repair with DTS Monaco:
- Prepare for Verification: Ensure that you have the necessary tools and software set up correctly.
- Clear DTCs: Clear any diagnostic trouble codes related to the replaced component.
- Check Live Data: Monitor relevant parameters to ensure the new component is functioning correctly.
- Run Routines: Perform diagnostic routines to test the functionality of the component and system.
- Perform Variant Coding: Configure the vehicle’s ECUs to match the new component.
- Post-Verification Steps: Recheck DTCs and live data, perform a road test, and document the verification process.
10.2 Benefits of Proper Verification
Proper verification offers several benefits:
- Ensured Repair Quality: Verification ensures that the repair has been performed correctly and that the vehicle is functioning as expected.
- Reduced Comebacks: By verifying the repair, you can reduce the risk of comebacks and customer dissatisfaction.
- Improved Customer Satisfaction: Customers will be more satisfied if they know that their vehicle has been thoroughly checked and verified.
- Enhanced Reputation: Performing proper verification can enhance your reputation as a skilled and reliable technician.
10.3 Call to Action
Ready to take your automotive diagnostic skills to the next level? Visit DTS-MONACO.EDU.VN to explore our comprehensive training courses, software resources, and expert support. Whether you’re a seasoned technician or just starting, we have the tools and knowledge you need to succeed in today’s automotive industry. Unlock the full potential of DTS Monaco and drive your career forward. Contact us today at Address: 275 N Harrison St, Chandler, AZ 85225, United States. Whatsapp: +1 (641) 206-8880.
FAQ: Verifying Repairs with DTS Monaco
1. What is DTS Monaco, and why is it used for repair verification?
DTS Monaco is a diagnostic software used for in-depth diagnostics, ECU programming, and vehicle configuration, making it ideal for verifying repairs by communicating with ECUs, reading diagnostic info, and running tests.
2. What are the main steps to verify a repair after replacing a component using DTS Monaco?
The main steps include clearing diagnostic trouble codes (DTCs), checking live data, running diagnostic routines, and, if necessary, performing variant coding to ensure the new component is properly integrated.
3. How do I clear DTCs using DTS Monaco?
Connect to the relevant ECU, navigate to the fault memory function, identify and clear the DTCs related to the replaced component, and then verify that the codes have been successfully cleared.
4. What is live data, and how do I interpret it using DTS Monaco?
Live data is real-time information about a component’s performance. Access it by connecting to the ECU, selecting the live data function, choosing relevant parameters, and comparing the readings to the manufacturer’s specifications to identify any issues.
5. How do I run diagnostic routines with DTS Monaco?
Connect to the ECU, find the routines function, select a routine related to the replaced component, execute it, and interpret the results by comparing them to expected outcomes in the vehicle’s service manual.
6. What is variant coding, and when is it necessary after replacing a component?
Variant coding configures a vehicle’s ECUs to match its specific options and equipment. It’s necessary when replacing ECUs or components that require integration with the vehicle’s systems.
7. How can I troubleshoot communication errors in DTS Monaco?
Check the diagnostic interface connection, verify protocol settings, restart the software, update interface drivers, and try using a different interface if possible.
8. What should I do if I encounter security access issues while using DTS Monaco?
Ensure you’re using the correct security key, follow the security access procedure in DTS Monaco, check the key’s validity, and contact support if needed.
9. Why is it important to perform a road test after verifying a repair with DTS Monaco?
A road test helps verify the repair under real-world conditions by simulating various driving scenarios and monitoring the vehicle’s performance to ensure everything is functioning correctly.
10. How can I stay updated with DTS Monaco and new automotive technologies?
Regularly update the DTS Monaco software, follow industry trends and training, adapt to new vehicle technologies, and invest in new tools and equipment as needed.