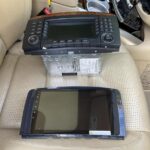
Do you need to diagnose communication failures on FlexRay using DTS Monaco and identify non-responding modules? This guide from DTS-MONACO.EDU.VN provides a comprehensive overview of how to effectively utilize DTS Monaco for FlexRay diagnostics, including identification of non-communicating modules, and solutions for automotive professionals. We will delve into troubleshooting strategies and tips for successful FlexRay communication analysis.
Contents
- 1. What is FlexRay and Why is Diagnosing Communication Failures Important?
- Understanding the Importance of FlexRay in Modern Vehicles
- 2. What is DTS Monaco and Why Use it for FlexRay Diagnostics?
- Why Choose DTS Monaco for FlexRay Communication Diagnostics?
- 3. How to Set Up DTS Monaco for FlexRay Diagnostics
- Step-by-Step Guide to Setting Up DTS Monaco:
- Troubleshooting Connection Issues:
- 4. How Do You Identify Non-Responding Modules on FlexRay Using DTS Monaco?
- Methods for Identifying Non-Responding Modules:
- Interpreting the Results:
- 5. Step-by-Step Guide: Diagnosing FlexRay Communication Failures with DTS Monaco
- Step 1: Read Diagnostic Trouble Codes (DTCs)
- Step 2: Analyze DTCs and Freeze Frame Data
- Step 3: Check FlexRay Bus Communication
- Step 4: Perform Component Testing
- Step 5: Inspect Wiring and Connections
- Step 6: Update ECU Software
- Step 7: Replace Faulty Components
- 6. What are Common Causes of FlexRay Communication Failures?
- Preventive Measures to Minimize Communication Failures
- 7. Advanced DTS Monaco Features for FlexRay Diagnostics
- Tips for Effective Use of Advanced Features
- 8. FlexRay Communication Protocols and Standards
- Key FlexRay Standards
- 9. Case Studies: Real-World FlexRay Diagnostic Scenarios with DTS Monaco
- Case Study 1: Non-Responding ABS Module
- Case Study 2: Intermittent Communication Errors
- Case Study 3: Faulty Airbag Control Unit (ACU)
- Lessons Learned from Case Studies
- 10. What are the Best Practices for Maintaining FlexRay Systems?
- Additional Tips for Maintaining FlexRay Systems:
- FAQ: Diagnosing FlexRay Communication Failures with DTS Monaco
- 1. What is the most common cause of FlexRay communication failure?
- 2. Can DTS Monaco be used to diagnose all types of FlexRay communication failures?
- 3. How often should FlexRay systems be inspected?
- 4. What are the signs of a FlexRay communication failure?
- 5. Is it possible to repair damaged FlexRay wiring?
- 6. Can software updates resolve FlexRay communication failures?
- 7. What is the role of diagnostic trouble codes (DTCs) in diagnosing FlexRay communication failures?
- 8. Do I need special training to use DTS Monaco for FlexRay diagnostics?
- 9. What is the best way to prevent FlexRay communication failures?
- 10. Where can I find more information about DTS Monaco and FlexRay diagnostics?
- Ready to Master FlexRay Diagnostics with DTS Monaco?
1. What is FlexRay and Why is Diagnosing Communication Failures Important?
FlexRay is a high-speed, fault-tolerant automotive network communication protocol designed for advanced safety-critical applications. Identifying and resolving communication failures in FlexRay systems is critical to ensuring vehicle safety, reliability, and performance.
FlexRay represents a significant advancement over previous automotive communication protocols like CAN (Controller Area Network), offering increased bandwidth and deterministic communication. This is particularly important for applications like advanced driver-assistance systems (ADAS) and autonomous driving, where real-time data exchange and predictable performance are essential.
According to a report by the National Highway Traffic Safety Administration (NHTSA), electronic system malfunctions, including communication failures, can contribute to a significant number of vehicle accidents. Therefore, accurate and efficient diagnosis of FlexRay communication issues is paramount for maintaining vehicle safety and preventing potential hazards.
Understanding the Importance of FlexRay in Modern Vehicles
FlexRay plays a crucial role in modern vehicle systems that require high data rates and deterministic communication, such as:
- Advanced Driver-Assistance Systems (ADAS): FlexRay facilitates the rapid exchange of sensor data and control signals between ADAS components like radar, cameras, and electronic control units (ECUs), enabling features like adaptive cruise control, lane keeping assist, and automatic emergency braking.
- Autonomous Driving Systems: In self-driving cars, FlexRay ensures reliable communication between numerous sensors, processing units, and actuators, making real-time decision-making and vehicle control possible.
- Chassis Control Systems: FlexRay enables advanced chassis control functions like electronic stability control (ESC), adaptive suspension, and electric power steering (EPS) by providing a high-bandwidth, low-latency communication channel.
- Powertrain Control Systems: FlexRay is utilized in powertrain applications to coordinate engine management, transmission control, and hybrid system operation, optimizing fuel efficiency and performance.
2. What is DTS Monaco and Why Use it for FlexRay Diagnostics?
DTS Monaco is a powerful diagnostic and engineering software tool widely used in the automotive industry. It offers advanced capabilities for ECU diagnostics, flashing, coding, and data analysis, making it an invaluable asset for diagnosing communication failures on FlexRay.
DTS Monaco provides a user-friendly interface and comprehensive features for interacting with vehicle ECUs, enabling technicians and engineers to:
- Read and clear diagnostic trouble codes (DTCs): Quickly identify and address communication-related faults stored in ECU memory.
- Access ECU data parameters: Monitor real-time data signals on the FlexRay network to identify anomalies or inconsistencies.
- Perform ECU flashing and coding: Update ECU software and configure parameters to resolve communication issues or enable new features.
- Execute diagnostic routines and tests: Run pre-defined diagnostic procedures to isolate and verify communication faults.
- Analyze FlexRay bus communication: Capture and analyze FlexRay bus traffic to identify communication patterns, errors, and bottlenecks.
Why Choose DTS Monaco for FlexRay Communication Diagnostics?
DTS Monaco stands out as a preferred diagnostic tool for FlexRay communication failures due to its:
- Comprehensive FlexRay Support: DTS Monaco offers extensive support for FlexRay communication, including the ability to configure FlexRay interfaces, monitor bus traffic, and perform advanced diagnostic tests.
- User-Friendly Interface: The software provides an intuitive and easy-to-navigate interface, making it accessible to technicians and engineers with varying levels of expertise.
- Advanced Diagnostic Capabilities: DTS Monaco offers a wide range of advanced diagnostic functions, including ECU flashing, coding, and data analysis, enabling users to effectively troubleshoot complex FlexRay communication issues.
- Integration with Vehicle Databases: DTS Monaco can be integrated with vehicle databases, providing access to ECU information, diagnostic procedures, and repair manuals, streamlining the diagnostic process.
- Customization Options: The software can be customized to meet specific diagnostic needs, allowing users to create custom diagnostic routines, data displays, and reports.
- Cost-Effectiveness: Compared to other high-end diagnostic tools, DTS Monaco provides a cost-effective solution for FlexRay communication diagnostics, making it accessible to a wider range of automotive professionals.
3. How to Set Up DTS Monaco for FlexRay Diagnostics
Before you can begin diagnosing communication failures on FlexRay with DTS Monaco, you need to properly set up the software and establish a connection to the vehicle’s FlexRay network.
Step-by-Step Guide to Setting Up DTS Monaco:
- Install DTS Monaco Software: Install the DTS Monaco software on a compatible Windows computer, following the instructions provided by the software vendor.
- Install Diagnostic Interface Drivers: Install the necessary drivers for your diagnostic interface device (e.g., a USB-to-FlexRay adapter). These drivers allow DTS Monaco to communicate with the vehicle’s FlexRay network through the interface.
- Configure Diagnostic Interface: In DTS Monaco, configure the diagnostic interface settings to match your interface device. This includes selecting the correct interface type, communication port, and FlexRay parameters.
- Connect to Vehicle: Connect the diagnostic interface device to the vehicle’s diagnostic port (typically an OBD-II port) and power on the vehicle’s ignition.
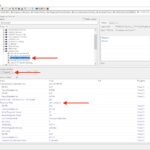
- Select Vehicle Project: In DTS Monaco, select the appropriate vehicle project for the vehicle you are diagnosing. This project contains the necessary ECU data, diagnostic procedures, and communication protocols for the specific vehicle model and year.
- Establish Communication: Initiate communication with the vehicle’s ECUs by selecting the “Connect” or “Establish Communication” option in DTS Monaco. The software will attempt to connect to the ECUs on the FlexRay network and display their status.
Troubleshooting Connection Issues:
If you encounter connection problems during setup, consider the following troubleshooting steps:
- Verify Interface Connection: Ensure that the diagnostic interface device is properly connected to both the computer and the vehicle’s diagnostic port.
- Check Driver Installation: Verify that the diagnostic interface drivers are correctly installed and up-to-date.
- Confirm Interface Configuration: Double-check the diagnostic interface settings in DTS Monaco to ensure they match your interface device.
- Verify Vehicle Compatibility: Confirm that the selected vehicle project in DTS Monaco is compatible with the vehicle you are diagnosing.
- Check Vehicle Power: Ensure that the vehicle’s ignition is turned on and that the battery has sufficient charge.
- Examine FlexRay Wiring: Inspect the FlexRay wiring and connectors for any signs of damage or corrosion.
4. How Do You Identify Non-Responding Modules on FlexRay Using DTS Monaco?
Identifying non-responding modules on the FlexRay network is a crucial first step in diagnosing communication failures. DTS Monaco provides several methods for detecting modules that are not communicating properly.
Methods for Identifying Non-Responding Modules:
- ECU Scan: Perform an ECU scan using DTS Monaco to identify all the ECUs on the FlexRay network and their communication status. Non-responding modules will typically be indicated as “Not Present,” “Not Responding,” or with a similar status message.
- Communication Test: Use the communication test function in DTS Monaco to send test messages to individual ECUs on the FlexRay network. If an ECU does not respond to the test message, it indicates a communication failure.
- Bus Monitoring: Monitor the FlexRay bus traffic using DTS Monaco’s bus monitoring feature. Observe the communication patterns and identify any ECUs that are not transmitting or receiving data.
- DTC Analysis: Check for diagnostic trouble codes (DTCs) related to communication failures. Non-responding modules may trigger DTCs indicating a loss of communication or a timeout error.
Interpreting the Results:
Once you have identified potential non-responding modules, it’s important to interpret the results carefully:
- Confirm Non-Responsiveness: Verify that the module is indeed non-responsive by performing multiple tests and checks. A temporary communication glitch could produce a false negative.
- Check Power Supply: Ensure that the non-responding module is receiving power. A faulty power supply or wiring issue could prevent the module from communicating.
- Examine Wiring and Connectors: Inspect the wiring and connectors associated with the non-responding module for any signs of damage, corrosion, or loose connections.
- Consider Module Compatibility: Verify that the non-responding module is compatible with the vehicle’s FlexRay network and that its software is up-to-date.
- Consult Vehicle Documentation: Refer to the vehicle’s service manual or wiring diagrams for information about the module’s location, wiring, and communication protocols.
5. Step-by-Step Guide: Diagnosing FlexRay Communication Failures with DTS Monaco
Once you have identified a non-responding module, you can use DTS Monaco to perform a more in-depth diagnosis of the FlexRay communication failure. Follow these steps to systematically troubleshoot the issue:
Step 1: Read Diagnostic Trouble Codes (DTCs)
Read the diagnostic trouble codes (DTCs) stored in the non-responding module and any other related ECUs. DTCs can provide valuable clues about the nature and location of the communication failure.
- Connect to the ECU: In DTS Monaco, select the non-responding module from the ECU list and establish communication.
- Read DTCs: Navigate to the DTC reading function in DTS Monaco and retrieve the stored DTCs.
- Record DTC Information: Record the DTC codes, descriptions, and any associated data parameters.
Step 2: Analyze DTCs and Freeze Frame Data
Analyze the DTCs and any associated freeze frame data to gain insights into the conditions that triggered the communication failure.
- Consult DTC Documentation: Refer to the vehicle’s service manual or online resources for detailed information about each DTC.
- Identify Potential Causes: Based on the DTC descriptions and freeze frame data, identify potential causes of the communication failure, such as wiring issues, faulty components, or software problems.
- Prioritize Troubleshooting: Prioritize your troubleshooting efforts based on the likelihood and severity of each potential cause.
Step 3: Check FlexRay Bus Communication
Monitor the FlexRay bus communication using DTS Monaco’s bus monitoring feature to observe the data traffic and identify any anomalies or errors.
- Start Bus Monitoring: In DTS Monaco, activate the FlexRay bus monitoring function.
- Observe Communication Patterns: Observe the communication patterns on the FlexRay bus, paying attention to the messages being transmitted and received by the non-responding module and other related ECUs.
- Identify Communication Errors: Look for any communication errors, such as corrupted messages, missing messages, or excessive bus traffic.
- Filter Communication: Use DTS Monaco’s filtering options to isolate the communication related to the non-responding module and focus your analysis.
Step 4: Perform Component Testing
Perform component testing on the non-responding module and related components to verify their functionality.
- Consult Service Manual: Refer to the vehicle’s service manual for specific component testing procedures and specifications.
- Use Diagnostic Tools: Use appropriate diagnostic tools, such as a multimeter, oscilloscope, or signal generator, to test the components.
- Check Wiring and Connections: Inspect the wiring and connections associated with the components for any signs of damage, corrosion, or loose connections.
- Compare Results: Compare your test results with the specifications in the service manual to determine if the components are functioning properly.
Step 5: Inspect Wiring and Connections
Thoroughly inspect the wiring and connections associated with the non-responding module and the FlexRay network for any signs of damage, corrosion, or loose connections.
- Visually Inspect Wiring: Visually inspect the wiring harness for any signs of damage, such as cuts, abrasions, or melted insulation.
- Check Connectors: Check the connectors for any signs of corrosion, bent pins, or loose connections.
- Test Wiring Continuity: Use a multimeter to test the continuity of the wiring between the non-responding module and other related ECUs.
- Repair or Replace Wiring: Repair or replace any damaged wiring or connectors.
Step 6: Update ECU Software
If the non-responding module has outdated software, consider updating it to the latest version. Software updates can often resolve communication issues and improve module performance.
- Check Software Version: In DTS Monaco, check the current software version of the non-responding module.
- Check for Updates: Check for available software updates from the vehicle manufacturer or a reputable software provider.
- Follow Update Instructions: Follow the update instructions provided by the software provider carefully.
- Verify Compatibility: Ensure that the software update is compatible with the vehicle and the non-responding module.
Step 7: Replace Faulty Components
If you have identified a faulty component, replace it with a new or remanufactured part.
- Obtain Replacement Part: Obtain a replacement part that is specifically designed for the vehicle and the non-responding module.
- Follow Replacement Instructions: Follow the replacement instructions provided by the vehicle manufacturer or a qualified technician.
- Verify Functionality: After replacing the component, verify that it is functioning properly and that the communication failure has been resolved.
6. What are Common Causes of FlexRay Communication Failures?
Understanding the common causes of FlexRay communication failures can help you diagnose and resolve issues more efficiently. Here’s a look at some frequent culprits:
- Wiring Issues: Damaged, corroded, or loose wiring and connectors are a common cause of FlexRay communication failures.
- ECU Malfunctions: Internal failures within ECUs can disrupt FlexRay communication.
- Software Problems: Outdated or corrupted ECU software can lead to communication errors.
- Bus Loading Issues: Excessive traffic on the FlexRay bus can cause communication bottlenecks and failures.
- Timing Problems: Synchronization issues between ECUs on the FlexRay network can disrupt communication.
- Electromagnetic Interference (EMI): External electromagnetic interference can disrupt FlexRay communication signals.
Preventive Measures to Minimize Communication Failures
Taking preventive measures can help minimize the risk of FlexRay communication failures and ensure the long-term reliability of your vehicle’s electronic systems. These measures include:
- Regular Maintenance: Perform regular maintenance on your vehicle’s electrical system, including inspecting and cleaning wiring and connectors.
- Software Updates: Keep your vehicle’s ECU software up-to-date to ensure optimal performance and communication compatibility.
- Proper Installation: Ensure that any aftermarket electronic devices are properly installed and do not interfere with the FlexRay network.
- Shielding: Use shielded cables and connectors to minimize the impact of electromagnetic interference on FlexRay communication signals.
- Professional Diagnostics: If you suspect a FlexRay communication issue, seek professional diagnostics from a qualified technician with expertise in FlexRay systems.
7. Advanced DTS Monaco Features for FlexRay Diagnostics
DTS Monaco offers a range of advanced features that can significantly enhance your ability to diagnose FlexRay communication failures:
- Bus Simulation: Simulate FlexRay bus traffic to test ECU functionality and communication behavior in a controlled environment.
- Signal Analysis: Analyze FlexRay communication signals in detail, including voltage levels, timing characteristics, and message content.
- Data Logging: Record FlexRay bus traffic for later analysis and troubleshooting.
- Scripting: Create custom diagnostic scripts to automate repetitive tasks and perform advanced diagnostic procedures.
- Remote Diagnostics: Perform remote diagnostics on vehicles equipped with FlexRay networks, enabling you to troubleshoot issues from a remote location.
Tips for Effective Use of Advanced Features
To make the most of DTS Monaco’s advanced features, consider these tips:
- Training: Invest in training to learn how to effectively use the advanced features of DTS Monaco.
- Documentation: Consult the DTS Monaco documentation for detailed information about each feature and its capabilities.
- Experimentation: Experiment with the advanced features to gain a better understanding of their functionality and how they can be applied to diagnose FlexRay communication failures.
- Collaboration: Collaborate with other technicians and engineers to share knowledge and best practices for using DTS Monaco’s advanced features.
- Real-World Application: Apply the advanced features to diagnose real-world FlexRay communication failures to gain practical experience and refine your diagnostic skills.
8. FlexRay Communication Protocols and Standards
A solid understanding of FlexRay communication protocols and standards is essential for effective diagnostics and troubleshooting. Key concepts include:
- Time-Triggered Protocol: FlexRay uses a time-triggered protocol, where communication events are scheduled in advance, ensuring deterministic behavior.
- Static and Dynamic Segments: FlexRay frames are divided into static and dynamic segments, allowing for both time-critical and event-driven communication.
- Communication Cycles: FlexRay communication is organized into cycles, with each cycle consisting of a static segment and a dynamic segment.
- Error Detection and Correction: FlexRay incorporates robust error detection and correction mechanisms to ensure reliable communication.
- Fault Tolerance: FlexRay is designed to be fault-tolerant, with redundant communication channels and error handling capabilities.
Key FlexRay Standards
Familiarize yourself with the key FlexRay standards, including:
- FlexRay Communications System Protocol Specification: Defines the FlexRay communication protocol and architecture.
- FlexRay Configuration Specification: Specifies the configuration parameters for FlexRay networks.
- FlexRay Physical Layer Specification: Defines the physical layer requirements for FlexRay communication.
- ISO 17987 (LIN): While not directly FlexRay, understanding Local Interconnect Network (LIN) is helpful as it often complements FlexRay in automotive networks.
- SAE J1939: Understanding SAE J1939, the standard for communication in heavy-duty vehicles, can provide a broader context for automotive networking.
9. Case Studies: Real-World FlexRay Diagnostic Scenarios with DTS Monaco
Examining real-world case studies can provide valuable insights into how DTS Monaco can be used to diagnose and resolve FlexRay communication failures.
Case Study 1: Non-Responding ABS Module
A technician was tasked with diagnosing a non-responding ABS (Anti-lock Braking System) module on a vehicle equipped with FlexRay. Using DTS Monaco, the technician performed an ECU scan and confirmed that the ABS module was not communicating. Further investigation revealed a damaged FlexRay wiring harness near the ABS module. After repairing the wiring harness, the ABS module regained communication, and the braking system functioned properly.
Case Study 2: Intermittent Communication Errors
A vehicle was experiencing intermittent communication errors on the FlexRay network, leading to unpredictable system behavior. Using DTS Monaco’s bus monitoring feature, a technician identified excessive bus traffic and timing issues. By optimizing the FlexRay network configuration and updating ECU software, the technician resolved the communication errors and stabilized the system.
Case Study 3: Faulty Airbag Control Unit (ACU)
A vehicle’s airbag warning light was illuminated, and diagnostic trouble codes indicated a communication failure with the airbag control unit (ACU). Using DTS Monaco, a technician performed component testing on the ACU and discovered an internal fault. Replacing the faulty ACU resolved the communication issue, and the airbag system functioned as intended.
Lessons Learned from Case Studies
These case studies highlight the importance of:
- Systematic Diagnosis: Following a systematic diagnostic approach to identify the root cause of FlexRay communication failures.
- Using DTS Monaco Effectively: Leveraging DTS Monaco’s features to gather data, analyze communication patterns, and perform component testing.
- Thorough Inspection: Conducting a thorough inspection of wiring, connectors, and components to identify physical damage or defects.
- Software Updates: Keeping ECU software up-to-date to ensure optimal communication compatibility and performance.
10. What are the Best Practices for Maintaining FlexRay Systems?
Following best practices for maintaining FlexRay systems is essential for preventing communication failures and ensuring long-term reliability.
- Regular Inspections: Perform regular inspections of wiring, connectors, and components to identify any signs of damage or wear.
- Proper Handling: Handle FlexRay wiring and connectors with care to avoid damage.
- Cleanliness: Keep FlexRay wiring and connectors clean and free from corrosion.
- Secure Connections: Ensure that all FlexRay connections are secure and properly tightened.
- Software Updates: Keep ECU software up-to-date to ensure optimal communication compatibility and performance.
- Professional Service: Seek professional service from a qualified technician for any FlexRay-related issues.
Additional Tips for Maintaining FlexRay Systems:
- Follow Manufacturer Recommendations: Follow the vehicle manufacturer’s recommendations for maintenance and service of FlexRay systems.
- Use Quality Parts: Use only high-quality replacement parts that are specifically designed for FlexRay systems.
- Avoid Overloading the Bus: Avoid overloading the FlexRay bus with unnecessary communication traffic.
- Shield Wiring: Use shielded wiring to minimize the impact of electromagnetic interference on FlexRay communication signals.
- Proper Grounding: Ensure that all FlexRay components are properly grounded to prevent electrical noise and interference.
By following these best practices, you can help ensure the long-term reliability and performance of your vehicle’s FlexRay systems.
FAQ: Diagnosing FlexRay Communication Failures with DTS Monaco
Here are some frequently asked questions about diagnosing FlexRay communication failures with DTS Monaco:
1. What is the most common cause of FlexRay communication failure?
The most common cause is wiring issues, including damage, corrosion, or loose connections.
2. Can DTS Monaco be used to diagnose all types of FlexRay communication failures?
Yes, DTS Monaco offers a comprehensive set of tools and features for diagnosing a wide range of FlexRay communication failures.
3. How often should FlexRay systems be inspected?
FlexRay systems should be inspected regularly as part of routine vehicle maintenance.
4. What are the signs of a FlexRay communication failure?
Signs can include warning lights, system malfunctions, and diagnostic trouble codes (DTCs).
5. Is it possible to repair damaged FlexRay wiring?
Minor damage to FlexRay wiring can sometimes be repaired, but severely damaged wiring should be replaced.
6. Can software updates resolve FlexRay communication failures?
Yes, software updates can often resolve communication issues and improve module performance.
7. What is the role of diagnostic trouble codes (DTCs) in diagnosing FlexRay communication failures?
DTCs provide valuable clues about the nature and location of the communication failure.
8. Do I need special training to use DTS Monaco for FlexRay diagnostics?
Yes, specialized training is recommended to effectively use DTS Monaco for FlexRay diagnostics.
9. What is the best way to prevent FlexRay communication failures?
Regular inspections, proper handling, and software updates are key preventive measures.
10. Where can I find more information about DTS Monaco and FlexRay diagnostics?
You can find more information on DTS-MONACO.EDU.VN and other automotive diagnostic resources.
Ready to Master FlexRay Diagnostics with DTS Monaco?
Don’t let FlexRay communication failures slow you down. With DTS Monaco and the knowledge you’ve gained from this guide, you’re well-equipped to diagnose and resolve even the most challenging FlexRay issues.
To take your skills to the next level, visit DTS-MONACO.EDU.VN today. Explore our comprehensive training courses, software solutions, and expert support services.
- Address: 275 N Harrison St, Chandler, AZ 85225, United States
- WhatsApp: +1 (641) 206-8880
- Website: DTS-MONACO.EDU.VN
Contact us today and unlock the full potential of DTS Monaco for FlexRay diagnostics. Elevate your automotive repair expertise and become a leader in the field!