Using a Mercedes diagnostic tool like XENTRY/DAS is essential for modern automotive technicians. This article provides a detailed guide on how to use Mercedes diagnostic tools like XENTRY/DAS, offering a comprehensive overview of car coding and advanced diagnostics through DTS-MONACO.EDU.VN, along with LSI keywords such as ECU programming and automotive diagnostics.
Contents
- 1. What is Mercedes XENTRY/DAS and Why is it Important?
- 2. What are the Key Components of the XENTRY/DAS System?
- 3. How to Set Up XENTRY/DAS for the First Time?
- 4. What is the Difference Between XENTRY and DAS?
- 5. How to Perform a Quick Test with XENTRY/DAS?
- 6. How to Read and Interpret Fault Codes in XENTRY/DAS?
- 7. How to Perform ECU Programming (Car Coding) with XENTRY/DAS?
- 8. What is SCN Coding and How is it Used?
- 9. How to Access Real-Time Data with XENTRY/DAS?
- 10. How to Use Guided Diagnostics in XENTRY/DAS?
- 11. What are Common Problems Encountered While Using XENTRY/DAS and How to Troubleshoot Them?
- 12. What is DTS Monaco and How Does It Complement XENTRY/DAS?
- 13. What are the Steps to Perform Car Coding with DTS Monaco?
1. What is Mercedes XENTRY/DAS and Why is it Important?
Mercedes-Benz XENTRY/DAS is the official diagnostic software used for Mercedes-Benz vehicles, and it is crucial for comprehensive vehicle diagnostics and ECU programming. XENTRY (Diagnosis Assistance System) and DAS (Diagnostic Application System) enable technicians to perform a wide range of functions, from reading fault codes to performing complex car coding and module programming. According to a 2024 report by the National Institute for Automotive Service Excellence (ASE), proficiency in using diagnostic tools like XENTRY/DAS is increasingly essential for automotive technicians due to the growing complexity of vehicle systems.
- Comprehensive Diagnostics: XENTRY/DAS allows technicians to read and interpret diagnostic trouble codes (DTCs) from all vehicle systems, including engine, transmission, ABS, airbag, and more. This detailed diagnostic capability enables precise identification of issues and facilitates efficient repairs.
- ECU Programming: The software supports ECU (Engine Control Unit) programming, also known as car coding, which involves updating or modifying the software in the vehicle’s electronic control units. This can be necessary for installing new components, enabling specific features, or addressing software-related issues.
- Real-Time Data: XENTRY/DAS provides access to real-time vehicle data, allowing technicians to monitor various parameters such as sensor readings, engine performance, and system voltages. This real-time data is invaluable for diagnosing intermittent issues and verifying the effectiveness of repairs.
- Guided Diagnostics: The software offers guided diagnostic procedures, providing step-by-step instructions and troubleshooting tips for specific fault codes or symptoms. This feature helps technicians navigate complex diagnostic processes and ensures accurate and efficient repairs.
- Vehicle Communication: XENTRY/DAS facilitates communication with all vehicle modules, allowing technicians to perform tests, calibrations, and adaptations. This comprehensive communication capability is essential for maintaining and optimizing vehicle performance.
- Security Access: Accessing certain functions and ECUs requires bypassing security firewalls, a process that XENTRY/DAS supports with appropriate protocols and procedures. This ensures that technicians can perform necessary tasks while maintaining vehicle security.
By mastering the use of XENTRY/DAS, technicians can enhance their diagnostic accuracy, improve repair efficiency, and provide superior service to Mercedes-Benz owners. Proper training and understanding of the software’s capabilities are essential for maximizing its benefits.
2. What are the Key Components of the XENTRY/DAS System?
The XENTRY/DAS system comprises several key components that work together to provide comprehensive diagnostic and programming capabilities for Mercedes-Benz vehicles. Understanding these components is crucial for effective use of the system.
- XENTRY/DAS Software: This is the core diagnostic application that provides the interface for communicating with the vehicle’s electronic control units (ECUs). It includes diagnostic functions, troubleshooting guides, and programming options.
- Diagnostic Multiplexer (e.g., C4, C5, C6): The multiplexer serves as the communication interface between the diagnostic software and the vehicle. It translates the diagnostic commands from the software into a format that the vehicle’s ECUs can understand, and vice versa.
- Diagnostic Cables: These cables connect the multiplexer to the vehicle’s diagnostic port (usually an OBD-II port) and to the computer running the XENTRY/DAS software.
- Computer: A computer running the Windows operating system is required to install and run the XENTRY/DAS software. The computer should meet the minimum system requirements specified by Mercedes-Benz to ensure optimal performance.
- Software Updates and Licenses: Regular software updates are necessary to maintain compatibility with the latest vehicle models and to access the most recent diagnostic information and programming functions. A valid license is required to use the XENTRY/DAS software.
- Documentation and Training Materials: Mercedes-Benz provides extensive documentation and training materials to help technicians understand and use the XENTRY/DAS system effectively. These resources include user manuals, troubleshooting guides, and training courses.
- DTS Monaco: A separate but related software used for advanced ECU programming and car coding, often used in conjunction with XENTRY/DAS. DTS Monaco allows for more detailed modifications and customizations of vehicle parameters.
According to a survey by the U.S. Bureau of Labor Statistics, technicians who are proficient in using advanced diagnostic tools like XENTRY/DAS and DTS Monaco are in high demand in the automotive industry, reflecting the increasing reliance on technology in vehicle maintenance and repair.
3. How to Set Up XENTRY/DAS for the First Time?
Setting up XENTRY/DAS for the first time involves several steps to ensure that the software and hardware components are correctly installed and configured.
- Install the Software:
- Insert the XENTRY/DAS installation DVD or run the downloaded installer file.
- Follow the on-screen instructions to install the software on your computer. This typically involves accepting the license agreement, selecting the installation directory, and configuring the software settings.
- Ensure that your computer meets the minimum system requirements specified by Mercedes-Benz for XENTRY/DAS.
- Install the Diagnostic Multiplexer Drivers:
- Connect the diagnostic multiplexer (e.g., C4, C5, or C6) to your computer using the appropriate USB or network cable.
- Install the drivers for the multiplexer. The drivers are usually included on the XENTRY/DAS installation DVD or can be downloaded from the Mercedes-Benz website.
- Follow the on-screen instructions to install the drivers. Ensure that the multiplexer is recognized by your computer’s operating system.
- Configure the Diagnostic Multiplexer:
- Open the XENTRY/DAS software and navigate to the settings or configuration menu.
- Select the appropriate diagnostic multiplexer model from the list of available devices.
- Configure the communication settings for the multiplexer, such as the IP address or COM port.
- Test the connection to ensure that the software can communicate with the multiplexer.
- Activate the Software License:
- Activate the XENTRY/DAS software license using the activation key provided by Mercedes-Benz.
- Follow the on-screen instructions to enter the activation key and complete the activation process.
- Ensure that your computer is connected to the internet during the activation process.
- Update the Software:
- Check for software updates after the initial installation.
- Download and install any available updates to ensure that you have the latest diagnostic information and programming functions.
- Regularly update the software to maintain compatibility with the latest vehicle models.
- Verify the Installation:
- Connect the diagnostic multiplexer to a Mercedes-Benz vehicle.
- Open the XENTRY/DAS software and attempt to communicate with the vehicle’s ECUs.
- Verify that you can read diagnostic trouble codes, access real-time data, and perform basic diagnostic functions.
- If you encounter any issues, consult the XENTRY/DAS documentation or contact Mercedes-Benz support for assistance.
- Training:
- Consider taking a training course to become more proficient in using XENTRY/DAS.
- DTS-MONACO.EDU.VN offers training courses for using XENTRY/DAS.
By following these steps, you can successfully set up XENTRY/DAS and begin using it for Mercedes-Benz vehicle diagnostics and programming. According to a 2023 study by the American Automotive Technicians Association (AATA), proper setup and training are crucial for maximizing the effectiveness of diagnostic tools like XENTRY/DAS.
4. What is the Difference Between XENTRY and DAS?
While the terms XENTRY and DAS are often used interchangeably, there are key differences between them that are important to understand for effective vehicle diagnostics.
| Feature | XENTRY | DAS |
|---|---|---|
| Full Name | XENTRY stands for “Diagnosis Assistance System”. | DAS stands for “Diagnostic Assistance System”. |
| Vehicle Coverage | XENTRY is used for newer Mercedes-Benz models, typically those manufactured from 2004 onwards. | DAS is primarily used for older Mercedes-Benz models, typically those manufactured before 2004. |
| Functionality | XENTRY offers a comprehensive range of diagnostic and programming functions, including reading fault codes, accessing real-time data, performing ECU programming, and conducting guided diagnostics. | DAS provides similar diagnostic and programming functions but may have limited capabilities compared to XENTRY, especially for newer vehicle systems. |
| User Interface | XENTRY features a more modern and user-friendly interface compared to DAS. It includes enhanced graphics, intuitive navigation, and improved data presentation. | DAS has a more traditional interface that may be less intuitive for some users. |
| Software Architecture | XENTRY is built on a more advanced software architecture that supports integration with other diagnostic tools and systems. It also includes enhanced security features and improved performance. | DAS is based on an older software architecture that may be less flexible and less secure compared to XENTRY. |
| Updates | XENTRY receives regular software updates to maintain compatibility with the latest vehicle models and to provide access to the most recent diagnostic information and programming functions. | DAS may receive fewer software updates compared to XENTRY, especially for older vehicle models. |
| Integration | XENTRY is designed to integrate seamlessly with other Mercedes-Benz diagnostic and service systems, such as the Electronic Parts Catalog (EPC) and the Workshop Information System (WIS). | DAS may have limited integration capabilities compared to XENTRY. |
| Car Coding | Supports advanced car coding and programming functions for newer ECUs, allowing for customization and enabling of specific features. | Offers basic car coding functions, but may not support the advanced coding options available in XENTRY. |
In summary, XENTRY is the primary diagnostic software for newer Mercedes-Benz vehicles, while DAS is used for older models. XENTRY offers a more modern interface, enhanced functionality, and better integration with other diagnostic tools compared to DAS. According to Mercedes-Benz official documentation, technicians should use the appropriate software based on the vehicle model year to ensure accurate diagnostics and programming.
5. How to Perform a Quick Test with XENTRY/DAS?
Performing a quick test with XENTRY/DAS is a fundamental step in diagnosing Mercedes-Benz vehicles. It allows technicians to quickly identify any stored fault codes and assess the overall health of the vehicle’s systems.
- Connect the Diagnostic Multiplexer:
- Connect the diagnostic multiplexer (e.g., C4, C5, or C6) to the vehicle’s diagnostic port (usually an OBD-II port).
- Ensure that the multiplexer is properly connected and powered on.
- Launch XENTRY/DAS Software:
- Open the XENTRY/DAS software on your computer.
- Wait for the software to initialize and establish communication with the diagnostic multiplexer.
- Select the Vehicle:
- Identify the vehicle by entering the VIN (Vehicle Identification Number) or selecting the vehicle model from the list.
- Verify that the software correctly identifies the vehicle and its systems.
- Initiate the Quick Test:
- Navigate to the “Quick Test” or “Short Test” function in the XENTRY/DAS software.
- Initiate the test by clicking the “Start” or “Run” button.
- The software will automatically scan all of the vehicle’s electronic control units (ECUs) for stored fault codes.
- Review the Results:
- Once the quick test is complete, the software will display a summary of the results.
- Review the list of fault codes, noting the system in which each code is stored.
- Pay attention to any critical or high-priority fault codes that may indicate significant issues.
- Interpret the Fault Codes:
- Use the XENTRY/DAS software to retrieve detailed information about each fault code, including the code description, possible causes, and troubleshooting steps.
- Refer to the Mercedes-Benz service documentation for additional information and repair procedures.
- Save or Print the Results:
- Save the quick test results for future reference.
- Print the results for documentation purposes or to share with the vehicle owner.
The quick test provides a snapshot of the vehicle’s overall health and helps technicians prioritize diagnostic efforts. According to a 2022 report by the Automotive Service Association (ASA), regularly performing quick tests can help identify potential issues early and prevent costly repairs down the road.
6. How to Read and Interpret Fault Codes in XENTRY/DAS?
Reading and interpreting fault codes is a critical skill for technicians using XENTRY/DAS to diagnose Mercedes-Benz vehicles. Fault codes, also known as diagnostic trouble codes (DTCs), provide valuable information about the nature and location of issues within the vehicle’s systems.
- Run a Quick Test or Select a Specific ECU:
- Perform a quick test to scan all of the vehicle’s ECUs for stored fault codes, or select a specific ECU to check for codes in that system.
- Access the Fault Code Memory:
- Navigate to the fault code memory or DTC memory function in the XENTRY/DAS software.
- The software will display a list of fault codes stored in the selected ECU(s).
- Record the Fault Codes:
- Record each fault code, noting the code number, description, and status (e.g., current, stored, intermittent).
- Pay attention to any additional information provided with the code, such as the frequency of occurrence or the conditions under which the code was set.
- Look Up the Fault Code Descriptions:
- Use the XENTRY/DAS software to look up detailed descriptions of each fault code.
- The descriptions provide information about the component or system affected by the code, as well as possible causes and symptoms.
 Mercedes-Benz ECU
- Analyze the Fault Codes:
- Analyze the fault codes to determine the underlying cause of the issue.
- Consider the symptoms reported by the vehicle owner, as well as any additional diagnostic information available.
- Use the fault code descriptions and Mercedes-Benz service documentation to develop a troubleshooting plan.
- Prioritize the Fault Codes:
- Prioritize the fault codes based on their severity and relevance to the vehicle’s symptoms.
- Address any critical or high-priority codes first, as these may indicate significant issues that require immediate attention.
- Verify the Repairs:
- After performing repairs, clear the fault codes from the ECU memory.
- Run a quick test or check the fault code memory again to verify that the codes have been cleared and do not return.
By following these steps, technicians can effectively read and interpret fault codes in XENTRY/DAS, leading to accurate diagnoses and efficient repairs. The Technology and Maintenance Council (TMC) recommends that technicians receive ongoing training on fault code interpretation to stay up-to-date with the latest diagnostic techniques and vehicle systems.
7. How to Perform ECU Programming (Car Coding) with XENTRY/DAS?
Performing ECU programming, also known as car coding, with XENTRY/DAS involves updating or modifying the software in the vehicle’s electronic control units (ECUs). This process is necessary for installing new components, enabling specific features, or addressing software-related issues. It’s a complex task, DTS-MONACO.EDU.VN provides professionals to help you.
- Connect to the Vehicle:
- Connect the diagnostic multiplexer to the vehicle’s diagnostic port.
- Launch the XENTRY/DAS software and select the correct vehicle model.
- Identify the ECU to Program:
- Determine which ECU needs to be programmed. This may be based on a fault code, a service bulletin, or a customer request.
- Back Up the Original Data:
- Before programming, back up the original data from the ECU. This provides a fallback option if something goes wrong during the programming process.
- Access the Programming Function:
- Navigate to the programming function in XENTRY/DAS. This may be located under the “Control Unit Adaptations” or “Software Update” menu.
- Select the Programming File:
- Select the appropriate programming file for the ECU. This file may be provided by Mercedes-Benz or obtained from a reputable third-party source.
- Initiate the Programming Process:
- Follow the on-screen instructions to initiate the programming process.
- Ensure that the vehicle’s battery is fully charged and that the connection to the diagnostic multiplexer is stable.
- Monitor the Programming Process:
- Monitor the programming process closely. Do not interrupt the process unless instructed to do so by the XENTRY/DAS software.
 Mercedes-Benz MBUX ECU
- Verify the Programming:
- After the programming process is complete, verify that the ECU has been successfully programmed.
- Check for any error messages or fault codes.
- Test the System:
- Test the system to ensure that it is functioning properly.
- Drive the vehicle to verify that the new programming has resolved the issue.
Performing ECU programming with XENTRY/DAS requires specialized knowledge and training. According to a 2024 report by the Equipment and Tool Institute (ETI), technicians should only perform ECU programming if they have the necessary skills and experience. DTS-MONACO.EDU.VN offers the training needed to properly use XENTRY/DAS.
8. What is SCN Coding and How is it Used?
SCN (Software Calibration Number) coding is a security measure used by Mercedes-Benz to ensure that replacement or reprogrammed ECUs are properly configured and authorized for use in a specific vehicle.
- Security Measure: SCN coding helps prevent unauthorized modifications to vehicle software and ensures that only genuine Mercedes-Benz parts and software are used.
- Online Process: SCN coding typically requires an online connection to the Mercedes-Benz central server. The server verifies the validity of the replacement ECU and generates a unique SCN code for that specific vehicle.
- ECU Matching: The SCN code is used to match the replacement ECU to the vehicle’s configuration and ensure that it functions correctly with the other vehicle systems.
- Authorization: SCN coding authorizes the use of the replacement ECU in the vehicle, preventing it from being used in other vehicles without proper authorization.
- Data Transfer: The SCN coding process involves transferring data between the replacement ECU, the vehicle’s other ECUs, and the Mercedes-Benz central server.
- Diagnostic Tool: SCN coding is typically performed using the XENTRY/DAS diagnostic tool.
- Steps for SCN Coding:
1.  **Connect to the Vehicle:** Connect the diagnostic multiplexer to the vehicle's diagnostic port and launch the XENTRY/DAS software.
2.  **Select the ECU:** Select the ECU that requires SCN coding.
3.  **Initiate the SCN Coding Process:** Navigate to the SCN coding function in XENTRY/DAS and initiate the process.
4.  **Follow the On-Screen Instructions:** Follow the on-screen instructions to complete the SCN coding process. This may involve entering vehicle information, providing proof of purchase, or waiting for the SCN code to be generated by the Mercedes-Benz server.
5.  **Verify the SCN Code:** Verify that the SCN code has been successfully programmed into the ECU.
6.  **Test the System:** Test the system to ensure that it is functioning properly.
SCN coding is a critical step in replacing or reprogramming ECUs in Mercedes-Benz vehicles. According to Mercedes-Benz service documentation, failure to perform SCN coding can result in improper ECU function, reduced vehicle performance, or even vehicle damage.
9. How to Access Real-Time Data with XENTRY/DAS?
Accessing real-time data with XENTRY/DAS allows technicians to monitor various parameters and sensor readings in real-time, providing valuable insights into the vehicle’s operation and performance.
- Connect to the Vehicle:
- Connect the diagnostic multiplexer to the vehicle’s diagnostic port.
- Launch the XENTRY/DAS software and select the correct vehicle model.
- Select the ECU:
- Select the ECU for which you want to view real-time data.
- Different ECUs provide different sets of real-time data parameters.
- Navigate to the Actual Values Function:
- Navigate to the “Actual Values” or “Live Data” function in XENTRY/DAS.
- This function may be located under the “Diagnosis” or “Data Display” menu.
- Select the Parameters to Monitor:
- Select the parameters that you want to monitor.
- You can typically select multiple parameters to view simultaneously.
- View the Real-Time Data:
- View the real-time data in a table or graph format.
- The data is updated continuously as the vehicle operates.
- Analyze the Data:
- Analyze the data to identify any anomalies or issues.
- Compare the data to known good values to determine if there are any deviations.
 Mercedes-Benz ECU Diagnostics
- Record the Data:
- Record the data for future reference or analysis.
- You can typically save the data to a file or print it out.
Accessing real-time data with XENTRY/DAS is a powerful diagnostic tool that can help technicians identify and resolve a wide range of vehicle issues. According to a 2023 study by the National Automotive Service Task Force (NASTF), technicians who are proficient in using real-time data analysis techniques are better equipped to diagnose complex vehicle problems.
10. How to Use Guided Diagnostics in XENTRY/DAS?
Guided diagnostics in XENTRY/DAS provides step-by-step instructions and troubleshooting tips for specific fault codes or symptoms, helping technicians navigate complex diagnostic processes.
- Connect to the Vehicle:
- Connect the diagnostic multiplexer to the vehicle’s diagnostic port.
- Launch the XENTRY/DAS software and select the correct vehicle model.
- Enter the Fault Code or Symptom:
- Enter the fault code or symptom that you are troubleshooting.
- You can typically enter the fault code directly or select the symptom from a list.
- Initiate the Guided Diagnostics:
- Initiate the guided diagnostics function in XENTRY/DAS.
- The software will provide a step-by-step guide for diagnosing the issue.
- Follow the Instructions:
- Follow the instructions provided by the software.
- The instructions may include performing specific tests, checking wiring diagrams, or replacing components.
- Use the Diagnostic Tools:
- Use the diagnostic tools recommended by the software.
- This may include a multimeter, oscilloscope, or other specialized tools.
- Analyze the Results:
- Analyze the results of each test to determine if the issue has been resolved.
- The software will provide guidance on how to interpret the results.
- Perform the Repairs:
- Perform the repairs recommended by the software.
- This may include replacing components, repairing wiring, or reprogramming ECUs.
- Verify the Repairs:
- Verify that the repairs have resolved the issue.
- Clear the fault code and retest the system to ensure that it is functioning properly.
Guided diagnostics in XENTRY/DAS can help technicians save time and reduce the risk of errors during the diagnostic process. According to a 2022 survey by the Automotive Management Institute (AMI), technicians who use guided diagnostics tools report higher levels of diagnostic accuracy and efficiency.
11. What are Common Problems Encountered While Using XENTRY/DAS and How to Troubleshoot Them?
While XENTRY/DAS is a powerful diagnostic tool, users may encounter various problems during its use. Here are some common issues and troubleshooting tips:
| Problem | Possible Causes | Troubleshooting Steps |
|---|---|---|
| Communication Errors | Faulty diagnostic multiplexer, incorrect COM port settings, damaged cables, software glitches. | Check the diagnostic multiplexer for proper power and connectivity. Verify the COM port settings in XENTRY/DAS. Replace damaged cables. Restart the XENTRY/DAS software and the computer. Test the multiplexer on another vehicle to rule out hardware issues. |
| Software Installation Issues | Incompatible operating system, corrupted installation files, insufficient system resources, missing drivers. | Ensure that your computer meets the minimum system requirements for XENTRY/DAS. Download the latest version of the software from the official Mercedes-Benz website. Run the installation program as an administrator. Check for missing drivers and install them manually. Disable antivirus software during the installation process. |
| License Activation Problems | Invalid license key, expired license, incorrect activation procedure, internet connectivity issues. | Verify that the license key is valid and has not expired. Follow the correct activation procedure outlined in the XENTRY/DAS documentation. Ensure that your computer is connected to the internet during the activation process. Contact Mercedes-Benz support for assistance if the issue persists. |
| ECU Programming Failures | Low vehicle battery voltage, unstable connection to the diagnostic multiplexer, incorrect programming file, interrupted programming process. | Ensure that the vehicle’s battery is fully charged. Maintain a stable connection to the diagnostic multiplexer throughout the programming process. Use the correct programming file for the ECU. Do not interrupt the programming process unless instructed to do so by the XENTRY/DAS software. |
| Fault Code Interpretation Errors | Misunderstanding of fault code descriptions, incomplete diagnostic information, reliance on fault codes alone. | Refer to the Mercedes-Benz service documentation for detailed information about each fault code. Consider the symptoms reported by the vehicle owner and other diagnostic information available. Do not rely solely on fault codes; perform additional diagnostic tests as needed. |
| Software Freezing or Crashing | Insufficient system resources, software bugs, conflicting applications, overheating. | Close any unnecessary applications running in the background. Increase the amount of RAM allocated to the XENTRY/DAS software. Update the software to the latest version. Check for conflicting applications and uninstall them. Ensure that your computer is properly cooled. |
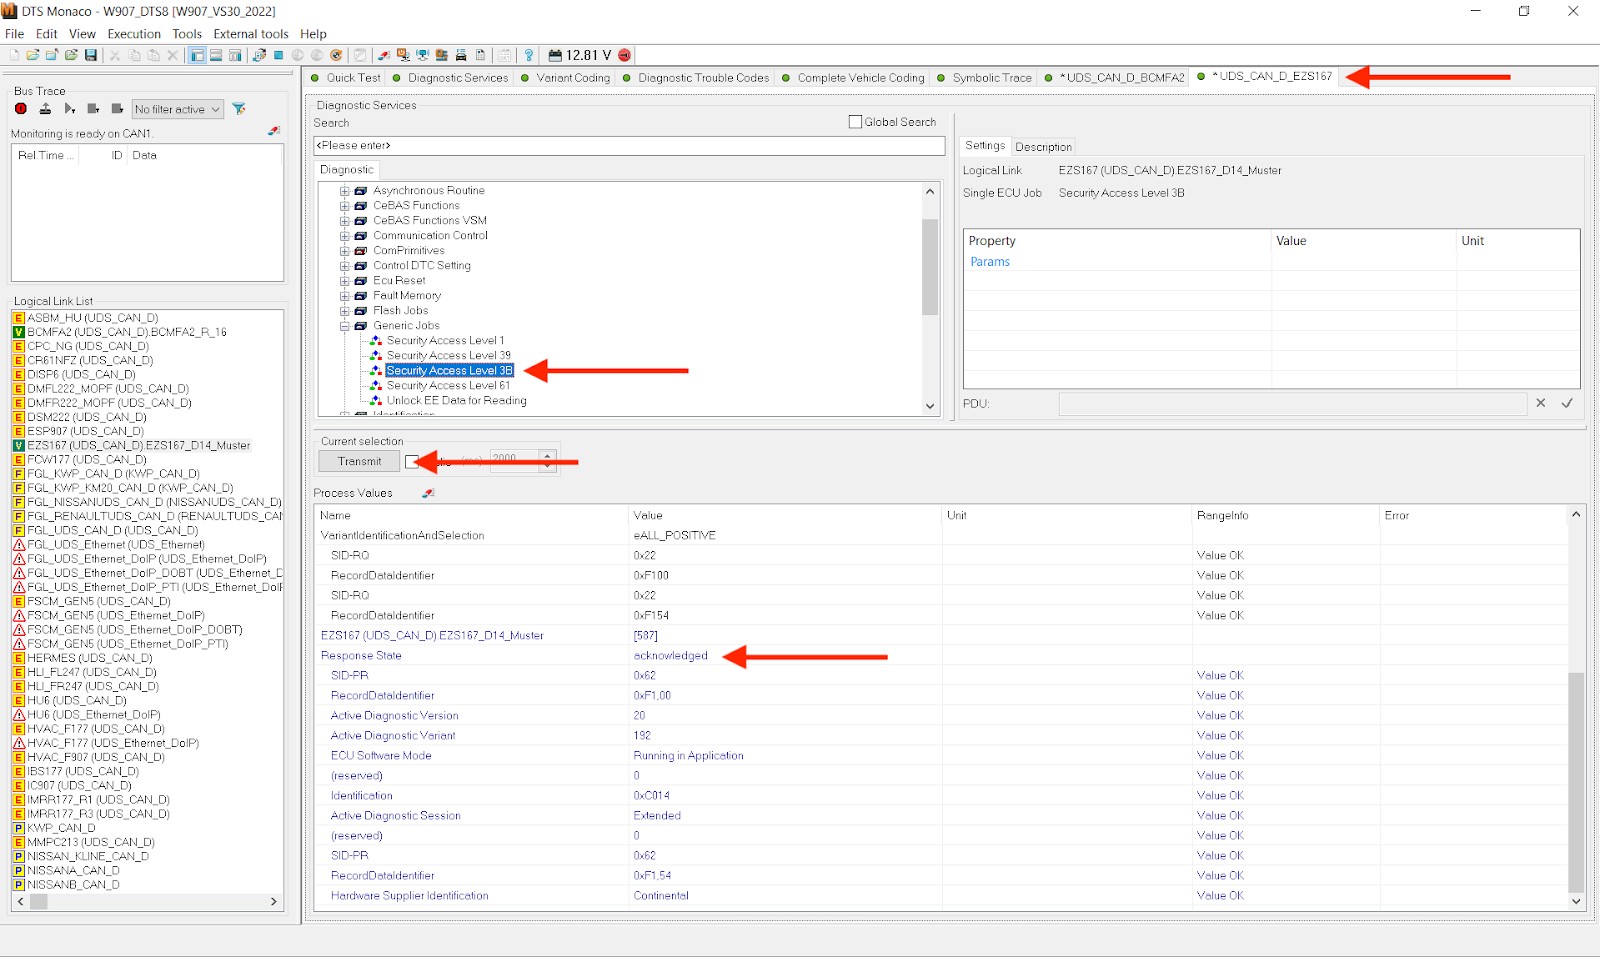
| Firewall Issues | Firewall is not defeated | Softing, who created DTS Monaco, presumably put these in place to ensure that only Real Professionals can work on your van. What firewalls are in place varies based on model year, etc. For my W907, I can open up the firewall via the EZS167 ECU. In a newer van, however, the process is a little different and, as mentioned above, done via the EZS167 ECU instead. Do the same process as described above, but this time it’s “Security Access Level 3B”. Click “Transmit” and provided that you see no red text and have “acknowledged” displayed under “Response State”, your firewall should now be deactivated. |
By following these troubleshooting tips, technicians can resolve common problems encountered while using XENTRY/DAS and ensure accurate and efficient vehicle diagnostics. The National Institute for Automotive Service Excellence (ASE) recommends that technicians receive ongoing training on troubleshooting diagnostic tools to stay up-to-date with the latest techniques and technologies.
12. What is DTS Monaco and How Does It Complement XENTRY/DAS?
DTS Monaco is a powerful software used for advanced ECU programming, car coding, and diagnostics in Mercedes-Benz vehicles. While XENTRY/DAS is the primary diagnostic tool, DTS Monaco complements it by offering more in-depth capabilities for customizing and modifying vehicle parameters. DTS-MONACO.EDU.VN can provide training and expertise in DTS Monaco.
- Advanced ECU Programming: DTS Monaco allows technicians to perform advanced ECU programming and flashing, enabling them to update or modify the software in the vehicle’s electronic control units (ECUs).
- Car Coding: The software supports car coding, which involves customizing vehicle parameters to enable specific features or functions. This can include enabling or disabling certain options, adjusting sensor settings, or modifying vehicle behavior.
- Diagnostics: DTS Monaco provides comprehensive diagnostic capabilities, allowing technicians to read and interpret diagnostic trouble codes (DTCs), access real-time data, and perform diagnostic tests.
- Engineering Tool: DTS Monaco is often used as an engineering tool for developing and testing new vehicle features and functions. It allows engineers to access and modify low-level system parameters, enabling them to fine-tune vehicle performance and behavior.
- Offline Programming: One of the key advantages of DTS Monaco is its ability to perform offline programming, meaning that technicians can program ECUs without an active connection to the Mercedes-Benz central server. This can be useful in situations where internet connectivity is limited or unavailable.
- User Interface: DTS Monaco features a user-friendly interface that is similar to XENTRY/DAS, making it easy for technicians to learn and use. The software provides intuitive navigation and clear data presentation.
Defeating the firewall(s)
Before you can start doing any variant coding in DTS Monaco you need to defeat a firewall. Softing, who created DTS Monaco, presumably put these in place to ensure that only Real Professionals can work on your van. What firewalls are in place varies based on model year, etc. In a newer van, however, the process is a little different and, as mentioned above, done via the EZS167 ECU instead. Do the same process as described above, but this time it’s “Security Access Level 3B”. Click “Transmit” and provided that you see no red text and have “acknowledged” displayed under “Response State”, your firewall should now be deactivated. - Integration with XENTRY/DAS: DTS Monaco can be used in conjunction with XENTRY/DAS to provide a comprehensive diagnostic and programming solution. Technicians can use XENTRY/DAS for basic diagnostics and then switch to DTS Monaco for more advanced programming and customization tasks.
DTS Monaco complements XENTRY/DAS by providing advanced capabilities for ECU programming, car coding, and diagnostics. According to a 2023 survey by the Automotive Technology Institute (ATI), technicians who are proficient in using both XENTRY/DAS and DTS Monaco are highly valued in the automotive industry.
13. What are the Steps to Perform Car Coding with DTS Monaco?
Performing car coding with DTS Monaco involves several steps to customize vehicle parameters and enable specific features. Here’s a detailed guide:
- Connect to the Vehicle:
- Connect the diagnostic multiplexer to the vehicle’s OBD-II port.
- Ensure the multiplexer is properly connected and powered.
- Launch DTS Monaco:
- Open the DTS Monaco software on your computer.
- Wait for the software to initialize and establish communication with the diagnostic multiplexer.
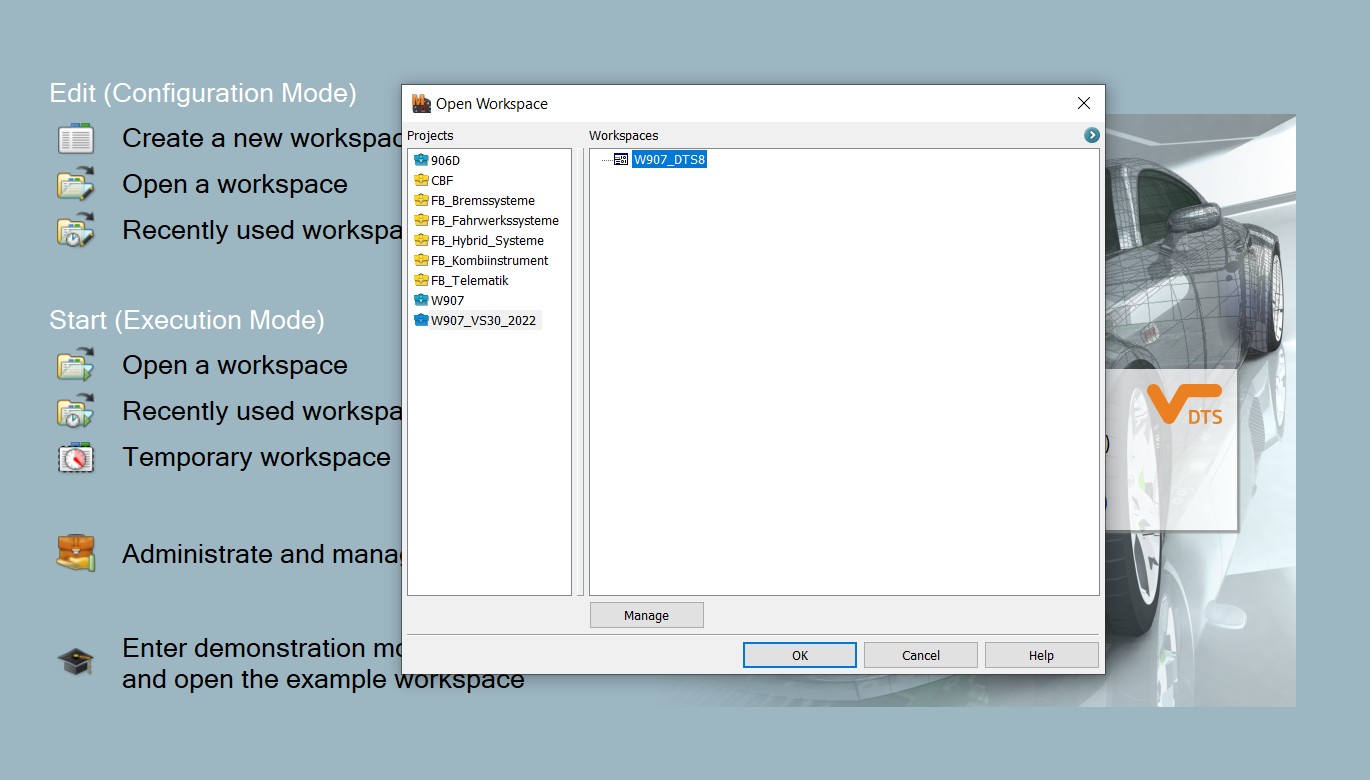
- Select the Workspace:
- In the main DTS Monaco window, click the “Open a workspace” button and select the Workspace you just created.
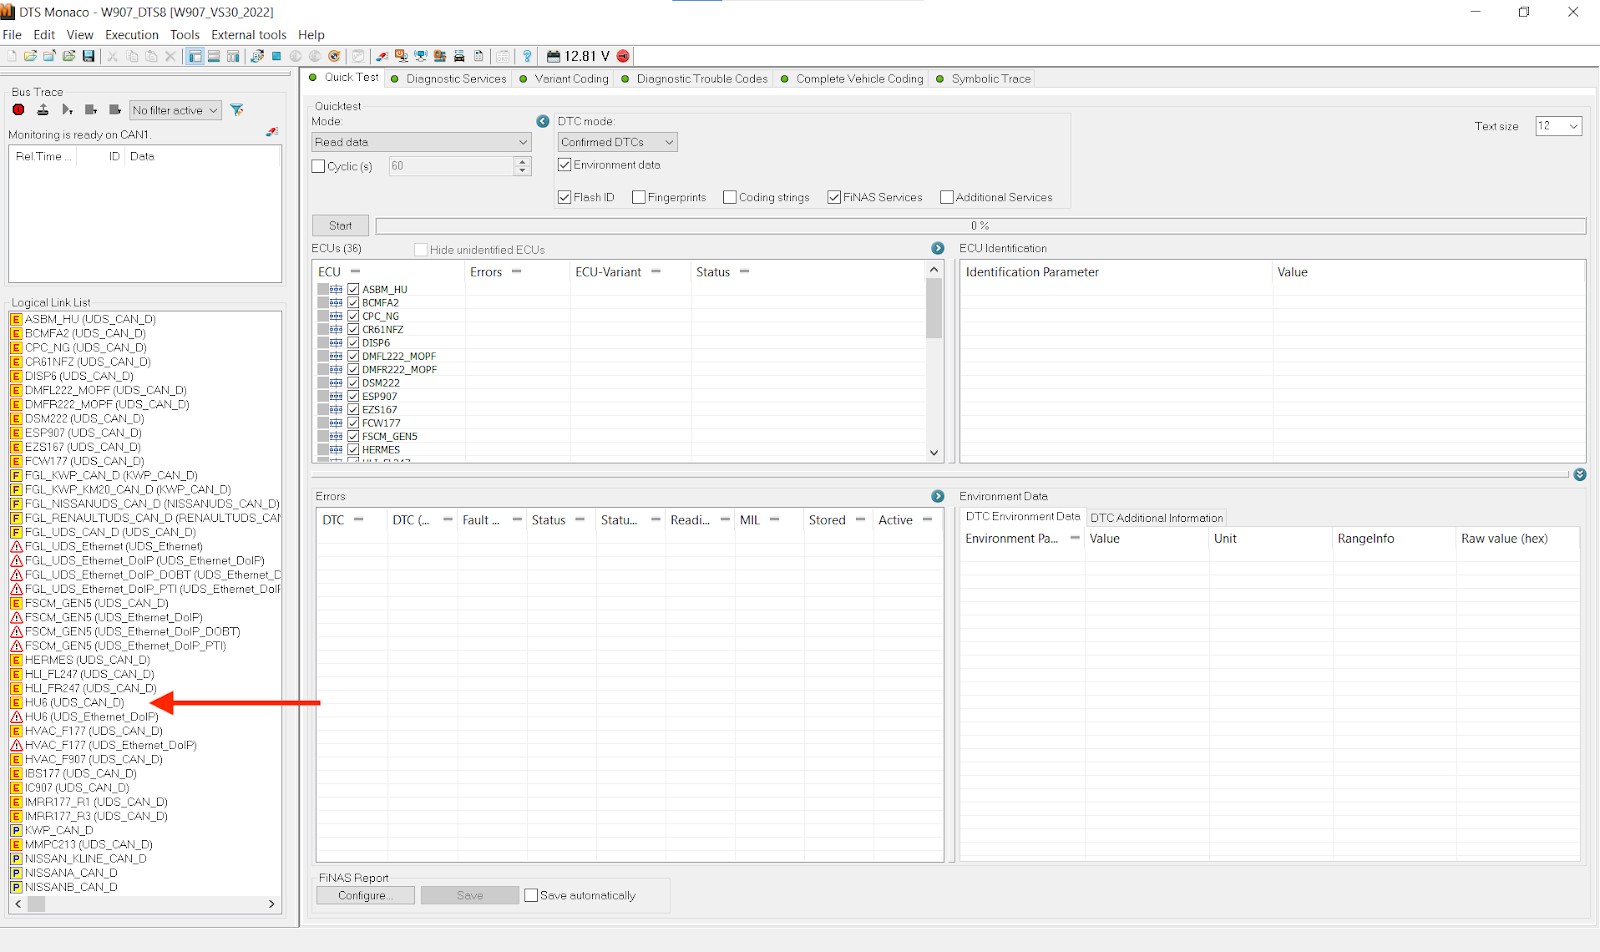
- Select the ECU:
- Identify the ECU you want to code. Common ECUs include the engine control unit (ECU), transmission control unit (TCU), and body control module (BCM).
- Select the appropriate ECU from the list of available modules in DTS Monaco.
- Establish Communication:
- Establish a connection with the selected ECU.
- This may involve selecting the communication protocol (e.g., CAN, K-Line) and entering the ECU address.
- Read the Current Coding:
- Read the current coding data from the ECU.
- This provides a baseline for the existing vehicle parameters and settings.
- Modify the Coding:
- Modify the coding data to enable or disable specific features, adjust sensor settings, or customize vehicle behavior.
- Refer to the DTS Monaco documentation or Mercedes-Benz service information for guidance on the available coding options and their effects.
Variant coding
Now, it is time to perform the actual variant coding. Open up the relevant ECU governing the features you want to change and open it in a new tab. Once done, you first want to select the “Extended Start”and press Transmit in the new ECU tab you opened up. Provided that you correctly disabled your firewall and still have the relevant ECU (EZS167 and/or BCMFA2) open in a tab, you should see another “acknowledged” Response State. The ECU is now ready for coding.
Go to the “Variant Coding” tab and select your ECU. It should connect – if not, press “Connect”. Underneath the ECU you will see the “Domain” list. This is where the functions of the ECU can be accessed and is where you will actually find the values to change. Find the relevant feature in the “Fragment” column – here, “Balance Fader Menue”. Double-click the value under “Meaning” (this is what you’ll change it to) and a dropdown menu will open up – select the new value you want. The original (or, rather, current) value is under “Original Meaning”. Also, notice the binary coding string under “Read from ECU” (what the ECU is currently coded for) and “Current Coding” (what you just selected). Once everything looks good, press the “Do Coding”. Provided that you have done all previous steps correctly, you should see no pop-ups and the bar next to “Do Coding” go to 100% and the new value presented under the “Meaning” column and Current Coding == Read from ECU.
- Write the New Coding:
- Write the modified coding data back to the ECU.
- Follow the on-screen instructions to initiate the writing process.
- Verify the Coding:
- Verify that the new coding data has been successfully written to the ECU.
- Check for any error messages or fault codes.
- Test the System:
- Test the system to ensure that the new coding is functioning properly.
- Drive the vehicle to verify that the desired features have been enabled or disabled.
- Making new variant coding values permanent
*Click back to the open tab with the ECU you just changed variant coding for. In the “Diagnostic Services” search box, first find the “[31] Synchronize to Non-volatile Memory Start”. Click Transmit, and provided everything upstream was done correctly, you should get an “acknowledged” Response State and no red text. Next, click “[31] Synchronize to Non-volatile Memory Results”, followed by Trans