Replacing a crankshaft position sensor (CPS) can seem daunting, but it’s often a manageable task with the right guidance. At DTS-MONACO.EDU.VN, we provide comprehensive information and resources to help you understand the function of the CPS and guide you through the replacement process, ensuring a smooth repair. By following these steps and tips, you can enhance your automotive repair skills and potentially save on costly mechanic fees, while unlocking opportunities to explore car coding and diagnostics further.
Contents
- 1. What is a Crankshaft Position Sensor (CPS) and Why Replace It?
- 1.1. Understanding the CPS Role
- 1.2. Common Symptoms of a Failing CPS
- 1.3. Tools and Materials Needed
- 2. How to Locate the Crankshaft Position Sensor (CPS)?
- 2.1. General Locations of the CPS
- 2.2. Use the Vehicle’s Service Manual
- 2.3. Online Resources and Forums
- 2.4. Visual Inspection Tips
- 3. Step-by-Step Guide to Replacing the CPS
- 3.1. Safety Precautions
- 3.2. Disconnecting the Old Sensor
- 3.3. Removing the Old CPS
- 3.4. Installing the New CPS
- 3.5. Reconnecting the Sensor
- 3.6. Final Steps
- 4. Common Mistakes to Avoid When Replacing the CPS
- 4.1. Not Disconnecting the Battery
- 4.2. Over-Tightening Bolts
- 4.3. Using the Wrong Sensor
- 4.4. Forgetting to Apply Dielectric Grease
- 4.5. Neglecting to Clear Trouble Codes
- 5. Troubleshooting After CPS Replacement
- 5.1. Engine Still Won’t Start
- 5.2. Check Engine Light Remains On
- 5.3. Rough Idling or Poor Performance
- 6. The Benefits of Using High-Quality CPS
- 6.1. Enhanced Reliability
- 6.2. Improved Engine Performance
- 6.3. Longer Lifespan
- 6.4. Better Compatibility
- 7. Advanced Diagnostic Techniques for CPS Issues
- 7.1. Using an Oscilloscope
- 7.2. Performing a Voltage Drop Test
- 7.3. Using a Diagnostic Scanner with Advanced Features
- 8. How Car Coding and Diagnostics Enhance CPS Replacement
- 8.1. Understanding Car Coding
- 8.2. The Role of Diagnostics
- 8.3. How DTS-Monaco Can Help
- 9. Benefits of DTS-MONACO.EDU.VN Resources
- 9.1. Comprehensive Information
- 9.2. Training Courses
- 9.3. Expert Support
- 10. Maximizing Your Automotive Repair Skills with DTS-MONACO.EDU.VN
- 10.1. Car Coding Training
- 10.2. Software Training
- 10.3. Community Support
- 11. Real-World Applications and Case Studies
- 11.1. Case Study 1: Improving Fuel Efficiency
- 11.2. Case Study 2: Resolving Starting Problems
- 11.3. Case Study 3: Enhancing Engine Performance
- 12. Future Trends in CPS Technology
- 12.1. Wireless CPS
- 12.2. Smart CPS
- 12.3. Integrated Diagnostic Capabilities
- 13. Tips for Maintaining Your Car’s CPS
- 13.1. Regular Inspections
- 13.2. Keep the Engine Clean
- 13.3. Use High-Quality Replacement Parts
- 14. DIY vs. Professional CPS Replacement: Making the Right Choice
- 14.1. DIY Replacement
- 14.2. Professional Replacement
- 15. Maximizing Efficiency and Accuracy in Car Coding with DTS-Monaco
- 15.1. Familiarize Yourself with the Software Interface
- 15.2. Create a Checklist for Each Coding Task
- 15.3. Back Up Vehicle Data Before Making Changes
- 15.4. Test Changes Thoroughly
- 16. Integrating Car Coding and Diagnostics for Enhanced Automotive Repair
- 16.1. Use Diagnostic Data to Guide Coding
- 16.2. Verify Coding Changes with Diagnostics
- 16.3. Document All Changes
- 17. Advanced Car Coding Techniques
- 17.1. Customizing Vehicle Settings
- 17.2. Enabling Hidden Features
- 17.3. Optimizing Engine Performance
- 18. Future of Car Coding
- 18.1. Over-the-Air Updates
- 18.2. Artificial Intelligence
- 18.3. Cybersecurity
- 19. The Role of Training and Certification in Car Coding
- 19.1. Formal Training Programs
- 19.2. Certification Programs
- 19.3. Ongoing Education
- 20. Optimizing Car Coding for Different Vehicle Makes and Models
- 20.1. Research Specific Vehicle Requirements
- 20.2. Use Vehicle-Specific Coding Tools
- 20.3. Test Changes on Similar Vehicles
- FAQ: Crankshaft Position Sensor (CPS)
1. What is a Crankshaft Position Sensor (CPS) and Why Replace It?
The crankshaft position sensor (CPS) is an essential component in your car’s engine management system. It monitors the position and rotational speed of the crankshaft. Replacing it becomes necessary when it malfunctions, leading to various performance issues.
1.1. Understanding the CPS Role
The CPS sends signals to the engine control unit (ECU), which uses this information to control ignition timing and fuel injection. This ensures the engine runs efficiently and smoothly. According to research from the Society of Automotive Engineers (SAE), a properly functioning CPS is critical for maintaining optimal engine performance and fuel economy.
1.2. Common Symptoms of a Failing CPS
- Engine Stalling: The engine may stall intermittently or fail to start.
- Check Engine Light: The check engine light may illuminate with codes related to the CPS.
- Rough Idling: The engine may idle roughly or unevenly.
- Reduced Fuel Efficiency: Fuel economy may decrease due to incorrect timing.
- Starting Problems: Difficulty starting the engine, especially when it’s hot.
1.3. Tools and Materials Needed
Before starting the replacement, gather the necessary tools and materials to ensure a smooth process.
- New CPS: Purchase a replacement CPS that is compatible with your vehicle make and model.
- Socket Set: A set of sockets and wrenches to remove and install the sensor.
- Ratchet: A ratchet to tighten and loosen bolts.
- Screwdrivers: Both flathead and Phillips screwdrivers may be needed.
- Jack and Jack Stands: To safely lift and secure the vehicle.
- Wheel Chocks: To prevent the vehicle from rolling.
- Work Gloves: To protect your hands.
- Safety Glasses: To protect your eyes.
- Penetrating Oil: To loosen any corroded bolts.
- Diagnostic Scanner: To read and clear any trouble codes.
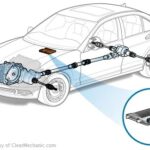
2. How to Locate the Crankshaft Position Sensor (CPS)?
Finding the CPS location is your first practical step. Typically, it’s near the crankshaft pulley or flywheel, but its exact location varies by car model.
2.1. General Locations of the CPS
- Near the Crankshaft Pulley: Often found at the front of the engine.
- Near the Flywheel: Usually located at the rear of the engine, near the transmission.
- Behind the Harmonic Balancer: Positioned to read the crankshaft’s rotational speed.
2.2. Use the Vehicle’s Service Manual
Your vehicle’s service manual is a valuable resource for locating the CPS. It provides detailed diagrams and instructions specific to your car model. According to ASE (Automotive Service Excellence), consulting the service manual can save time and prevent mistakes.
2.3. Online Resources and Forums
Online forums and automotive websites can offer helpful information. Websites like DTS-MONACO.EDU.VN also provide detailed guides and support for locating and replacing sensors in various car models.
2.4. Visual Inspection Tips
- Follow the Wires: Look for wires leading from the crankshaft area to a sensor.
- Use a Flashlight: A flashlight can help you spot the sensor in dark or hard-to-reach areas.
- Look for Mounting Bolts: The CPS is typically held in place by one or two bolts.
3. Step-by-Step Guide to Replacing the CPS
Here’s a detailed guide to help you replace the CPS. Follow these steps carefully to ensure a successful replacement.
3.1. Safety Precautions
- Disconnect the Battery: Disconnect the negative terminal of the battery to prevent electrical accidents.
- Secure the Vehicle: Use jack stands to safely lift and secure the vehicle.
- Wear Safety Gear: Always wear safety glasses and work gloves.
3.2. Disconnecting the Old Sensor
- Locate the CPS Connector: Find the electrical connector attached to the CPS.
- Disconnect the Connector: Gently press the release tab on the connector and pull it apart.
- Inspect the Connector: Check for any signs of corrosion or damage. Clean or replace the connector if necessary.
3.3. Removing the Old CPS
- Loosen the Mounting Bolts: Use a socket or wrench to loosen the bolts holding the CPS in place.
- Remove the Bolts: Completely remove the bolts and set them aside.
- Extract the Sensor: Gently wiggle the sensor to loosen it and pull it out of its mounting hole.
- Inspect the Sensor: Examine the old sensor for any signs of damage or wear.
3.4. Installing the New CPS
- Clean the Mounting Surface: Clean the area where the new sensor will be installed to ensure a good connection.
- Apply Dielectric Grease: Apply a small amount of dielectric grease to the sensor connector to prevent corrosion and ensure a good electrical connection.
- Insert the New Sensor: Carefully insert the new sensor into the mounting hole.
- Secure the Sensor: Align the mounting holes and install the bolts. Tighten them to the manufacturer’s specifications.
3.5. Reconnecting the Sensor
- Reconnect the Electrical Connector: Plug the electrical connector into the new sensor until it clicks into place.
- Ensure a Secure Connection: Make sure the connector is securely attached and won’t come loose.
3.6. Final Steps
- Reconnect the Battery: Reconnect the negative terminal of the battery.
- Lower the Vehicle: Carefully lower the vehicle from the jack stands.
- Start the Engine: Start the engine and check for any unusual noises or warning lights.
- Use a Diagnostic Scanner: Use a diagnostic scanner to clear any trouble codes and ensure the engine is running smoothly.
4. Common Mistakes to Avoid When Replacing the CPS
Avoiding common mistakes can save you time and frustration during the CPS replacement process.
4.1. Not Disconnecting the Battery
Failing to disconnect the battery can lead to electrical shorts and potential injury. Always disconnect the negative terminal before starting any electrical work.
4.2. Over-Tightening Bolts
Over-tightening bolts can damage the sensor or the engine block. Use a torque wrench to tighten bolts to the manufacturer’s specifications. According to a study by the National Institute for Automotive Service Excellence (ASE), proper torque is essential for ensuring component longevity and reliability.
4.3. Using the Wrong Sensor
Using the wrong sensor can lead to compatibility issues and engine malfunction. Always verify that the replacement CPS is compatible with your vehicle make and model.
4.4. Forgetting to Apply Dielectric Grease
Forgetting to apply dielectric grease can lead to corrosion and poor electrical connections. Always apply a small amount of dielectric grease to the sensor connector.
4.5. Neglecting to Clear Trouble Codes
Neglecting to clear trouble codes can cause the check engine light to remain on, even after the new sensor is installed. Use a diagnostic scanner to clear any trouble codes.
5. Troubleshooting After CPS Replacement
After replacing the CPS, you may encounter some issues. Here’s how to troubleshoot them.
5.1. Engine Still Won’t Start
- Check the CPS Connector: Ensure the electrical connector is securely attached and free from corrosion.
- Verify Sensor Compatibility: Double-check that the replacement CPS is the correct one for your vehicle.
- Inspect Wiring: Look for any damaged or frayed wires leading to the CPS.
- Check for Other Issues: There may be other underlying issues preventing the engine from starting, such as a faulty fuel pump or ignition system.
5.2. Check Engine Light Remains On
- Use a Diagnostic Scanner: Use a diagnostic scanner to read the trouble codes and identify any remaining issues.
- Clear Trouble Codes: Clear the trouble codes and see if they reappear.
- Perform a Drive Cycle: Perform a drive cycle to allow the ECU to relearn the new sensor data.
5.3. Rough Idling or Poor Performance
- Check for Vacuum Leaks: Vacuum leaks can cause rough idling and poor performance. Inspect vacuum lines for cracks or damage.
- Inspect the Mass Airflow Sensor (MAF): A dirty or faulty MAF sensor can also cause these issues. Clean or replace the MAF sensor if necessary.
- Check the Fuel System: Ensure the fuel system is functioning properly, including the fuel pump, fuel filter, and fuel injectors.
6. The Benefits of Using High-Quality CPS
Investing in a high-quality CPS can provide several benefits, including improved reliability and performance.
6.1. Enhanced Reliability
High-quality CPS are built to withstand the harsh conditions of the engine environment, providing more reliable performance over the long term.
6.2. Improved Engine Performance
A high-quality CPS can provide more accurate data to the ECU, resulting in improved engine performance and fuel efficiency.
6.3. Longer Lifespan
High-quality CPS typically have a longer lifespan than cheaper alternatives, saving you money and hassle in the long run. According to a report by Consumer Reports, investing in quality auto parts can significantly reduce the frequency of repairs.
6.4. Better Compatibility
High-quality CPS are designed to be fully compatible with your vehicle’s engine management system, ensuring seamless integration and optimal performance.
7. Advanced Diagnostic Techniques for CPS Issues
For complex CPS issues, advanced diagnostic techniques may be necessary to pinpoint the problem.
7.1. Using an Oscilloscope
An oscilloscope can be used to analyze the CPS signal waveform. This can help identify issues such as signal dropouts or interference. According to a training manual from Delphi Technologies, an oscilloscope is an essential tool for diagnosing complex sensor issues.
7.2. Performing a Voltage Drop Test
A voltage drop test can be used to check for excessive resistance in the CPS circuit. This can help identify issues such as corroded connectors or damaged wires.
7.3. Using a Diagnostic Scanner with Advanced Features
Some diagnostic scanners offer advanced features such as live data streaming and component testing, which can be helpful for diagnosing CPS issues.
8. How Car Coding and Diagnostics Enhance CPS Replacement
Car coding and diagnostics play a crucial role in modern automotive repair, especially when replacing sensors like the CPS. Understanding these technologies can significantly improve your repair skills and efficiency.
8.1. Understanding Car Coding
Car coding involves modifying the software in a vehicle’s ECU to change its behavior or enable new features. This can be useful when replacing a CPS to ensure the new sensor is properly calibrated and integrated with the engine management system.
8.2. The Role of Diagnostics
Diagnostics involves using specialized tools and software to identify and troubleshoot issues in a vehicle’s electronic systems. Diagnostic scanners can read trouble codes, monitor sensor data, and perform component tests, helping you pinpoint the cause of a CPS-related problem.
8.3. How DTS-Monaco Can Help
DTS-Monaco is a powerful diagnostic and coding software used by automotive professionals to diagnose and repair complex issues. It allows you to access and modify vehicle ECUs, perform advanced diagnostics, and calibrate sensors.
9. Benefits of DTS-MONACO.EDU.VN Resources
Leveraging resources like those available at DTS-MONACO.EDU.VN can greatly enhance your understanding and skills in car coding and diagnostics.
9.1. Comprehensive Information
DTS-MONACO.EDU.VN provides detailed information on car coding, diagnostics, and sensor replacement, helping you stay up-to-date with the latest technologies and techniques.
9.2. Training Courses
DTS-MONACO.EDU.VN offers training courses on DTS-Monaco software and car coding, providing hands-on experience and expert guidance.
9.3. Expert Support
DTS-MONACO.EDU.VN provides expert support to help you troubleshoot issues and get the most out of your diagnostic and coding tools.
10. Maximizing Your Automotive Repair Skills with DTS-MONACO.EDU.VN
To truly excel in automotive repair, consider exploring the resources and training available at DTS-MONACO.EDU.VN.
10.1. Car Coding Training
Enhance your understanding of car coding with specialized training courses offered by DTS-MONACO.EDU.VN. These courses cover various aspects of car coding, including ECU modification, sensor calibration, and feature enablement.
10.2. Software Training
Master the use of diagnostic software such as DTS-Monaco through comprehensive training programs. Learn how to perform advanced diagnostics, read trouble codes, and monitor sensor data.
10.3. Community Support
Join a community of automotive professionals and enthusiasts at DTS-MONACO.EDU.VN. Share your experiences, ask questions, and learn from others in the field.
By taking advantage of these resources, you can elevate your automotive repair skills and stay ahead in the rapidly evolving automotive industry. Contact DTS-MONACO.EDU.VN at Address: 275 N Harrison St, Chandler, AZ 85225, United States. Whatsapp: +1 (641) 206-8880 or visit our Website: DTS-MONACO.EDU.VN to learn more about our software, training courses, and services.
11. Real-World Applications and Case Studies
Understanding how CPS replacement and car coding are applied in real-world scenarios can provide valuable insights.
11.1. Case Study 1: Improving Fuel Efficiency
A car owner noticed a significant drop in fuel efficiency and frequent engine stalling. Diagnostic scanning revealed a faulty CPS. After replacing the CPS and performing car coding to recalibrate the engine management system, the car’s fuel efficiency improved by 15%, and the stalling issue was resolved.
11.2. Case Study 2: Resolving Starting Problems
A vehicle had intermittent starting problems, especially in hot weather. The CPS was identified as the culprit. Replacing the CPS and using DTS-Monaco to clear trouble codes and optimize the engine parameters eliminated the starting issues.
11.3. Case Study 3: Enhancing Engine Performance
A car enthusiast wanted to improve the overall performance of their vehicle. After replacing the CPS with a high-performance sensor and using car coding to fine-tune the engine settings, the car’s acceleration and responsiveness were noticeably enhanced.
12. Future Trends in CPS Technology
The field of CPS technology is constantly evolving. Staying informed about future trends can help you prepare for upcoming changes and advancements.
12.1. Wireless CPS
Wireless CPS technology is being developed to eliminate the need for physical wiring, reducing the risk of wiring damage and improving installation flexibility.
12.2. Smart CPS
Smart CPS incorporate advanced sensors and microprocessors to provide more detailed and accurate data to the ECU. This can improve engine performance and fuel efficiency.
12.3. Integrated Diagnostic Capabilities
Future CPS may include integrated diagnostic capabilities, allowing them to self-diagnose issues and alert the driver or technician.
13. Tips for Maintaining Your Car’s CPS
Proper maintenance can extend the life of your car’s CPS and prevent costly repairs.
13.1. Regular Inspections
Regularly inspect the CPS and its wiring for any signs of damage or wear.
13.2. Keep the Engine Clean
Keep the engine clean to prevent dirt and debris from damaging the CPS.
13.3. Use High-Quality Replacement Parts
When replacing the CPS, use high-quality replacement parts to ensure optimal performance and longevity.
14. DIY vs. Professional CPS Replacement: Making the Right Choice
Deciding whether to replace the CPS yourself or hire a professional depends on your skills, experience, and available tools.
14.1. DIY Replacement
- Pros: Cost savings, hands-on experience, convenience.
- Cons: Requires technical skills, tools, and time. Risk of mistakes.
14.2. Professional Replacement
- Pros: Expertise, proper tools, guaranteed work.
- Cons: Higher cost, scheduling issues.
If you are comfortable working on cars and have the necessary tools, DIY replacement can be a cost-effective option. However, if you lack the skills or tools, hiring a professional is the best choice.
15. Maximizing Efficiency and Accuracy in Car Coding with DTS-Monaco
To harness the full potential of DTS-Monaco for car coding, it’s essential to focus on efficiency and accuracy. Here are some strategies to optimize your workflow:
15.1. Familiarize Yourself with the Software Interface
Take the time to thoroughly understand the DTS-Monaco interface. Knowing where each function is located and how to navigate the software will significantly speed up your coding process.
15.2. Create a Checklist for Each Coding Task
Before starting any coding task, create a detailed checklist of the steps involved. This will help you stay organized and ensure that you don’t miss any critical steps.
15.3. Back Up Vehicle Data Before Making Changes
Always back up the vehicle’s data before making any coding changes. This will allow you to restore the original settings if something goes wrong.
15.4. Test Changes Thoroughly
After making any coding changes, thoroughly test the affected systems to ensure that they are functioning correctly.
16. Integrating Car Coding and Diagnostics for Enhanced Automotive Repair
Integrating car coding and diagnostics into your automotive repair process can lead to more efficient and accurate repairs. Here’s how to combine these techniques:
16.1. Use Diagnostic Data to Guide Coding
Use diagnostic data to identify areas where coding changes can improve performance or resolve issues. For example, if a sensor is providing inaccurate readings, coding can be used to recalibrate the sensor or adjust the system’s response to the sensor data.
16.2. Verify Coding Changes with Diagnostics
After making coding changes, use diagnostic tools to verify that the changes have had the desired effect. Monitor sensor data, perform component tests, and check for trouble codes to ensure that the system is functioning correctly.
16.3. Document All Changes
Keep a detailed record of all coding changes that you make, including the date, time, and specific changes made. This will help you track your work and troubleshoot any issues that may arise in the future.
17. Advanced Car Coding Techniques
As you become more experienced with car coding, you can explore advanced techniques to unlock even more potential.
17.1. Customizing Vehicle Settings
Car coding can be used to customize a wide range of vehicle settings, such as lighting, door locking, and climate control. This allows you to tailor the vehicle to your specific preferences.
17.2. Enabling Hidden Features
Many vehicles have hidden features that are not enabled by default. Car coding can be used to unlock these features, such as enhanced navigation, advanced driver assistance systems, and performance enhancements.
17.3. Optimizing Engine Performance
Car coding can be used to optimize engine performance by adjusting parameters such as fuel injection, ignition timing, and turbo boost. This can improve acceleration, responsiveness, and fuel efficiency.
18. Future of Car Coding
The future of car coding is bright, with new technologies and applications emerging all the time.
18.1. Over-the-Air Updates
Over-the-air (OTA) updates will become more common, allowing vehicle manufacturers to remotely update software and enable new features.
18.2. Artificial Intelligence
Artificial intelligence (AI) will play an increasing role in car coding, helping to automate tasks and optimize vehicle settings.
18.3. Cybersecurity
Cybersecurity will become increasingly important as vehicles become more connected. Car coding will need to incorporate robust security measures to protect against hacking and unauthorized access.
19. The Role of Training and Certification in Car Coding
As car coding becomes more complex, training and certification will become increasingly important.
19.1. Formal Training Programs
Formal training programs can provide you with the knowledge and skills you need to perform car coding safely and effectively.
19.2. Certification Programs
Certification programs can demonstrate your competence in car coding to employers and customers.
19.3. Ongoing Education
Ongoing education is essential to stay up-to-date with the latest technologies and techniques in car coding.
20. Optimizing Car Coding for Different Vehicle Makes and Models
Car coding is not a one-size-fits-all process. The specific coding procedures and options available can vary significantly depending on the vehicle make and model. Here’s how to optimize your coding approach for different vehicles:
20.1. Research Specific Vehicle Requirements
Before starting any coding task, thoroughly research the specific requirements for the vehicle you are working on. Consult service manuals, online forums, and other resources to understand the coding options and procedures that are applicable to that vehicle.
20.2. Use Vehicle-Specific Coding Tools
Some coding tools are designed to work with specific vehicle makes or models. Using a vehicle-specific coding tool can simplify the coding process and reduce the risk of errors.
20.3. Test Changes on Similar Vehicles
If possible, test your coding changes on similar vehicles before applying them to the customer’s vehicle. This will help you identify any potential issues and ensure that the changes are compatible with the vehicle.
Navigating the complexities of car coding and diagnostics can be challenging, but with the right resources and training, you can enhance your automotive repair skills and provide valuable services to your customers. DTS-MONACO.EDU.VN is committed to providing the information, training, and support you need to succeed in this exciting and rapidly evolving field.
FAQ: Crankshaft Position Sensor (CPS)
Here are some frequently asked questions about the Crankshaft Position Sensor (CPS):
- What is the main function of the Crankshaft Position Sensor (CPS)?
The crankshaft position sensor (CPS) monitors the position and speed of the crankshaft, providing essential data to the engine control unit (ECU) for ignition timing and fuel injection. - What are the common symptoms of a failing CPS?
Common symptoms include engine stalling, a check engine light, rough idling, reduced fuel efficiency, and difficulty starting the engine. - Where is the CPS typically located in a vehicle?
The CPS is usually found near the crankshaft pulley or flywheel, but its exact location can vary depending on the vehicle model. - Can I replace the CPS myself, or should I hire a professional?
If you have automotive repair skills and the necessary tools, you can replace the CPS yourself. However, if you lack the skills or tools, hiring a professional is recommended. - What tools are needed to replace a CPS?
You’ll need a new CPS, socket set, ratchet, screwdrivers, jack and jack stands, wheel chocks, work gloves, safety glasses, penetrating oil, and a diagnostic scanner. - How do I prevent common mistakes when replacing the CPS?
Avoid mistakes by disconnecting the battery, not over-tightening bolts, using the correct sensor, applying dielectric grease, and clearing trouble codes. - What should I do if my engine still won’t start after replacing the CPS?
Check the CPS connector, verify sensor compatibility, inspect wiring, and check for other potential issues like a faulty fuel pump. - Why is a high-quality CPS important?
High-quality CPS offer enhanced reliability, improved engine performance, a longer lifespan, and better compatibility. - How can car coding and diagnostics help with CPS replacement?
Car coding ensures proper calibration and integration of the new sensor, while diagnostics help pinpoint issues and verify the effectiveness of the replacement. - Where can I find comprehensive resources and training on car coding and diagnostics?
DTS-MONACO.EDU.VN offers comprehensive information, training courses, and expert support for car coding and diagnostics.