Replacing the evaporative emissions (EVAP) canister is crucial for maintaining a clean environment and optimal vehicle performance, and DTS-MONACO.EDU.VN is here to guide you through the process. An EVAP canister replacement ensures your vehicle meets emissions standards and avoids potential engine issues. Master the EVAP system, troubleshoot common problems, and confidently perform replacements with advanced diagnostic tools and comprehensive car coding knowledge, unlocking efficiency and expertise in automotive maintenance.
Contents
- 1. Understanding the EVAP System and Its Importance
- 1.1. What is the EVAP System?
- 1.2. Key Components of the EVAP System
- 1.3. Why is the EVAP Canister Important?
- 1.4. Environmental Impact of a Faulty EVAP Canister
- 2. Identifying a Bad EVAP Canister: Symptoms and Diagnostics
- 2.1. Common Symptoms of a Failing EVAP Canister
- 2.2. Diagnostic Tools and Techniques
- 2.3. Interpreting OBD-II Error Codes Related to the EVAP System
- 2.4. Step-by-Step Diagnostic Procedure
- 2.5. Using DTS-Monaco for Advanced Diagnostics
- 3. Gathering Tools and Materials for EVAP Canister Replacement
- 3.1. Essential Tools for the Job
- 3.2. Required Materials and Replacement Parts
- 3.3. Where to Source Quality Replacement Parts
- 3.4. Budgeting for the Replacement
- 3.5. Safety Precautions
- 4. Step-by-Step Guide to Replacing the EVAP Canister
- 4.1. Preparing the Vehicle
- 4.2. Accessing the EVAP Canister
- 4.3. Disconnecting Hoses and Electrical Connectors
- 4.4. Removing the Old EVAP Canister
- 4.5. Installing the New EVAP Canister
- 4.6. Final Checks and Reassembly
- 5. Post-Replacement Procedures and Testing
- 5.1. Clearing Diagnostic Trouble Codes (DTCs)
- 5.2. Performing a Test Drive
- 5.3. Monitoring EVAP System Parameters with DTS-Monaco
- 5.4. Common Issues After Replacement and Troubleshooting
- 5.5. When to Seek Professional Help
- 6. Advanced EVAP System Diagnostics with DTS-Monaco
- 6.1. Introduction to DTS-Monaco Software
- 6.2. Setting Up DTS-Monaco for EVAP System Diagnostics
- 6.3. Real-Time Data Monitoring
- 6.4. Actuator Tests
- 6.5. Advanced Coding and Reprogramming
- 6.6. Benefits of Using DTS-Monaco for EVAP Diagnostics
- 6.7. Resources for Learning DTS-Monaco
- 7. Maintaining Your Vehicle’s EVAP System
- 7.1. Regular Inspections
- 7.2. Preventing Common EVAP System Problems
- 7.3. The Role of Fuel Additives
- 7.4. Professional EVAP System Cleaning Services
- 7.5. Long-Term Benefits of a Well-Maintained EVAP System
- 8. Car Coding and EVAP System Optimization
- 8.1. What is Car Coding?
- 8.2. How Car Coding Can Improve EVAP System Performance
- 8.3. Using DTS-Monaco for Car Coding
- 8.4. Safety Precautions When Car Coding
- 8.5. Benefits of Car Coding for EVAP System Optimization
- 9. Common Mistakes to Avoid During EVAP Canister Replacement
- 9.1. Incorrect Hose Connections
- 9.2. Damaging Electrical Connectors
- 9.3. Over-Tightening Bolts
- 9.4. Neglecting to Replace Worn Hoses
- 9.5. Forgetting to Clear Diagnostic Trouble Codes (DTCs)
- 9.6. Ignoring Safety Precautions
- 9.7. Using Low-Quality Replacement Parts
- 9.8. Not Consulting the Vehicle’s Service Manual
- 10. FAQs About EVAP Canister Replacement
- 10.1. How long does an EVAP canister last?
- 10.2. Can I drive with a bad EVAP canister?
- 10.3. How much does it cost to replace an EVAP canister?
- 10.4. Can a bad gas cap cause EVAP problems?
- 10.5. Is it difficult to replace an EVAP canister myself?
- 10.6. What are the symptoms of a clogged EVAP canister?
- 10.7. How can I test my EVAP system?
- 10.8. What is the purpose of the EVAP vent valve?
- 10.9. Can car coding help optimize my EVAP system?
- 10.10. Where can I learn more about car coding and EVAP system diagnostics?
1. Understanding the EVAP System and Its Importance
1.1. What is the EVAP System?
The Evaporative Emission Control (EVAP) system is designed to prevent fuel vapors from escaping into the atmosphere. According to the Environmental Protection Agency (EPA), EVAP systems can significantly reduce hydrocarbon emissions, contributing to cleaner air. At its core, the system captures fuel vapors, stores them, and then purges them into the engine to be burned during normal operation. This entire process reduces the number of harmful gases released into the environment and improves fuel efficiency.
1.2. Key Components of the EVAP System
Several components work together to make the EVAP system function correctly:
- Fuel Tank: Stores the gasoline. It is a sealed unit to prevent vapor escape.
- EVAP Canister: Contains activated charcoal that absorbs and stores fuel vapors.
- Purge Valve: Controls the flow of vapors from the canister to the engine intake manifold.
- Vent Valve: Allows fresh air to enter the canister when the purge valve is open.
- Pressure Sensor: Monitors the pressure within the EVAP system to detect leaks.
1.3. Why is the EVAP Canister Important?
The EVAP canister is the heart of the EVAP system. It prevents harmful fuel vapors from being released into the atmosphere by trapping and storing them. A properly functioning canister ensures your vehicle complies with environmental regulations, reduces smog, and operates efficiently. When the canister fails, it can lead to various issues, including:
- Check Engine Light: Triggered by pressure imbalances.
- Fuel Efficiency Problems: Due to improper vapor management.
- Emissions Test Failure: Resulting from excessive hydrocarbon emissions.
1.4. Environmental Impact of a Faulty EVAP Canister
A faulty EVAP canister directly contributes to air pollution. Fuel vapors contain volatile organic compounds (VOCs) that contribute to smog formation and can have detrimental health effects. The EPA estimates that malfunctioning EVAP systems can lead to significant increases in hydrocarbon emissions, undermining air quality efforts.
2. Identifying a Bad EVAP Canister: Symptoms and Diagnostics
2.1. Common Symptoms of a Failing EVAP Canister
Recognizing the signs of a failing EVAP canister is essential for timely repair. Common symptoms include:
- Check Engine Light: This is often the first sign. The OBD-II system detects pressure or flow issues and illuminates the light.
- Fuel Odor: A noticeable smell of gasoline around the vehicle, especially after fueling.
- Poor Fuel Economy: The engine may not be operating efficiently due to incorrect vapor management.
- Difficulty Starting: Excess vacuum pressure in the fuel tank can cause hard starting.
- Rough Idling: Irregular engine performance at idle.
- Failed Emissions Test: A malfunctioning canister will likely cause the vehicle to fail an emissions test.
2.2. Diagnostic Tools and Techniques
To accurately diagnose an EVAP canister issue, technicians use various diagnostic tools:
- OBD-II Scanner: Retrieves diagnostic trouble codes (DTCs) related to the EVAP system.
- Smoke Machine: Injects smoke into the EVAP system to identify leaks.
- Multimeter: Tests the electrical components, such as the purge and vent valves.
- Scan Tools: Advanced tools that can monitor live data from the EVAP system sensors.
2.3. Interpreting OBD-II Error Codes Related to the EVAP System
Understanding OBD-II codes is crucial for diagnosing EVAP issues. Some common codes include:
- P0440: Evaporative Emission Control System Malfunction.
- P0441: Evaporative Emission Control System Incorrect Purge Flow.
- P0442: Evaporative Emission Control System Leak Detected (Small Leak).
- P0446: Evaporative Emission Control System Vent Control Circuit Malfunction.
- P0455: Evaporative Emission Control System Leak Detected (Gross Leak).
Each code provides specific information about the nature of the problem, helping pinpoint the faulty component.
2.4. Step-by-Step Diagnostic Procedure
Here’s a step-by-step guide to diagnosing EVAP system problems:
- Connect the OBD-II scanner and retrieve any stored DTCs.
- Research the codes to understand the potential issues.
- Inspect the EVAP canister for visible damage or cracks.
- Check the hoses and connections for leaks or blockages.
- Test the purge and vent valves using a multimeter.
- Use a smoke machine to detect any leaks in the system.
- Monitor the EVAP system sensors with a scan tool to check their readings.
2.5. Using DTS-Monaco for Advanced Diagnostics
For technicians looking for advanced diagnostic capabilities, DTS-Monaco offers powerful features for analyzing the EVAP system. DTS-Monaco allows you to:
- Access detailed system parameters: Monitor real-time data from EVAP sensors.
- Perform actuator tests: Activate and test the purge and vent valves.
- Run diagnostic routines: Execute comprehensive tests to identify faults.
- Reprogram control units: Update software to improve EVAP system performance.
With DTS-Monaco, you can achieve a deeper understanding of the EVAP system and perform more accurate and efficient diagnoses. Contact DTS-MONACO.EDU.VN for more information on how to use DTS-Monaco for EVAP system diagnostics.
3. Gathering Tools and Materials for EVAP Canister Replacement
3.1. Essential Tools for the Job
Before starting the EVAP canister replacement, ensure you have the following tools:
- Wrench Set: For removing bolts and fasteners.
- Screwdriver Set: Both flathead and Phillips head screwdrivers.
- Socket Set: Including various sizes and extensions.
- Pliers: For disconnecting hoses and clips.
- Jack and Jack Stands: To safely lift and support the vehicle.
- Safety Glasses: To protect your eyes from debris.
- Gloves: To protect your hands.
- Flashlight or Work Light: To provide adequate lighting.
- Penetrating Oil: To loosen rusted bolts.
- OBD-II Scanner: To clear codes after the replacement.
3.2. Required Materials and Replacement Parts
Gather these materials and parts before starting:
- New EVAP Canister: Purchase a high-quality replacement canister that matches your vehicle’s specifications.
- Replacement Hoses: Replace any cracked or worn hoses.
- Hose Clamps: To secure the new hoses.
- Vent Valve (if necessary): Replace the vent valve if it shows signs of damage or malfunction.
- Shop Towels: To clean up spills.
- Battery Terminal Cleaner: To clean battery terminals before disconnecting.
3.3. Where to Source Quality Replacement Parts
Sourcing reliable replacement parts is critical for a successful repair. Consider these options:
- Local Auto Parts Stores: Reputable stores like AutoZone, O’Reilly Auto Parts, and Advance Auto Parts offer a wide range of parts.
- Online Retailers: Websites like Amazon and RockAuto provide access to a vast selection of parts at competitive prices.
- Dealerships: Dealerships offer OEM (Original Equipment Manufacturer) parts, ensuring the highest quality and compatibility.
3.4. Budgeting for the Replacement
The cost of an EVAP canister replacement can vary depending on the vehicle make and model, as well as the source of the parts. Here’s a general cost breakdown:
- EVAP Canister: $50 – $200
- Replacement Hoses and Clamps: $10 – $30
- Vent Valve (if needed): $20 – $50
- Labor (if hiring a mechanic): $100 – $300
The total cost can range from $180 to $580, depending on whether you perform the replacement yourself or hire a professional.
3.5. Safety Precautions
Safety should always be a top priority. Before starting the replacement:
- Disconnect the Battery: Prevents electrical shorts.
- Wear Safety Glasses and Gloves: Protects eyes and hands.
- Work in a Well-Ventilated Area: Avoid inhaling fuel vapors.
- Use Jack Stands: Never work under a vehicle supported only by a jack.
- Have a Fire Extinguisher Nearby: In case of fuel spills.
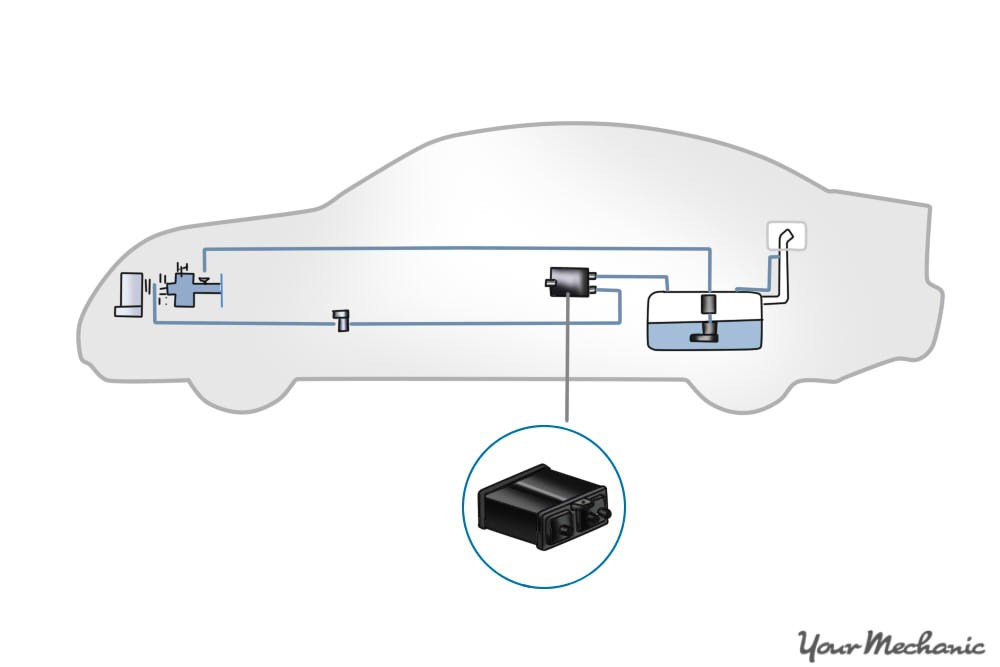
 Evap emissions control canister is located near the fuel cell
4. Step-by-Step Guide to Replacing the EVAP Canister
4.1. Preparing the Vehicle
- Park the Vehicle: Park on a level surface and engage the parking brake.
- Gather Tools and Materials: Ensure you have all the necessary tools and replacement parts.
- Disconnect the Battery: Disconnect the negative terminal of the battery to prevent electrical issues.
- Locate the EVAP Canister: Consult your vehicle’s service manual to find the exact location of the EVAP canister. It is typically located near the fuel tank or in the engine compartment.
4.2. Accessing the EVAP Canister
- Lift the Vehicle: Use a jack to lift the vehicle and secure it with jack stands.
- Remove Underbody Panels (if necessary): Some vehicles have underbody panels that need to be removed to access the EVAP canister. Use a screwdriver or socket set to remove these panels.
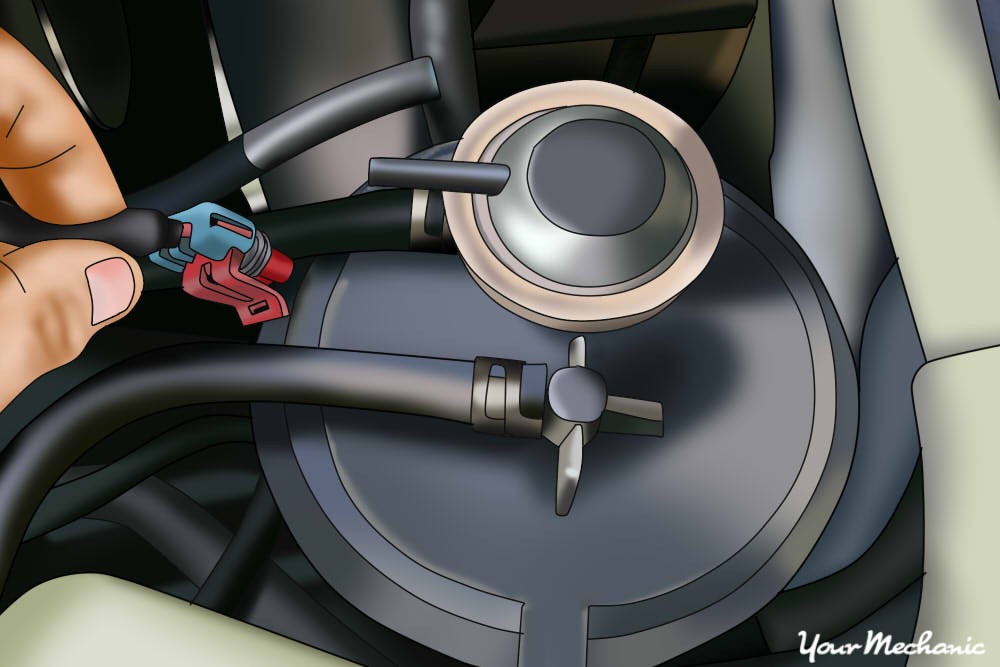
4.3. Disconnecting Hoses and Electrical Connectors
- Label Hoses: Before disconnecting any hoses, label them with masking tape to ensure correct reinstallation.
- Disconnect Hoses: Use pliers to loosen the hose clamps and carefully disconnect the hoses from the EVAP canister.
- Disconnect Electrical Connectors: Disconnect any electrical connectors attached to the EVAP canister or vent valve.
4.4. Removing the Old EVAP Canister
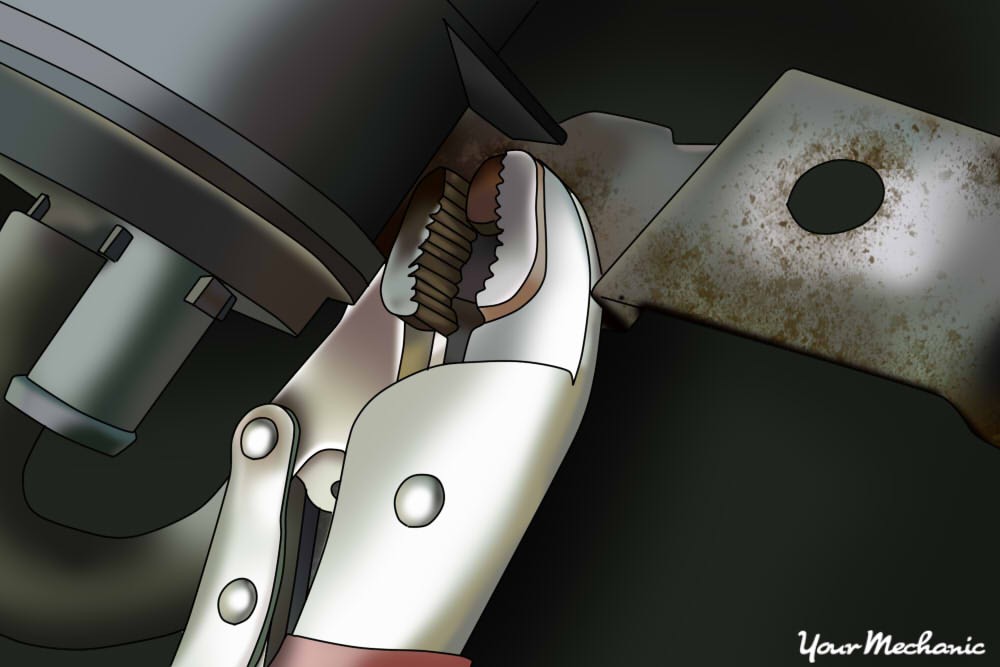
- Remove Mounting Bolts: Use a wrench or socket set to remove the bolts or screws that secure the EVAP canister to the vehicle.
- Remove the Canister: Carefully remove the old EVAP canister from its mounting location.
4.5. Installing the New EVAP Canister
- Inspect the New Canister: Check the new EVAP canister for any damage.
- Install the New Canister: Place the new EVAP canister in its mounting location and secure it with the bolts or screws.
- Reconnect Hoses: Reconnect the hoses to the EVAP canister, ensuring they are attached to the correct ports as indicated by your labels.
- Reconnect Electrical Connectors: Reconnect any electrical connectors.
4.6. Final Checks and Reassembly
- Check Hose Connections: Ensure all hoses are securely attached and the clamps are tight.
- Reinstall Underbody Panels: If you removed any underbody panels, reinstall them.
- Lower the Vehicle: Carefully lower the vehicle from the jack stands.
- Reconnect the Battery: Reconnect the negative terminal of the battery.
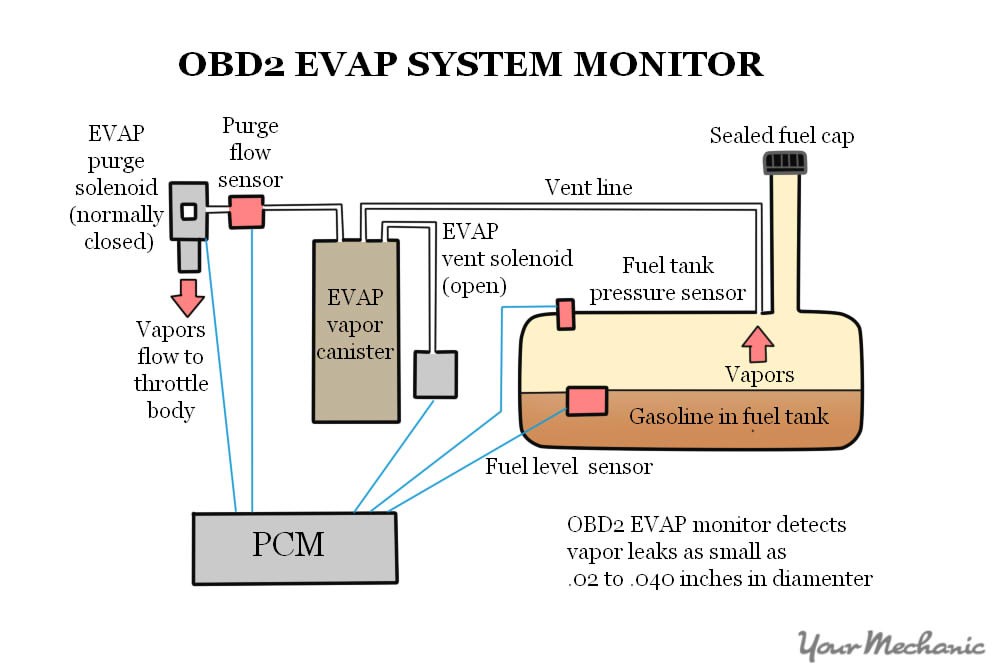 Diagram showing evap vapor canister attached to a fuel vent line that is also attached to the fuel tank
5. Post-Replacement Procedures and Testing
5.1. Clearing Diagnostic Trouble Codes (DTCs)
After replacing the EVAP canister, it’s essential to clear any stored diagnostic trouble codes (DTCs) using an OBD-II scanner. Clearing the codes allows the vehicle’s computer to recognize the new canister and reset the system.
- Connect the OBD-II Scanner: Plug the scanner into the OBD-II port, typically located under the dashboard.
- Turn on the Ignition: Turn the ignition key to the “ON” position without starting the engine.
- Access the Code Clearing Function: Navigate the scanner’s menu to find the option to clear DTCs.
- Confirm the Clearing Process: Follow the scanner’s prompts to confirm and complete the code clearing process.
- Verify Code Clearance: After clearing the codes, rescan the system to ensure no DTCs remain.
5.2. Performing a Test Drive
A test drive is crucial to ensure the EVAP system is functioning correctly after the replacement.
- Start the Engine: Start the engine and let it idle for a few minutes.
- Monitor for Unusual Noises or Odors: Listen for any unusual noises or fuel odors that may indicate a problem.
- Drive at Various Speeds: Drive the vehicle at different speeds and under various conditions to test the EVAP system’s performance.
- Check the Check Engine Light: Ensure the check engine light does not illuminate during the test drive.
- Observe Fuel Efficiency: Monitor the vehicle’s fuel efficiency to ensure it is within the expected range.
5.3. Monitoring EVAP System Parameters with DTS-Monaco
For a more thorough evaluation, use DTS-Monaco to monitor the EVAP system parameters in real-time.
- Connect DTS-Monaco: Connect the DTS-Monaco interface to the vehicle’s OBD-II port and your computer.
- Select EVAP System Monitoring: Choose the EVAP system monitoring option in the DTS-Monaco software.
- Monitor Real-Time Data: Observe the live data from the EVAP system sensors, including pressure readings, purge valve activity, and vent valve status.
- Analyze Data: Analyze the data to ensure all parameters are within the normal operating range.
- Perform Actuator Tests: Use DTS-Monaco to perform actuator tests on the purge and vent valves to verify their functionality. Contact DTS-MONACO.EDU.VN for detailed guidance on using DTS-Monaco.
5.4. Common Issues After Replacement and Troubleshooting
Even after a successful replacement, some issues may arise. Here are common problems and how to troubleshoot them:
- Check Engine Light Returns:
- Possible Cause: Incorrect hose connections, faulty vent valve, or a leak in the system.
- Troubleshooting Steps: Double-check all hose connections, test the vent valve with a multimeter, and use a smoke machine to check for leaks.
- Fuel Odor Persists:
- Possible Cause: Leak in the fuel lines or a loose fuel cap.
- Troubleshooting Steps: Inspect fuel lines for leaks and ensure the fuel cap is properly tightened.
- Poor Fuel Economy Continues:
- Possible Cause: Faulty oxygen sensor or other engine-related issues.
- Troubleshooting Steps: Check the oxygen sensor and other engine components using an OBD-II scanner and perform necessary repairs.
5.5. When to Seek Professional Help
If you encounter persistent issues or are not comfortable performing the replacement yourself, seek professional help from a certified mechanic.
- Complex Diagnostic Procedures: If you need help with advanced diagnostics.
- Specialized Tools Required: If you lack the necessary tools.
- Persistent Problems: If issues persist after troubleshooting.
 Zoomed out diagram of location of evap emission control canister
6. Advanced EVAP System Diagnostics with DTS-Monaco
6.1. Introduction to DTS-Monaco Software
DTS-Monaco is a powerful diagnostic and car coding software widely used by automotive technicians for advanced vehicle diagnostics and reprogramming. It offers comprehensive access to vehicle systems, including the EVAP system, enabling detailed analysis and precise troubleshooting.
6.2. Setting Up DTS-Monaco for EVAP System Diagnostics
To use DTS-Monaco for EVAP system diagnostics, follow these steps:
- Install DTS-Monaco Software: Install the DTS-Monaco software on your computer. Ensure you have the necessary licenses and updates.
- Connect the Interface: Connect the DTS-Monaco interface to your vehicle’s OBD-II port and your computer.
- Select the Vehicle Model: In the DTS-Monaco software, select the correct vehicle make, model, and year.
- Access EVAP System Diagnostics: Navigate to the EVAP system diagnostics section in the software.
6.3. Real-Time Data Monitoring
DTS-Monaco allows you to monitor real-time data from the EVAP system sensors, providing valuable insights into its operation.
- Pressure Sensors: Monitor the pressure readings from the fuel tank and EVAP canister.
- Purge Valve: Observe the duty cycle and activation status of the purge valve.
- Vent Valve: Check the open or closed status of the vent valve.
- Fuel Tank Level: Monitor the fuel tank level to ensure proper readings.
6.4. Actuator Tests
Performing actuator tests with DTS-Monaco can help you verify the functionality of the EVAP system components.
- Purge Valve Test: Activate the purge valve to check its response and ensure it opens and closes correctly.
- Vent Valve Test: Activate the vent valve to verify it opens and closes as commanded.
- Leak Test: Perform a system leak test to identify any leaks in the EVAP system.
6.5. Advanced Coding and Reprogramming
DTS-Monaco also allows you to perform advanced coding and reprogramming of the EVAP system control unit.
- Software Updates: Update the EVAP system control unit software to the latest version.
- Parameter Adjustments: Adjust system parameters to optimize performance and efficiency.
- Adaptations: Perform adaptations to ensure the EVAP system is correctly calibrated after replacing components.
6.6. Benefits of Using DTS-Monaco for EVAP Diagnostics
Using DTS-Monaco for EVAP system diagnostics offers several benefits:
- Comprehensive Data Access: Access detailed data and parameters that are not available with standard OBD-II scanners.
- Precise Troubleshooting: Pinpoint the exact cause of EVAP system issues with advanced diagnostic routines.
- Efficient Repairs: Perform repairs more efficiently with accurate and reliable diagnostic information.
- Enhanced Vehicle Performance: Optimize EVAP system performance with coding and reprogramming capabilities.
6.7. Resources for Learning DTS-Monaco
To master DTS-Monaco, consider these resources:
- DTS-MONACO.EDU.VN: Offers training courses and resources.
- Online Forums: Engage with other users.
- User Manuals: Consult the official DTS-Monaco user manuals for detailed instructions.
 Round evap emissions control canister electrical harness being removed
7. Maintaining Your Vehicle’s EVAP System
7.1. Regular Inspections
Regular inspections are crucial for maintaining the health of your vehicle’s EVAP system. By catching minor issues early, you can prevent them from escalating into major problems that could lead to costly repairs.
- Visual Inspection: Periodically check the EVAP canister, hoses, and connections for any signs of damage, such as cracks, leaks, or corrosion.
- Hose Condition: Ensure that all hoses are securely connected and in good condition. Replace any hoses that appear worn or brittle.
- Fuel Cap: Check the fuel cap to ensure it is properly tightened and in good condition. A loose or damaged fuel cap can cause EVAP system leaks.
7.2. Preventing Common EVAP System Problems
Several factors can contribute to EVAP system problems. By taking preventive measures, you can minimize the risk of issues.
- Use High-Quality Fuel: Using high-quality fuel can help prevent contaminants from entering the EVAP system and causing clogs or other problems.
- Avoid Overfilling the Fuel Tank: Overfilling the fuel tank can saturate the EVAP canister with fuel, reducing its efficiency and potentially causing damage.
- Regular Maintenance: Follow the manufacturer’s recommended maintenance schedule for your vehicle, including EVAP system checks and maintenance.
7.3. The Role of Fuel Additives
Fuel additives can play a role in maintaining the EVAP system by helping to keep fuel injectors clean and preventing the buildup of deposits that can affect engine performance and emissions.
- Fuel Injector Cleaners: Use fuel injector cleaners periodically to remove deposits from fuel injectors and maintain optimal fuel flow.
- Fuel Stabilizers: If you plan to store your vehicle for an extended period, use a fuel stabilizer to prevent fuel degradation and buildup of deposits in the EVAP system.
7.4. Professional EVAP System Cleaning Services
In some cases, professional EVAP system cleaning services may be necessary to remove stubborn deposits and restore the system to optimal performance.
- EVAP System Flush: A professional EVAP system flush can help remove contaminants and deposits from the canister, hoses, and valves.
- Component Cleaning: Individual components, such as the purge valve and vent valve, can be cleaned to remove buildup and ensure proper operation.
7.5. Long-Term Benefits of a Well-Maintained EVAP System
Maintaining your vehicle’s EVAP system offers numerous long-term benefits.
- Reduced Emissions: A well-maintained EVAP system helps reduce harmful emissions, contributing to cleaner air and a healthier environment.
- Improved Fuel Efficiency: A properly functioning EVAP system helps optimize fuel efficiency, saving you money on fuel costs.
- Prevention of Costly Repairs: By catching and addressing minor issues early, you can prevent them from escalating into major problems that could lead to costly repairs.
- Extended Vehicle Lifespan: A well-maintained EVAP system helps ensure the long-term health and reliability of your vehicle, extending its lifespan.
 Wrench being used to remove mounting bolts
8. Car Coding and EVAP System Optimization
8.1. What is Car Coding?
Car coding involves modifying a vehicle’s software to enable or disable certain features, adjust performance parameters, or customize vehicle behavior. This can be particularly useful for optimizing the EVAP system.
8.2. How Car Coding Can Improve EVAP System Performance
Car coding can be used to:
- Adjust Purge Valve Settings: Fine-tune the purge valve operation to optimize vapor flow and reduce emissions.
- Modify Vent Valve Parameters: Adjust the vent valve settings to ensure proper venting and prevent pressure buildup.
- Enable Advanced Diagnostic Features: Unlock advanced diagnostic features in the vehicle’s computer to monitor EVAP system performance more closely.
- Optimize Fuel Efficiency: Improve fuel efficiency by optimizing the EVAP system’s vapor recovery process.
8.3. Using DTS-Monaco for Car Coding
DTS-Monaco is a powerful tool for car coding, offering comprehensive access to vehicle control units and allowing you to modify software parameters.
- Connect to the Vehicle: Connect the DTS-Monaco interface to your vehicle’s OBD-II port and your computer.
- Select the Control Unit: In the DTS-Monaco software, select the control unit related to the EVAP system.
- Access Coding Options: Navigate to the coding options section in the software.
- Modify Parameters: Modify the desired parameters according to your specific needs and goals.
- Apply Changes: Apply the changes and verify that they are correctly implemented.
8.4. Safety Precautions When Car Coding
Car coding can be risky if not performed correctly. Follow these safety precautions:
- Back Up Original Settings: Always back up the original settings before making any changes.
- Use Reliable Software: Use reliable and well-tested car coding software, such as DTS-Monaco.
- Follow Instructions Carefully: Follow the software instructions carefully and double-check all settings before applying changes.
- Seek Professional Help: If you are not comfortable performing car coding yourself, seek professional help from a qualified technician.
8.5. Benefits of Car Coding for EVAP System Optimization
Car coding offers several benefits for EVAP system optimization.
- Improved Performance: Optimize the EVAP system for improved performance and efficiency.
- Customization: Customize the EVAP system to meet your specific needs and preferences.
- Advanced Diagnostics: Unlock advanced diagnostic features for more comprehensive monitoring.
- Fuel Efficiency: Improve fuel efficiency by optimizing the vapor recovery process.
DTS-MONACO.EDU.VN offers comprehensive training and support for using DTS-Monaco for car coding and EVAP system optimization. Contact us today to learn more. Address: 275 N Harrison St, Chandler, AZ 85225, United States. Whatsapp: +1 (641) 206-8880. Website: DTS-MONACO.EDU.VN.
9. Common Mistakes to Avoid During EVAP Canister Replacement
9.1. Incorrect Hose Connections
One of the most common mistakes during EVAP canister replacement is incorrectly connecting the hoses.
- Problem: Connecting the hoses to the wrong ports can cause EVAP system malfunctions, leading to check engine lights and poor performance.
- Solution: Always label the hoses before disconnecting them and refer to the vehicle’s service manual or a diagram to ensure correct reinstallation.
9.2. Damaging Electrical Connectors
Electrical connectors can be fragile, and mishandling them can cause damage.
- Problem: Damaged electrical connectors can result in poor connections or complete loss of electrical function, leading to EVAP system failures.
- Solution: Use care when disconnecting electrical connectors and avoid pulling on the wires. Use a small screwdriver to gently release any retaining clips.
9.3. Over-Tightening Bolts
Over-tightening bolts can damage the EVAP canister or its mounting brackets.
- Problem: Over-tightening can strip the threads on the bolts or crack the plastic components of the EVAP canister.
- Solution: Use a torque wrench to tighten the bolts to the manufacturer’s specified torque. If you don’t have a torque wrench, tighten the bolts snugly but not excessively.
9.4. Neglecting to Replace Worn Hoses
Worn or cracked hoses can cause leaks in the EVAP system.
- Problem: Leaks can lead to check engine lights, poor fuel economy, and failed emissions tests.
- Solution: Inspect the hoses for signs of wear, such as cracks or brittleness, and replace them as needed.
9.5. Forgetting to Clear Diagnostic Trouble Codes (DTCs)
Forgetting to clear the DTCs after replacing the EVAP canister can cause confusion.
- Problem: The check engine light may remain on even after the replacement, leading you to believe that there is still a problem.
- Solution: Use an OBD-II scanner to clear the DTCs after replacing the EVAP canister.
9.6. Ignoring Safety Precautions
Ignoring safety precautions can lead to injuries or damage to the vehicle.
- Problem: Failing to disconnect the battery, using jack stands, or wearing safety glasses can result in electrical shocks, injuries from falling vehicles, or eye damage.
- Solution: Always follow safety precautions, such as disconnecting the battery, using jack stands, wearing safety glasses and gloves, and working in a well-ventilated area.
9.7. Using Low-Quality Replacement Parts
Using low-quality replacement parts can result in premature failure and other problems.
- Problem: Low-quality EVAP canisters may not meet the vehicle’s specifications and can fail quickly, leading to repeat repairs.
- Solution: Use high-quality replacement parts from reputable brands or OEM parts to ensure proper fit and function.
9.8. Not Consulting the Vehicle’s Service Manual
Failing to consult the vehicle’s service manual can lead to mistakes and difficulties during the replacement process.
- Problem: The service manual provides detailed instructions and diagrams that are specific to your vehicle, which can help you avoid mistakes and complete the replacement correctly.
- Solution: Consult the vehicle’s service manual for detailed instructions and diagrams before starting the EVAP canister replacement.
 Battery being connected to a car battery
10. FAQs About EVAP Canister Replacement
10.1. How long does an EVAP canister last?
The lifespan of an EVAP canister varies depending on driving conditions and maintenance, but it typically lasts between 100,000 and 150,000 miles.
10.2. Can I drive with a bad EVAP canister?
While you can drive with a bad EVAP canister, it’s not recommended. It can lead to reduced fuel efficiency, a check engine light, and potential failure during emissions testing.
10.3. How much does it cost to replace an EVAP canister?
The cost to replace an EVAP canister typically ranges from $180 to $580, including parts and labor.
10.4. Can a bad gas cap cause EVAP problems?
Yes, a loose or damaged gas cap can cause EVAP system leaks, leading to a check engine light and other issues.
10.5. Is it difficult to replace an EVAP canister myself?
Replacing an EVAP canister is a moderately difficult task that can be done by experienced DIYers. However, it requires some mechanical knowledge, the right tools, and adherence to safety precautions.
10.6. What are the symptoms of a clogged EVAP canister?
Symptoms of a clogged EVAP canister include a check engine light, fuel odor, poor fuel economy, and difficulty starting the engine.
10.7. How can I test my EVAP system?
You can test your EVAP system using an OBD-II scanner to check for error codes, a smoke machine to detect leaks, or a multimeter to test the electrical components.
10.8. What is the purpose of the EVAP vent valve?
The EVAP vent valve allows fresh air to enter the EVAP canister when the purge valve is open, facilitating the vapor recovery process.
10.9. Can car coding help optimize my EVAP system?
Yes, car coding can be used to adjust EVAP system parameters, enable advanced diagnostic features, and optimize fuel efficiency.
10.10. Where can I learn more about car coding and EVAP system diagnostics?
DTS-MONACO.EDU.VN offers comprehensive training courses and resources for car coding and EVAP system diagnostics. Contact us today to learn more.
Ready to take control of your vehicle’s EVAP system? Visit DTS-MONACO.EDU.VN to explore our advanced diagnostic tools, comprehensive training courses, and expert car coding services. Contact us at Address: 275 N Harrison St, Chandler, AZ 85225, United States or Whatsapp: +1 (641) 206-8880. Unlock the full potential of your vehicle today.