C4 vs C6: Which interface’s drivers are easier to install and configure is a common question in the automotive diagnostics and car coding world, and the answer often depends on the specific tools and software being used. Navigating the complexities of automotive interfaces can be daunting, but at DTS-MONACO.EDU.VN, we’re committed to providing you with the knowledge and resources you need to succeed. By exploring the nuances of C4 and C6 interfaces, along with the role of the Bosch suite, we aim to simplify the installation and configuration process, empowering you with essential car coding skills and in-depth diagnostic capabilities, and offering streamlined driver management.
Contents
- 1. What is the C4 Interface?
- 1.1. C4 Interface: An Overview
- 1.2. Key Features of the C4 Interface
- 1.3. Why is the C4 Interface Essential?
- 2. What is the C6 Interface?
- 2.1. C6 Interface: An Overview
- 2.2. Key Features of the C6 Interface
- 2.3. The Advantages of the C6 Interface
- 3. Key Differences Between C4 and C6 Interfaces
- 3.1. Performance and Speed
- 3.2. Compatibility
- 3.3. Security Features
- 3.4. Diagnostic Capabilities
- 3.5. User Interface
- 3.6. Cost
- 4. Driver Installation and Configuration
- 4.1. C4 Interface Driver Installation
- 4.2. C6 Interface Driver Installation
- 4.3. Bosch Suite and Driver Management
- 4.4. Step-by-Step Guide: Installing C4/C6 Drivers
- 4.5. Troubleshooting Common Driver Issues
- 4.6. Tips for Successful Driver Installation
- 5. Bosch Suite: A Streamlined Solution
- 5.1. Overview of the Bosch Suite
- 5.2. Key Features of the Bosch Suite
- 5.3. Benefits of Using the Bosch Suite
- 5.4. How the Bosch Suite Simplifies Driver Installation
- 5.5. Compatibility of the Bosch Suite with C4 and C6 Interfaces
- 6. User Experiences and Testimonials
- 6.1. Technician A: C4 Interface Experience
- 6.2. Technician B: C6 Interface Experience
- 6.3. Automotive Shop Owner: Impact on Business
- 6.4. Expert Opinions on Driver Installation Differences
- 7. Troubleshooting Tips for Driver Issues
- 7.1. General Troubleshooting Steps
- 7.2. Common Driver Error Messages and Solutions
- 7.3. When to Seek Professional Help
- 8. The Role of DTS-MONACO.EDU.VN
- 8.1. Training and Educational Resources
- 8.2. Software and Tool Support
- 8.3. Community and Expert Assistance
- 8.4. How DTS-MONACO.EDU.VN Can Help With Your Interface Needs
- 8.5. Success Stories From DTS-MONACO.EDU.VN Alumni
- 9. The Future of Automotive Interfaces
- 9.1. Emerging Technologies in Automotive Diagnostics
- 9.2. Predictions for Future Interface Development
- 9.3. How to Stay Updated With the Latest Trends
- 10. Conclusion
- FAQ Section
- 1. What are the main differences between the C4 and C6 interfaces?
- 2. Which interface, C4 or C6, is easier to install and configure drivers for?
- 3. What is the Bosch suite and how does it help with driver management?
- 4. Are the C4 and C6 interfaces compatible with all Mercedes-Benz models?
- 5. What are some common issues encountered during driver installation and how can they be resolved?
- 6. What role does DTS-MONACO.EDU.VN play in helping technicians with their interface needs?
- 7. How can I stay updated with the latest trends and technologies in automotive diagnostics?
- 8. Is the C6 interface worth the higher cost compared to the C4?
- 9. Can the Bosch suite be used with both the C4 and C6 interfaces?
- 10. What emerging technologies are shaping the future of automotive diagnostics?
1. What is the C4 Interface?
The C4 interface is a diagnostic tool used extensively in the automotive industry for Mercedes-Benz vehicles.
1.1. C4 Interface: An Overview
The C4 interface serves as a critical link between a technician’s diagnostic computer and the vehicle’s electronic control units (ECUs). It enables comprehensive diagnostics, programming, and module coding, and supports older and newer Mercedes-Benz models.
1.2. Key Features of the C4 Interface
- Comprehensive Diagnostics: The C4 interface allows technicians to perform in-depth diagnostics, including reading and clearing diagnostic trouble codes (DTCs), accessing live data, and conducting various tests to identify issues within the vehicle’s systems.
- ECU Programming: It facilitates the programming of ECUs, allowing for software updates, recalibrations, and module replacements. This ensures that the vehicle’s electronic systems operate optimally.
- Module Coding: The C4 interface supports module coding, enabling the configuration and customization of individual modules to match the vehicle’s specifications and customer preferences.
- Compatibility: Designed to be compatible with a wide range of Mercedes-Benz models, the C4 interface can handle both older and newer vehicles, making it a versatile tool for automotive technicians.
- Wireless Connectivity: Many C4 interfaces offer wireless connectivity, providing greater flexibility and convenience for technicians working in the workshop.
1.3. Why is the C4 Interface Essential?
The C4 interface is essential because it provides the necessary tools for maintaining, repairing, and upgrading Mercedes-Benz vehicles. Without it, technicians would struggle to diagnose complex issues, perform necessary programming, and ensure that the vehicle’s electronic systems are functioning correctly.
2. What is the C6 Interface?
The C6 interface is the latest diagnostic tool for Mercedes-Benz vehicles, offering enhanced capabilities and compatibility.
2.1. C6 Interface: An Overview
The C6 interface represents the cutting edge of diagnostic technology for Mercedes-Benz. It builds upon the capabilities of its predecessors, offering faster data transfer rates, improved security features, and enhanced compatibility with the latest vehicle models.
2.2. Key Features of the C6 Interface
- High-Speed Data Transfer: The C6 interface boasts significantly faster data transfer rates compared to previous generations, enabling quicker diagnostics, programming, and module coding.
- Enhanced Security: With advanced security protocols, the C6 interface ensures secure communication between the diagnostic computer and the vehicle’s ECUs, protecting against unauthorized access and potential cyber threats.
- Broad Compatibility: The C6 interface is designed to be compatible with the latest Mercedes-Benz models, as well as many older vehicles, making it a future-proof investment for automotive technicians.
- Advanced Diagnostic Functions: It supports advanced diagnostic functions, including real-time monitoring of vehicle systems, advanced troubleshooting procedures, and detailed analysis of diagnostic data.
- User-Friendly Interface: The C6 interface features a user-friendly interface, making it easier for technicians to navigate and utilize its advanced features.
2.3. The Advantages of the C6 Interface
The C6 interface offers numerous advantages over older diagnostic tools, including faster performance, enhanced security, broader compatibility, and advanced diagnostic functions. It empowers technicians to diagnose and repair Mercedes-Benz vehicles more efficiently and effectively.
3. Key Differences Between C4 and C6 Interfaces
Understanding the key differences between the C4 and C6 interfaces is essential for selecting the right tool for your diagnostic needs.
3.1. Performance and Speed
The C6 interface offers significantly faster data transfer rates compared to the C4 interface. This means that diagnostic procedures, programming tasks, and module coding can be completed more quickly with the C6 interface, saving valuable time in the workshop.
3.2. Compatibility
While both interfaces support a wide range of Mercedes-Benz models, the C6 interface is specifically designed to be compatible with the latest vehicles. This makes it a more future-proof investment, ensuring that you can continue to service newer models as they are released.
3.3. Security Features
The C6 interface incorporates advanced security protocols to protect against unauthorized access and potential cyber threats. These enhanced security features provide peace of mind, knowing that your diagnostic procedures are secure.
3.4. Diagnostic Capabilities
The C6 interface supports advanced diagnostic functions, including real-time monitoring of vehicle systems and detailed analysis of diagnostic data. These enhanced capabilities enable technicians to perform more comprehensive diagnostics and troubleshooting.
3.5. User Interface
The C6 interface features a user-friendly interface, making it easier for technicians to navigate and utilize its advanced features. This can improve workflow efficiency and reduce the learning curve for new users.
3.6. Cost
The C6 interface typically comes at a higher cost compared to the C4 interface. However, the increased performance, enhanced security, and broader compatibility of the C6 interface may justify the investment for many automotive technicians.
4. Driver Installation and Configuration
The ease of driver installation and configuration can significantly impact the user experience with both C4 and C6 interfaces.
4.1. C4 Interface Driver Installation
Installing drivers for the C4 interface can sometimes be challenging, particularly if you are not familiar with the process. The installation typically involves:
- Locating the Correct Drivers: Finding the correct drivers for your specific C4 interface and operating system can be difficult.
- Compatibility Issues: Older drivers may not be compatible with newer operating systems, and vice versa, leading to installation errors and device conflicts.
- Manual Configuration: In some cases, manual configuration may be required to ensure that the drivers are properly installed and the interface is functioning correctly.
4.2. C6 Interface Driver Installation
The C6 interface generally offers a more streamlined driver installation process compared to the C4 interface. This is often due to:
- Plug-and-Play Compatibility: Many C6 interfaces offer plug-and-play compatibility, meaning that the drivers are automatically installed when the device is connected to the computer.
- Driver Updates: Driver updates are typically more readily available for the C6 interface, ensuring compatibility with the latest operating systems and software.
- Simplified Configuration: The configuration process for the C6 interface is often simplified, with user-friendly interfaces and intuitive settings.
4.3. Bosch Suite and Driver Management
The Bosch suite can play a significant role in simplifying driver management for both C4 and C6 interfaces. By providing a centralized platform for driver installation, updates, and configuration, the Bosch suite can streamline the entire process and reduce the risk of errors.
4.4. Step-by-Step Guide: Installing C4/C6 Drivers
Here’s a general guide to installing drivers for C4/C6 interfaces:
- Obtain the Driver: Typically, the driver comes with the purchase of the diagnostic tool. Ensure it’s compatible with your OS.
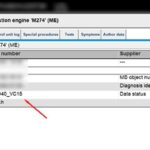
- Install Diagnostic Software: Install the primary diagnostic software like XENTRY or DAS, which often includes necessary drivers.
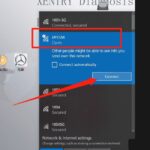
- Connect the Interface: Plug in the C4 or C6 interface to your computer.
- Follow Installation Prompts: If the driver doesn’t automatically install, manually run the driver setup from the downloaded files.
- Restart Your Computer: After installation, restart your computer to ensure all changes are applied.
- Verify Installation: Check the Device Manager to confirm that the interface is recognized and working without errors.
4.5. Troubleshooting Common Driver Issues
- Driver Not Found: Ensure the device is properly connected and try reinstalling the driver.
- Compatibility Errors: Check the system requirements of the driver and ensure they match your computer’s specifications.
- Device Conflicts: Resolve any device conflicts in the Device Manager by updating or reinstalling conflicting drivers.
4.6. Tips for Successful Driver Installation
- Read the Manual: Always refer to the product manual for specific installation instructions.
- Administrator Privileges: Run the driver installation with administrator privileges to avoid permission issues.
- Disable Antivirus: Temporarily disable antivirus software during installation to prevent interference.
5. Bosch Suite: A Streamlined Solution
The Bosch suite offers a streamlined solution for managing drivers and configuring automotive interfaces.
5.1. Overview of the Bosch Suite
The Bosch suite is a comprehensive software package that provides a centralized platform for managing drivers, configuring interfaces, and performing diagnostic procedures. It is designed to simplify the workflow for automotive technicians and improve efficiency in the workshop.
5.2. Key Features of the Bosch Suite
- Driver Management: The Bosch suite offers automated driver installation, updates, and configuration, ensuring that your interfaces are always running with the latest drivers.
- Interface Configuration: It provides intuitive tools for configuring interface settings, such as communication protocols, baud rates, and diagnostic parameters.
- Diagnostic Procedures: The Bosch suite includes a range of diagnostic procedures, including reading and clearing DTCs, accessing live data, and performing various tests to identify issues within the vehicle’s systems.
- Data Analysis: It offers advanced data analysis tools, allowing technicians to analyze diagnostic data, identify trends, and make informed decisions about repairs and maintenance.
- Remote Support: The Bosch suite facilitates remote support, enabling technicians to connect with experts and receive assistance with complex diagnostic procedures.
5.3. Benefits of Using the Bosch Suite
- Simplified Driver Management: The Bosch suite simplifies driver management, saving time and reducing the risk of errors.
- Improved Efficiency: By providing a centralized platform for managing drivers, configuring interfaces, and performing diagnostic procedures, the Bosch suite improves efficiency in the workshop.
- Enhanced Diagnostic Capabilities: It offers advanced diagnostic capabilities, enabling technicians to perform more comprehensive diagnostics and troubleshooting.
- Remote Support: The Bosch suite facilitates remote support, providing technicians with access to experts and assistance with complex diagnostic procedures.
- Cost Savings: By improving efficiency and reducing the risk of errors, the Bosch suite can lead to significant cost savings in the long run.
5.4. How the Bosch Suite Simplifies Driver Installation
The Bosch suite simplifies driver installation by providing automated driver installation, updates, and configuration. With just a few clicks, technicians can ensure that their interfaces are running with the latest drivers, without having to manually search for and install drivers.
5.5. Compatibility of the Bosch Suite with C4 and C6 Interfaces
The Bosch suite is compatible with both C4 and C6 interfaces, making it a versatile solution for managing drivers and configuring interfaces. Whether you are using a C4 interface or a C6 interface, the Bosch suite can streamline the process and improve efficiency.
6. User Experiences and Testimonials
Real-world experiences from technicians can provide valuable insights into the ease of use and effectiveness of C4 and C6 interfaces.
6.1. Technician A: C4 Interface Experience
“I’ve been using the C4 interface for several years, and while it’s a reliable tool, I have to admit that driver installation can be a pain. Finding the right drivers, dealing with compatibility issues, and manually configuring the settings can be time-consuming and frustrating. However, once the drivers are properly installed, the C4 interface works well for diagnosing and repairing Mercedes-Benz vehicles.”
6.2. Technician B: C6 Interface Experience
“I recently upgraded to the C6 interface, and I’m impressed with the improved performance and ease of use. The driver installation was a breeze, thanks to the plug-and-play compatibility and simplified configuration process. The C6 interface is also noticeably faster than the C4 interface, which has significantly improved my workflow efficiency.”
6.3. Automotive Shop Owner: Impact on Business
“Investing in the C6 interface has been a game-changer for my automotive shop. The faster performance, enhanced security, and broader compatibility of the C6 interface have enabled us to service more vehicles and provide better service to our customers. The simplified driver management provided by the Bosch suite has also saved us valuable time and reduced the risk of errors.”
6.4. Expert Opinions on Driver Installation Differences
Experts in automotive diagnostics often note that while C4 interfaces are reliable, their initial setup can be complex. C6 interfaces, especially when paired with updated software suites, generally offer a more straightforward installation experience, reducing downtime and setup costs.
7. Troubleshooting Tips for Driver Issues
Even with the best interfaces and software, driver issues can arise. Here are some troubleshooting tips to help you resolve common problems.
7.1. General Troubleshooting Steps
- Verify Compatibility: Ensure that the drivers you are installing are compatible with your operating system and interface.
- Check Device Connections: Make sure that the interface is properly connected to your computer and the vehicle.
- Restart Your Computer: Restart your computer to refresh the system and resolve any temporary issues.
- Update Drivers: Check for driver updates and install them to ensure that you have the latest versions.
- Reinstall Drivers: If all else fails, try reinstalling the drivers from scratch.
7.2. Common Driver Error Messages and Solutions
- “Device Not Recognized”: This error message typically indicates a problem with the USB connection or driver installation. Try using a different USB port, reinstalling the drivers, or updating the USB drivers.
- “Driver Installation Failed”: This error message can occur due to compatibility issues, corrupted driver files, or insufficient permissions. Make sure that you are running the installation with administrator privileges, disabling any antivirus software, and using compatible drivers.
- “Device Conflict”: This error message indicates that there is a conflict between two or more devices in your system. Try resolving the conflict by uninstalling the conflicting devices, updating their drivers, or reconfiguring their settings.
7.3. When to Seek Professional Help
If you have exhausted all troubleshooting steps and are still unable to resolve the driver issues, it may be time to seek professional help. Contact the manufacturer of the interface, a qualified automotive technician, or a computer support specialist for assistance.
8. The Role of DTS-MONACO.EDU.VN
DTS-MONACO.EDU.VN plays a crucial role in empowering automotive technicians with the knowledge and resources they need to succeed in the world of car coding and diagnostics.
8.1. Training and Educational Resources
DTS-MONACO.EDU.VN offers comprehensive training and educational resources on car coding, diagnostics, and the use of various automotive interfaces, including C4 and C6 interfaces. Our training programs are designed to provide technicians with the skills and knowledge they need to diagnose and repair vehicles efficiently and effectively.
8.2. Software and Tool Support
We provide support for a wide range of software and tools used in the automotive industry, including DTS-Monaco, XENTRY, DAS, and the Bosch suite. Our team of experts can help you with software installation, configuration, and troubleshooting, ensuring that you have the tools you need to get the job done.
8.3. Community and Expert Assistance
DTS-MONACO.EDU.VN fosters a vibrant community of automotive technicians, experts, and enthusiasts. Our community forum provides a platform for sharing knowledge, asking questions, and receiving assistance from experienced professionals.
8.4. How DTS-MONACO.EDU.VN Can Help With Your Interface Needs
- Consultation: We offer consultations to help you choose the right interface for your needs, taking into account your budget, the types of vehicles you service, and your diagnostic requirements.
- Training: Our training programs cover the installation, configuration, and use of various automotive interfaces, ensuring that you have the skills and knowledge you need to succeed.
- Support: We provide ongoing support for our customers, helping them with any issues they may encounter with their interfaces, software, or diagnostic procedures.
We can help ensure that the interfaces are running with the latest drivers. - Resources: Our website provides a wealth of resources, including articles, tutorials, and troubleshooting guides, to help you stay up-to-date on the latest automotive technologies and best practices.
8.5. Success Stories From DTS-MONACO.EDU.VN Alumni
- John, Automotive Technician: “Thanks to the training I received from DTS-MONACO.EDU.VN, I was able to successfully install and configure my C6 interface and start diagnosing and repairing Mercedes-Benz vehicles with confidence. The support I received from the community and experts was invaluable.”
- Maria, Shop Owner: “DTS-MONACO.EDU.VN helped me choose the right interface for my shop and provided me with the training and support I needed to get the most out of it. The streamlined driver management provided by the Bosch suite has saved us valuable time and reduced the risk of errors.”
9. The Future of Automotive Interfaces
The world of automotive interfaces is constantly evolving, with new technologies and features being developed all the time.
9.1. Emerging Technologies in Automotive Diagnostics
- Cloud-Based Diagnostics: Cloud-based diagnostics allows technicians to access diagnostic data and perform diagnostic procedures remotely, improving efficiency and reducing the need for expensive equipment.
- Artificial Intelligence (AI) Diagnostics: AI diagnostics uses machine learning algorithms to analyze diagnostic data, identify patterns, and predict potential issues before they occur.
- Augmented Reality (AR) Diagnostics: AR diagnostics overlays diagnostic information onto the technician’s view of the vehicle, providing real-time guidance and assistance.
- Wireless Communication Protocols: Newer interfaces are leveraging enhanced wireless protocols for faster, more reliable connections.
9.2. Predictions for Future Interface Development
- Increased Integration: Future interfaces are likely to be more integrated with vehicle systems, providing access to a wider range of data and functions.
- Improved Security: Security will continue to be a major focus, with interfaces incorporating advanced security protocols to protect against unauthorized access and cyber threats.
- Enhanced User Experience: Interfaces will become more user-friendly, with intuitive interfaces and simplified workflows.
- Standardization: There may be a move towards greater standardization of automotive interfaces, making it easier for technicians to work with different vehicle makes and models.
9.3. How to Stay Updated With the Latest Trends
- Follow Industry News: Stay informed about the latest developments in automotive diagnostics by following industry news sources, attending trade shows, and reading publications.
- Join Online Communities: Participate in online communities and forums to connect with other technicians, experts, and enthusiasts.
- Attend Training Programs: Take advantage of training programs offered by DTS-MONACO.EDU.VN and other organizations to learn about the latest technologies and best practices.
- Experiment With New Tools: Don’t be afraid to experiment with new tools and software to see how they can improve your workflow and diagnostic capabilities.
10. Conclusion
Choosing between the C4 and C6 interfaces depends on your specific needs and priorities. The C6 interface generally offers a more streamlined driver installation process, faster performance, enhanced security, and broader compatibility. However, the C4 interface remains a reliable and cost-effective option for many technicians. The Bosch suite can simplify driver management for both interfaces, and DTS-MONACO.EDU.VN provides the training, support, and resources you need to succeed in the world of car coding and diagnostics. Regardless of which interface you choose, staying updated with the latest technologies and best practices is essential for providing high-quality service to your customers. Explore our comprehensive car coding resources and unlock your full potential today.
Ready to enhance your skills in car coding and diagnostics? Visit DTS-MONACO.EDU.VN to explore our comprehensive training programs, software support, and expert community. Whether you’re just starting out or looking to advance your career, we have the resources you need to succeed. Contact us today to learn more about how we can help you achieve your goals.
- Address: 275 N Harrison St, Chandler, AZ 85225, United States
- WhatsApp: +1 (641) 206-8880
- Website: DTS-MONACO.EDU.VN
FAQ Section
1. What are the main differences between the C4 and C6 interfaces?
The C6 interface offers faster data transfer rates, enhanced security features, broader compatibility with newer Mercedes-Benz models, and generally easier driver installation compared to the C4 interface.
2. Which interface, C4 or C6, is easier to install and configure drivers for?
Generally, the C6 interface drivers are easier to install and configure, often featuring plug-and-play compatibility and simplified setup processes, but experiences can vary based on the specific software suite used.
3. What is the Bosch suite and how does it help with driver management?
The Bosch suite is a software package that centralizes driver management, interface configuration, and diagnostic procedures, simplifying the process for automotive technicians and reducing errors.
4. Are the C4 and C6 interfaces compatible with all Mercedes-Benz models?
While both interfaces support a wide range of Mercedes-Benz models, the C6 interface is specifically designed to be compatible with the latest vehicles, making it a more future-proof investment.
5. What are some common issues encountered during driver installation and how can they be resolved?
Common issues include driver not found, compatibility errors, and device conflicts. Solutions involve verifying compatibility, checking device connections, reinstalling drivers, and resolving device conflicts in the Device Manager.
6. What role does DTS-MONACO.EDU.VN play in helping technicians with their interface needs?
DTS-MONACO.EDU.VN offers training, software support, community assistance, and resources to help technicians with interface selection, installation, configuration, and troubleshooting.
7. How can I stay updated with the latest trends and technologies in automotive diagnostics?
Stay updated by following industry news, joining online communities, attending training programs, and experimenting with new tools and software.
8. Is the C6 interface worth the higher cost compared to the C4?
The higher cost of the C6 interface may be justified by its faster performance, enhanced security, broader compatibility, and simplified driver management, especially for those who service newer Mercedes-Benz models.
9. Can the Bosch suite be used with both the C4 and C6 interfaces?
Yes, the Bosch suite is compatible with both C4 and C6 interfaces, making it a versatile solution for driver management and interface configuration.
10. What emerging technologies are shaping the future of automotive diagnostics?
Emerging technologies include cloud-based diagnostics, artificial intelligence (AI) diagnostics, and augmented reality (AR) diagnostics, which promise to improve efficiency, accuracy, and accessibility in automotive diagnostics.
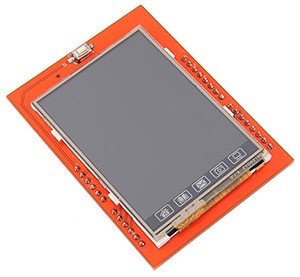 Arduino Uno R3 graphics accelerator shield
Alt: Low-cost QVGA TFT LCD shield widely available on eBay, commonly used with Arduino boards, showcasing a simple display setup.
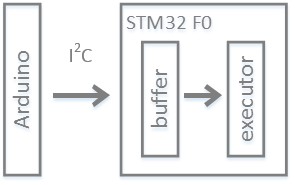 Block diagram of the Arduino graphics accelerator shield project, illustrating the connections between the STM32F0 MCU, SPI flash, and LCD
Alt: Block diagram outlining the graphics co-processor using STM32F0 MCU, incorporating SPI flash and an LCD, and highlighting data flow and communication protocols.
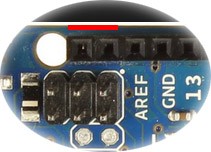 I2C pins on the Arduino Uno R3, indicating the location of the SCL and SDA pins below the red line
Alt: Detailed view of the I2C pins on the Arduino Uno R3 board, pinpointing the SCL and SDA pins used for communication, emphasizing the R3 model’s specific pin configuration.
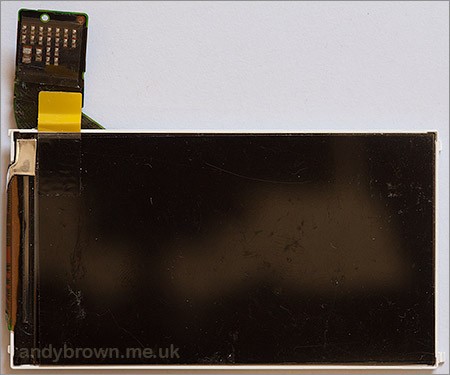 Front view of the Sony Ericsson Vivaz U5 LCD, known for its high resolution and wide viewing angle
Alt: Frontal shot of the Sony Ericsson Vivaz U5 LCD, demonstrating its clear display and compact design, crucial for high-resolution graphics projects.
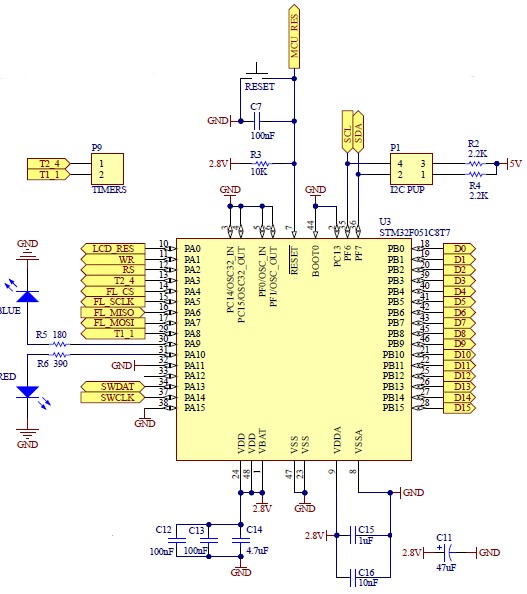
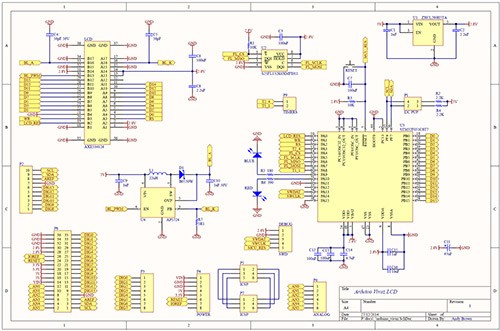 Schematic diagram of the Arduino graphics accelerator shield, detailing the electronic components and their connections
Alt: Full schematic of the graphics accelerator, detailing component interconnections, including power supply, MCU, and LCD interfaces, critical for replicating the hardware setup.
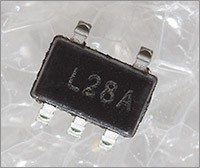 Close-up view of the ZXCL280H5TA LDO regulator, used for providing a stable 2.8V power supply
Alt: A close-up of the ZXCL280H5TA voltage regulator, essential for supplying stable 2.8V power, ensuring optimal performance of the electronic components.
 Schematic of the MCU section of the Arduino graphics accelerator shield, highlighting the connections to the STM32F051C8T7 microcontroller
Alt: Detailed schematic of the MCU segment, specifying connections to the STM32F051C8T7, essential for configuring data buses and control signals for display operations.
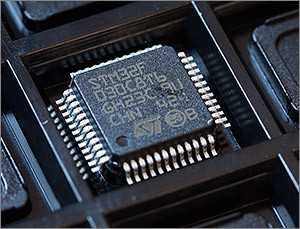 Image of the STM32F030C8T6 microcontroller, recommended as a cost-effective alternative to the STM32F051C8T7
Alt: Close-up of the STM32F030C8T6 microcontroller, suggesting it as a budget-friendly substitute for projects, ensuring core functionalities are maintained at a reduced cost.
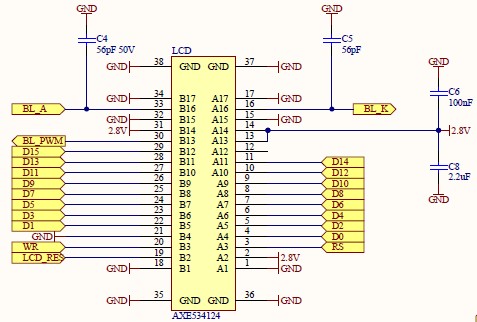 Schematic of the LCD connector section of the Arduino graphics accelerator shield, showing the pin assignments and connections
Alt: Schematic of the LCD connector, illustrating precise pin assignments and connections via the AXE534124 connector, crucial for accurate signal transmission to the display.
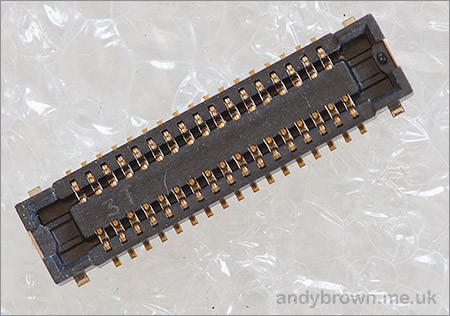 Image of the AXE534124 34-pin connector, used for connecting the LCD to the shield
Alt: Visual of the AXE534124 connector, highlighting its 34 pins and compact design, essential for establishing a reliable connection between the LCD and the development board.
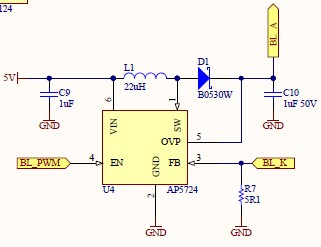 Schematic of the LCD backlight section of the Arduino graphics accelerator shield, detailing the AP5724 LED driver circuit
Alt: Schematic depicting the LCD backlight circuit, detailing components like the AP5724 LED driver, crucial for powering and controlling the backlight intensity of the display panel.
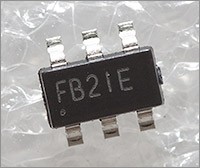 Image of the AP5724 LED driver, used for controlling the backlight of the LCD
Alt: Detailed shot of the AP5724 LED driver, a critical component for adjusting backlight brightness and ensuring optimal visibility on the LCD screen.
 Schematic of the flash memory section of the Arduino graphics accelerator shield, showing the connections to the Spansion S25 flash IC
Alt: Detailed schematic of the flash memory setup, displaying connections to the Spansion S25 flash IC, enabling external data storage and quick access for graphical content.
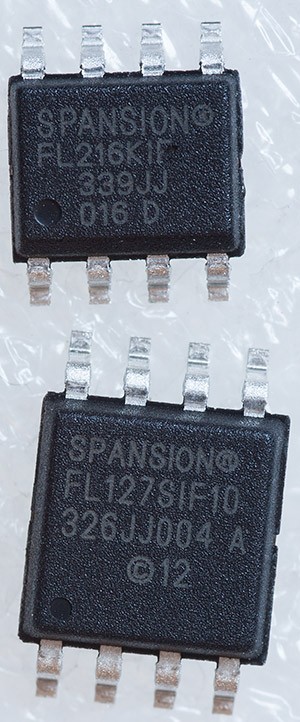 Image of the 16Mb and 128Mb flash ICs, illustrating the difference in size between the 150mil and 208mil SOIC-8 packages
Alt: A size comparison between 16Mb and 128Mb flash ICs, showcasing the difference in footprint between 150mil and 208mil packages for PCB design considerations.
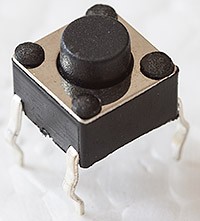 Image of the 6x6mm PCB button, commonly used for reset functionality
Alt: Close-up of a 6x6mm PCB button, typically used for reset functions, illustrating its compact size and black corner posts for secure mounting on circuit boards.
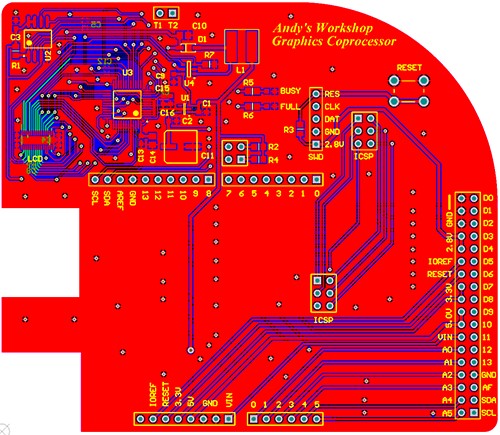 PCB layout of the Arduino graphics accelerator shield, highlighting the placement of components and traces
Alt: PCB layout view, illustrating component placement and trace routing on the Arduino shield, optimized for fitting onto the Arduino Uno and maximizing space utilization.
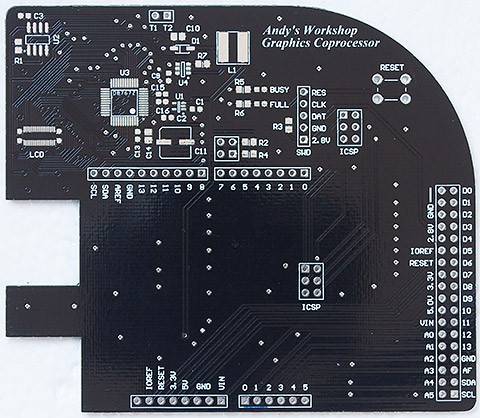 Front and back views of the assembled PCB for the Arduino graphics accelerator shield, showcasing the black solder mask
Alt: A high-resolution front view of the assembled PCB, highlighting component placement and soldering quality under a black solder mask, showcasing completed electronic assembly.
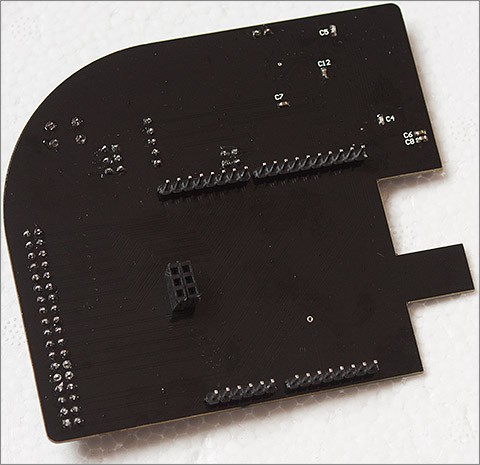
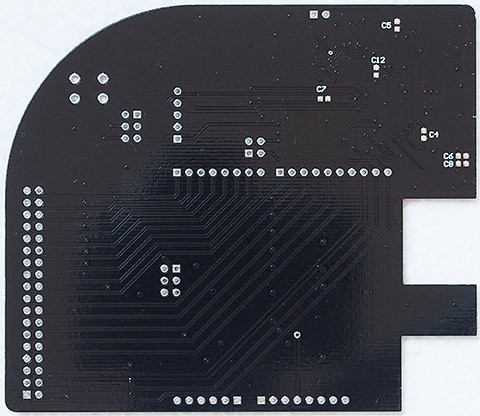 Back view of the assembled PCB for the Arduino graphics accelerator shield, showing the rear-mounted components and pin headers
Alt: High-resolution back view of the assembled PCB, revealing rear-mounted components and soldering, showcasing the underside construction and pin header integration.
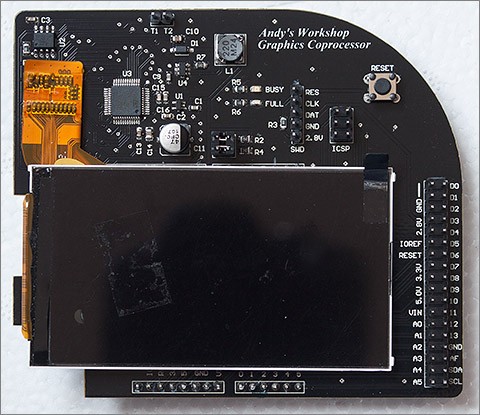
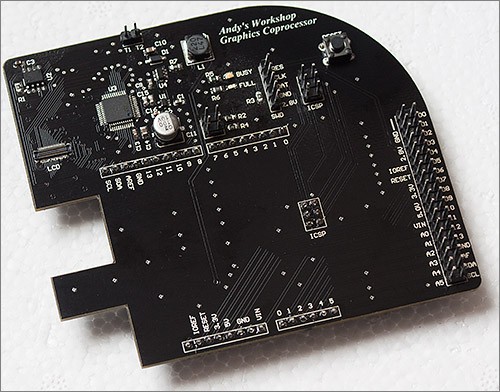 Assembled Arduino graphics accelerator shield with components, upward-facing pin headers, and space for the LCD panel
Alt: Close-up of the assembled graphics shield, featuring all surface-mounted components and upward-facing pin headers, prepped for LCD panel installation on the board.
 Rear view of the assembled Arduino graphics accelerator shield, showing capacitors and downward-facing pin headers
Alt: Assembled graphics shield’s back view, showing rear-mounted capacitors and downward-facing pin headers, essential for establishing electrical connections and supporting board stability.
 Arduino graphics accelerator shield with the LCD fitted, demonstrating the complete assembly
Alt: Fully assembled graphics shield with the LCD fitted, displaying the completed project with all components connected, showing how the display panel integrates into the overall design.
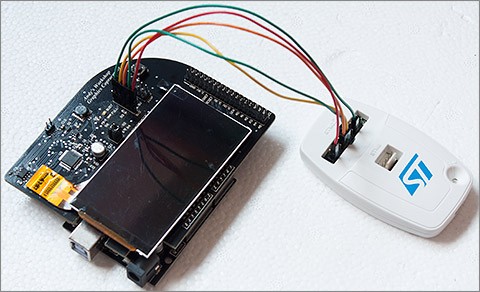 Arduino graphics accelerator board connected and wired up to the ST-Link/v2 debugging and programming dongle
Alt: The graphics shield wired with the ST-Link/v2 debugger, enabling firmware uploading and debugging directly from the board, streamlining the software development process.
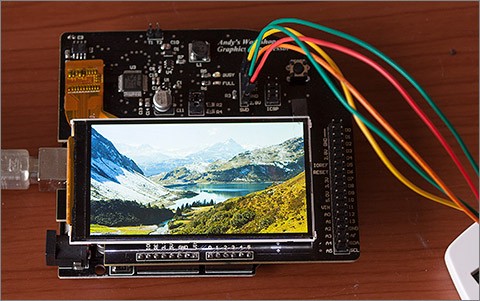 Arduino graphics accelerator board displaying a JPEG image stored on the onboard flash IC
Alt: Demonstration of JPEG image rendering on the assembled display, sourced from onboard flash memory, showcasing the board’s image processing and display capabilities.
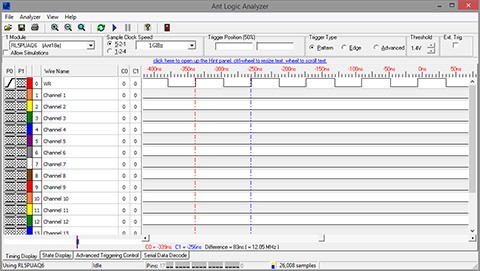 Logic analyzer screen grab showing the write cycle for the LCD
Alt: Logic analyzer capture of the LCD write cycle, measuring timing characteristics and performance metrics essential for display optimization and synchronization.
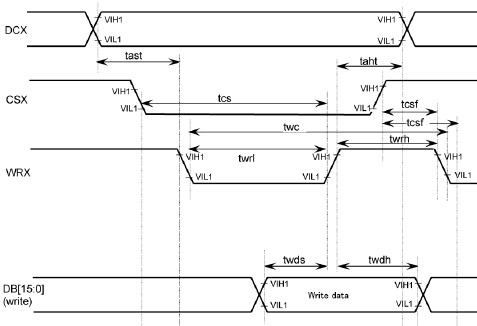 Waveform diagram of the R61523 LCD controller, indicating important timings such as twds, twdh, and twc
Alt: R61523 controller waveform, specifying critical timing parameters like twds, twdh, and twc, ensuring proper data setup, hold times, and overall display performance.
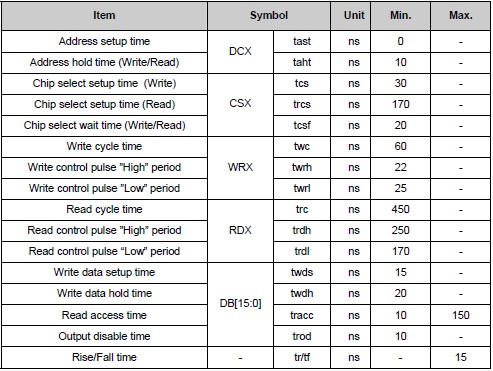 Table of limiting values for the R61523 LCD controller, including twds, twdh, and twc
Alt: Specifications table for the R61523 controller, detailing electrical characteristics and timing limits like twds, twdh, and twc, crucial for designing compliant display interfaces.
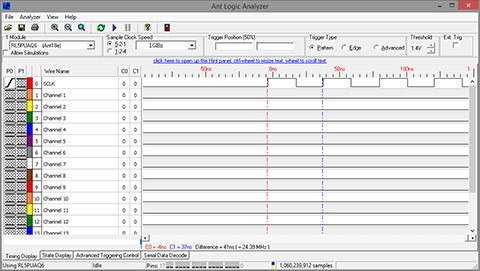
 Logic analyzer screen grab showing the write cycle for the LCD after overclocking the STM32
Alt: Overclocked LCD write cycle analyzed via logic analyzer, illustrating performance improvements in timing characteristics after increasing system clock frequency, for optimizing display refresh rates.
 Logic analyzer screen grab showing the SPI clock frequency
Alt: SPI clock signal capture using a logic analyzer, displaying frequency measurements for optimizing data transfer rates and ensuring compatibility within the system’s serial interface.
 Logic analyzer screen grab showing the SPI clock frequency after overclocking the STM32
Alt: Captured logic analyzer readout of the SPI clock, post-overclocking, illustrating boosted frequencies and increased data throughput within the system’s serial communication bus.
Arduino graphics accelerator board displaying a JPEG image stored on the onboard flash IC
Alt: Rendered test image on the graphics shield, validating display functionality and graphical output accuracy for assessing visual performance.
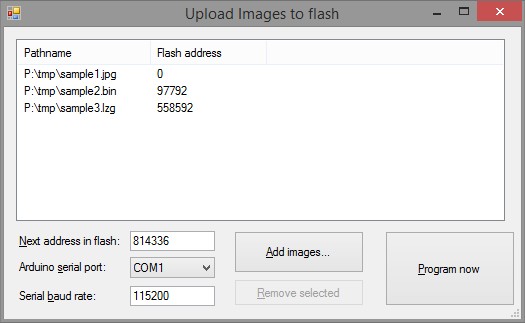 Screenshot of the UploadToFlash.exe PC application, used for programming bitmaps into the flash IC
Alt: Screenshot of UploadToFlash.exe, a PC utility for loading bitmap images to flash memory, showcasing its interface and image handling capabilities for custom display content.
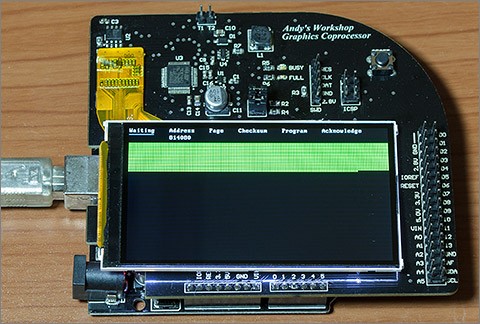 Arduino graphics accelerator board with the flash programmer after programming
Alt: Visual status of programmed flash memory on the graphics board, indicating green squares for successful writes, displaying successful custom content uploads and memory programming.