Can C4/C6 be used with virtual machine software like VMware or VirtualBox? Yes, it can be achieved by implementing proper USB/network passthrough, and DTS-MONACO.EDU.VN is here to guide you through the process. This allows automotive technicians to perform advanced car coding and diagnostics within a virtualized environment, leveraging the power of tools like DTS-Monaco. Embrace the future of automotive diagnostics with VM compatibility, remote access, and streamlined workflows.
Contents
- 1. Understanding C4/C6 and Virtual Machine Compatibility
- 1.1 What are C4/C6 Diagnostic Tools?
- 1.2 What is Virtual Machine Software?
- 1.3 Why Use C4/C6 with Virtual Machines?
- 2. Key Requirements for C4/C6 and Virtual Machine Integration
- 2.1 Hardware Requirements
- 2.2 Software Requirements
- 2.3 Understanding USB and Network Passthrough
- 3. Step-by-Step Guide to Setting Up C4/C6 with VMware
- 3.1 Installing VMware Workstation Pro
- 3.2 Creating a New Virtual Machine
- 3.3 Installing the Guest Operating System
- 3.4 Configuring USB Passthrough
- 3.5 Configuring Network Settings
- 4. Step-by-Step Guide to Setting Up C4/C6 with VirtualBox
- 4.1 Installing VirtualBox
- 4.2 Creating a New Virtual Machine
- 4.3 Installing the Guest Operating System
- 4.4 Configuring USB Passthrough
- 4.5 Configuring Network Settings
- 5. Troubleshooting Common Issues
- 5.1 USB Device Not Recognized
- 5.2 Network Connectivity Problems
- 5.3 Performance Issues
- 5.4 Software Compatibility Issues
- 6. Best Practices for Optimal Performance
- 6.1 Dedicate Resources
- 6.2 Use SSD Storage
- 6.3 Keep Host OS Clean
- 6.4 Regularly Update
- 6.5 Monitor Performance
- 7. Advantages of Using DTS-Monaco with C4/C6 in a Virtual Machine
- 7.1 Enhanced Car Coding Capabilities
- 7.2 Streamlined Workflow with DTS-Monaco
- 7.3 Training and Support from DTS-MONACO.EDU.VN
- 8. Ensuring Security and Stability
- 8.1 Isolating Diagnostic Environment
- 8.2 Regular Backups
- 8.3 Secure Network Configuration
- 8.4 Software Updates
- 9. The Future of Automotive Diagnostics with Virtualization
- 9.1 Remote Diagnostics and Telematics
- 9.2 Cloud-Based Diagnostic Platforms
- 9.3 Integration with AI and Machine Learning
- 10. Embrace the Power of Virtualization for Automotive Diagnostics
- 10.1 Revolutionize Your Automotive Diagnostics
- 10.2 Master Car Coding with DTS-Monaco
- 10.3 Elevate Your Skills with DTS-MONACO.EDU.VN
- Frequently Asked Questions (FAQ)
- 1. Can I use a C4/C6 diagnostic tool with VMware or VirtualBox?
- 2. What are the minimum hardware requirements for running a C4/C6 diagnostic tool in a virtual machine?
- 3. Which virtual machine software is recommended for C4/C6 diagnostic tools?
- 4. How do I configure USB passthrough in VMware or VirtualBox for my C4/C6 interface?
- 5. What network settings should I use for my virtual machine to communicate with the vehicle?
- 6. What is DTS-Monaco, and why is it useful for car coding?
- 7. How can DTS-MONACO.EDU.VN help me with DTS-Monaco and car coding?
- 8. Is it safe to run diagnostic software in a virtual machine?
- 9. How can I improve the performance of my virtual machine when using diagnostic tools?
- 10. What are the future trends in automotive diagnostics and virtualization?
1. Understanding C4/C6 and Virtual Machine Compatibility
1.1 What are C4/C6 Diagnostic Tools?
C4 and C6 are advanced diagnostic tools used in the automotive industry, primarily for Mercedes-Benz vehicles. These tools facilitate comprehensive vehicle diagnostics, programming, and coding, enabling technicians to perform tasks such as:
- Reading and clearing diagnostic trouble codes (DTCs)
- Programming electronic control units (ECUs)
- Performing software updates
- Activating and deactivating vehicle components
- Car coding to customize vehicle functions
These capabilities are crucial for modern automotive repair and maintenance, allowing technicians to address complex issues that require in-depth system knowledge and specialized software.
1.2 What is Virtual Machine Software?
Virtual machine (VM) software, such as VMware and VirtualBox, allows you to run multiple operating systems on a single physical machine. Each VM operates as an isolated environment, complete with its own virtualized hardware resources. This virtualization technology offers several benefits:
- Resource Optimization: Efficiently utilize hardware resources by running multiple applications and operating systems on a single machine.
- Isolation: Prevent software conflicts by isolating applications within their respective VMs.
- Flexibility: Easily create, clone, and manage virtual machines, facilitating rapid deployment and testing.
- Portability: Move VMs between different physical machines, ensuring consistent performance and configuration.
1.3 Why Use C4/C6 with Virtual Machines?
Combining C4/C6 diagnostic tools with virtual machine software provides numerous advantages for automotive technicians:
- Cost-Effectiveness: Reduce hardware costs by running diagnostic software on existing computers.
- Improved Efficiency: Streamline workflows by consolidating multiple diagnostic tools and software applications into a single environment.
- Enhanced Flexibility: Access diagnostic tools remotely, enabling technicians to perform diagnostics from any location.
- Risk Mitigation: Isolate diagnostic software to prevent conflicts with other applications or operating system issues.
By virtualizing the diagnostic environment, technicians can optimize their workflows, reduce costs, and enhance their overall efficiency, making it an attractive solution for modern automotive repair shops.
2. Key Requirements for C4/C6 and Virtual Machine Integration
2.1 Hardware Requirements
To ensure seamless integration and optimal performance, several hardware requirements must be met:
| Component | Specification |
|---|---|
| Processor (CPU) | Intel Core i5 or higher with at least 4 cores |
| Memory (RAM) | 16 GB or more |
| Storage | 256 GB SSD or larger (for the host OS and VM) |
| USB Ports | USB 2.0 or 3.0 ports for connecting the C4/C6 interface |
| Network Adapter | Gigabit Ethernet adapter for reliable network connectivity |
| Operating System | Windows 10 or 11 (64-bit) for the host OS |
| Virtualization Support | Ensure that the CPU supports virtualization features (Intel VT-x or AMD-V) and that they are enabled in the BIOS/UEFI settings. |
Sufficient processing power and memory are crucial for running the VM and diagnostic software smoothly. A fast SSD ensures quick boot times and application loading, while reliable USB and network connectivity are essential for the diagnostic interface to communicate effectively with the vehicle.
2.2 Software Requirements
In addition to the hardware, the following software components are necessary:
| Software | Version/Specification |
|---|---|
| Virtual Machine Software | VMware Workstation Pro (16 or later) or VirtualBox (6.0 or later) |
| Guest Operating System | Windows 7, 8.1, or 10 (64-bit) for the VM (matching the diagnostic software requirements) |
| Diagnostic Software | Mercedes-Benz diagnostic software (e.g., XENTRY/DAS) |
| USB Passthrough Drivers | Drivers required by the virtual machine software to properly pass through the USB device. |
| Network Configuration | Properly configured network settings to allow communication between the VM and the vehicle. |
The choice of VM software depends on personal preference and specific features needed. VMware Workstation Pro is a commercial solution with advanced features, while VirtualBox is a free and open-source alternative. The guest OS should be compatible with the diagnostic software, and proper drivers and network configurations are essential for seamless operation.
2.3 Understanding USB and Network Passthrough
USB and network passthrough are critical for enabling communication between the virtual machine and the physical diagnostic tools.
- USB Passthrough: Allows the virtual machine to directly access USB devices connected to the host computer. This is necessary for the C4/C6 interface to communicate with the diagnostic software running in the VM.
- Network Passthrough: Enables the virtual machine to access the network, allowing communication with the vehicle’s systems and external resources.
Proper configuration of these passthrough features ensures that the diagnostic software can interact with the vehicle as if it were running on a physical machine.
3. Step-by-Step Guide to Setting Up C4/C6 with VMware
3.1 Installing VMware Workstation Pro
-
Download VMware Workstation Pro:
- Visit the VMware website and download the latest version of VMware Workstation Pro.
- You may need to create an account or log in to access the download.
-
Run the Installer:
- Locate the downloaded installer file and run it.
- Follow the on-screen instructions to install VMware Workstation Pro.
-
License Activation:
- Enter your license key when prompted during the installation process.
- If you don’t have a license key, you can opt for a trial period to evaluate the software.
 Installing VMware Workstation Pro
3.2 Creating a New Virtual Machine
-
Open VMware Workstation Pro:
- Launch the VMware Workstation Pro application.
-
Create a New Virtual Machine:
- Click on “Create a New Virtual Machine” to start the New Virtual Machine Wizard.
-
Configuration Type:
- Select “Typical” for a straightforward setup or “Custom” for more advanced options.
- Click “Next.”
-
Guest Operating System Installation:
- Choose “I will install the operating system later” if you want to create the VM without immediately installing the OS.
- Click “Next.”
-
Select Guest Operating System:
- Select the guest operating system (e.g., Microsoft Windows) and the specific version (e.g., Windows 10 64-bit).
- Click “Next.”
-
Name and Location:
- Enter a name for your virtual machine (e.g., “Mercedes Diagnostic VM”).
- Choose a location to store the virtual machine files.
- Click “Next.”
-
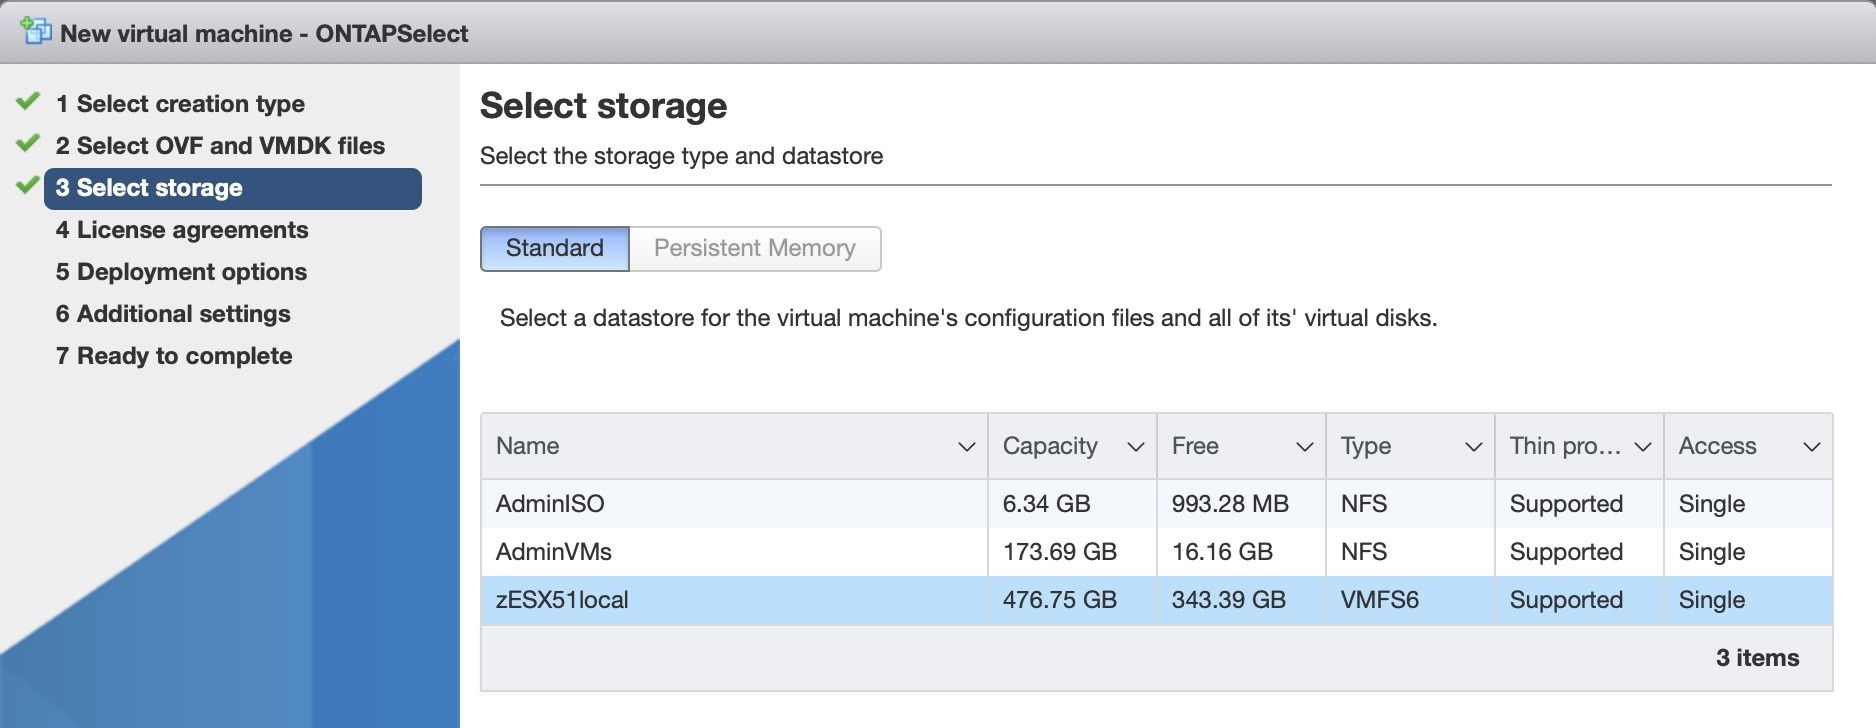
Disk Size:
- Specify the maximum disk size for the virtual machine (e.g., 200 GB).
- Select “Store virtual disk as a single file” for better performance.
- Click “Next.”
-
Ready to Create Virtual Machine:
- Review the settings and click “Finish” to create the virtual machine.
 Virtual Machine Settings
3.3 Installing the Guest Operating System
- Review the settings and click “Finish” to create the virtual machine.
-
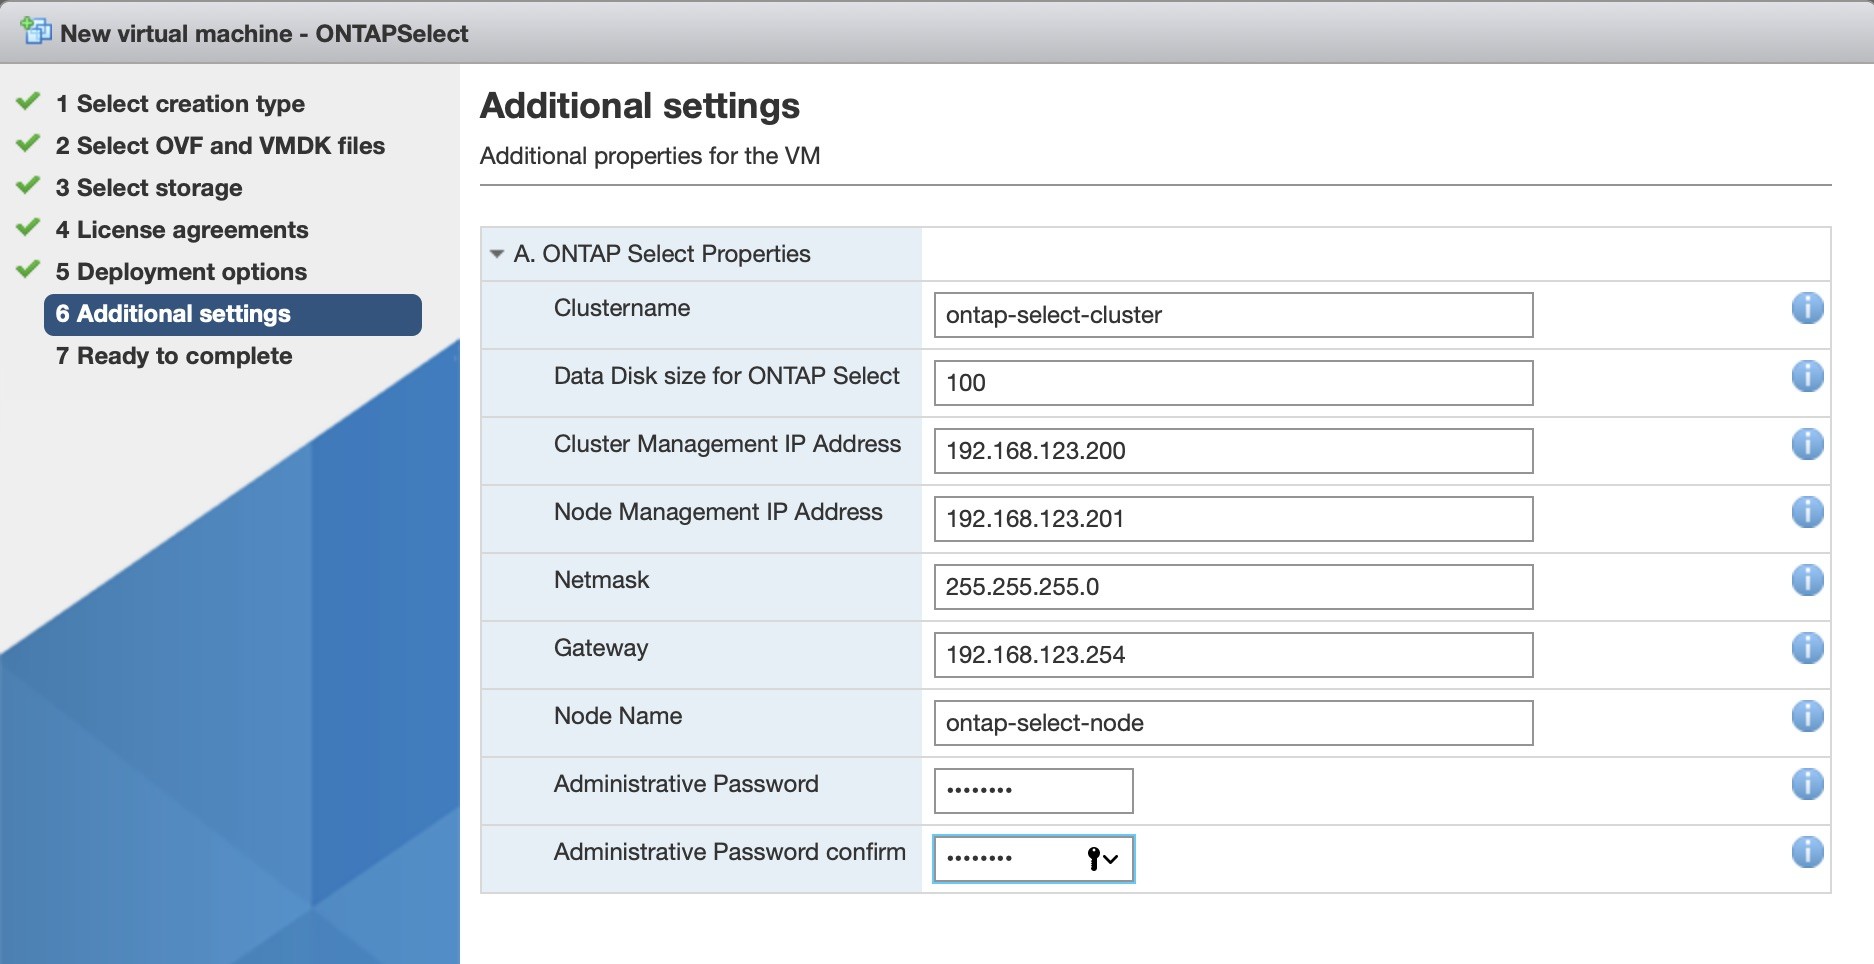
Edit Virtual Machine Settings:
- Select your newly created virtual machine from the VMware Workstation Pro library.
- Click “Edit virtual machine settings.”
-
Add ISO Image:
- Go to the “Hardware” tab and select “CD/DVD Drive.”
- Choose “Use ISO image file” and browse to your Windows ISO file.
- Click “OK.”
-
Power On the Virtual Machine:
- Click “Power on virtual machine.”
-
Install Windows:
- Follow the on-screen instructions to install Windows in the virtual machine.
- Provide the necessary information, such as language, time zone, and product key.
-
VMware Tools Installation:
- After installing Windows, install VMware Tools to improve performance and integration.
- Go to “VM” in the menu bar and select “Install VMware Tools.”
- Follow the on-screen instructions to complete the installation.
3.4 Configuring USB Passthrough
-
Connect the C4/C6 Interface:
- Plug the C4/C6 interface into a USB port on your host computer.
-
Edit Virtual Machine Settings:
- Select your virtual machine in VMware Workstation Pro and click “Edit virtual machine settings.”
-
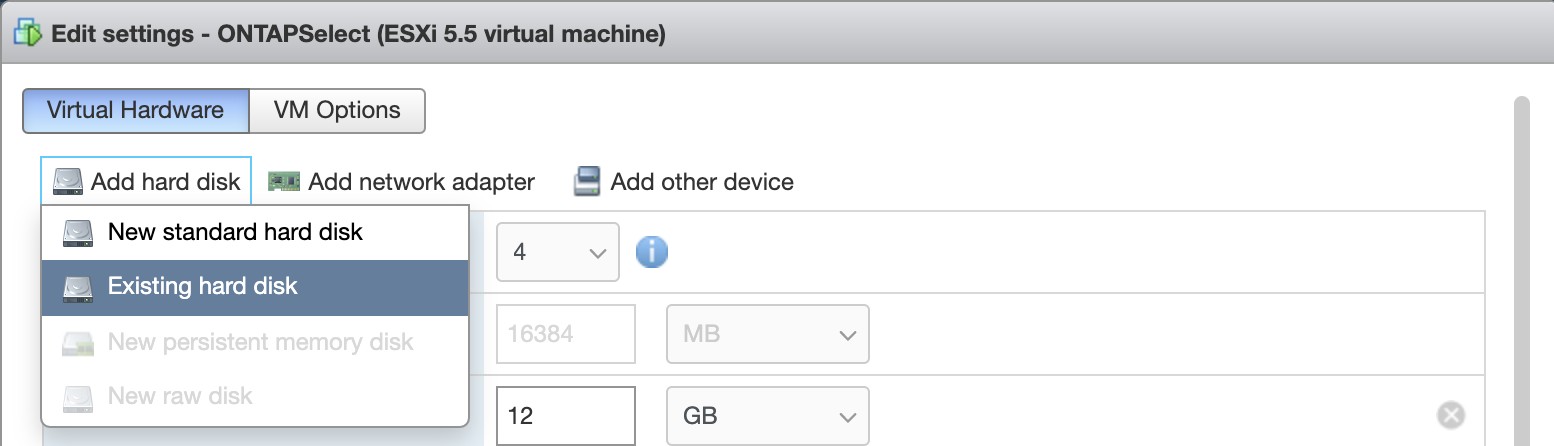
Add USB Controller:
- Go to the “Hardware” tab and click “Add.”
- Select “USB Controller” and click “Next.”
- Choose the appropriate USB compatibility (USB 2.0 or USB 3.0) based on your device.
- Click “Finish.”
-
Connect USB Device:
- In the VMware Workstation Pro menu, go to “VM” > “Removable Devices” and select your C4/C6 interface.
- Click “Connect (disconnect from host).”
-
Install Drivers:
- In the virtual machine, install the necessary drivers for the C4/C6 interface.
- Follow the manufacturer’s instructions for driver installation.
 USB Passthrough Configuration
3.5 Configuring Network Settings
-
Edit Virtual Machine Settings:
- Select your virtual machine in VMware Workstation Pro and click “Edit virtual machine settings.”
-
Network Adapter Settings:
- Go to the “Hardware” tab and select “Network Adapter.”
- Choose the appropriate network connection type:
- Bridged: Connects the VM directly to the physical network.
- NAT: Shares the host’s IP address with the VM.
- Host-only: Creates a private network between the host and the VM.
- For diagnostic purposes, “Bridged” is often the best option as it allows the VM to obtain its own IP address on the network.
- Click “OK.”
-
Configure IP Address:
- In the virtual machine, configure the IP address and other network settings to match your network configuration.
- Ensure that the VM can communicate with the vehicle and any necessary network resources.
4. Step-by-Step Guide to Setting Up C4/C6 with VirtualBox
4.1 Installing VirtualBox
-
Download VirtualBox:
- Visit the VirtualBox website and download the latest version for your host operating system.
-
Run the Installer:
- Locate the downloaded installer file and run it.
- Follow the on-screen instructions to install VirtualBox.
-
Install Extension Pack:
- Download the VirtualBox Extension Pack from the same download page.
- Install the Extension Pack by double-clicking the downloaded file and following the prompts. This pack provides additional features such as USB 2.0 and 3.0 support.
4.2 Creating a New Virtual Machine
-
Open VirtualBox:
- Launch the VirtualBox application.
-
Create a New Virtual Machine:
- Click on “New” to start the New Virtual Machine Wizard.
-
Name and Operating System:
- Enter a name for your virtual machine (e.g., “Mercedes Diagnostic VM”).
- Select the type (e.g., Microsoft Windows) and version (e.g., Windows 10 64-bit) of the guest operating system.
- Click “Next.”
-
Memory Size:
- Specify the amount of memory (RAM) to allocate to the virtual machine (e.g., 8 GB or more).
- Click “Next.”
-
Hard Disk:
- Choose “Create a virtual hard disk now.”
- Click “Create.”
-
Hard Disk File Type:
- Select “VDI (VirtualBox Disk Image).”
- Click “Next.”
-
Storage on Physical Hard Disk:
- Choose “Dynamically allocated” for efficient storage use.
- Click “Next.”
-
File Location and Size:
- Specify the file location and size for the virtual hard disk (e.g., 200 GB).
- Click “Create.”
4.3 Installing the Guest Operating System
-
Select Virtual Machine:
- Select your newly created virtual machine from the VirtualBox library.
-
Settings:
- Click “Settings.”
-
Storage:
- Go to the “Storage” tab.
- Under “Controller: IDE,” click the “Empty” CD/DVD drive.
- Click the CD/DVD icon on the right and choose “Choose a disk file.”
- Browse to your Windows ISO file and select it.
- Click “OK.”
-
Start the Virtual Machine:
- Click “Start” to power on the virtual machine.
-
Install Windows:
- Follow the on-screen instructions to install Windows in the virtual machine.
- Provide the necessary information, such as language, time zone, and product key.
-
Guest Additions Installation:
- After installing Windows, install VirtualBox Guest Additions to improve performance and integration.
- Go to “Devices” in the menu bar and select “Insert Guest Additions CD image.”
- In the virtual machine, open File Explorer and navigate to the CD drive.
- Run the VBoxWindowsAdditions.exe file and follow the on-screen instructions to complete the installation.
4.4 Configuring USB Passthrough
-
Connect the C4/C6 Interface:
- Plug the C4/C6 interface into a USB port on your host computer.
-
Settings:
- Select your virtual machine in VirtualBox and click “Settings.”
-
USB:
- Go to the “USB” tab.
- Enable the USB controller by selecting “Enable USB Controller.”
- Choose the appropriate USB controller type (USB 2.0 or USB 3.0) based on your device.
-
Add USB Device Filter:
- Click the “Add new USB filter” icon (a plus sign).
- Select your C4/C6 interface from the list.
- Click “OK.”
-
Start the Virtual Machine:
- Start the virtual machine. The C4/C6 interface should now be accessible from within the virtual machine.
-
Install Drivers:
- In the virtual machine, install the necessary drivers for the C4/C6 interface.
- Follow the manufacturer’s instructions for driver installation.
4.5 Configuring Network Settings
-
Settings:
- Select your virtual machine in VirtualBox and click “Settings.”
-
Network:
- Go to the “Network” tab.
- Adapter 1 should be enabled.
- Choose the appropriate network connection type:
- NAT: Shares the host’s IP address with the VM.
- Bridged Adapter: Connects the VM directly to the physical network.
- Host-only Adapter: Creates a private network between the host and the VM.
- For diagnostic purposes, “Bridged Adapter” is often the best option as it allows the VM to obtain its own IP address on the network.
- Select the appropriate network interface from the “Name” dropdown.
- Click “OK.”
-
Configure IP Address:
- In the virtual machine, configure the IP address and other network settings to match your network configuration.
- Ensure that the VM can communicate with the vehicle and any necessary network resources.
5. Troubleshooting Common Issues
5.1 USB Device Not Recognized
-
Issue: The C4/C6 interface is not recognized by the virtual machine.
-
Solution:
- Ensure that USB passthrough is correctly configured in the VM settings.
- Verify that the correct USB drivers are installed in the guest operating system.
- Try connecting the device to a different USB port on the host computer.
- Restart the virtual machine and the host computer.
- Check for any driver conflicts in the Device Manager of the guest operating system.
5.2 Network Connectivity Problems
-
Issue: The virtual machine cannot connect to the network or communicate with the vehicle.
-
Solution:
- Verify that the network adapter settings are correctly configured in the VM settings.
- Ensure that the guest operating system has a valid IP address and DNS settings.
- Check the firewall settings in the guest operating system to ensure that they are not blocking network traffic.
- Test network connectivity by pinging other devices on the network.
5.3 Performance Issues
-
Issue: The virtual machine is running slowly or experiencing performance issues.
-
Solution:
- Allocate more RAM and CPU resources to the virtual machine.
- Ensure that the host computer meets the minimum hardware requirements for running the VM.
- Close unnecessary applications on the host computer to free up resources.
- Defragment the virtual hard disk to improve performance.
- Use an SSD for the virtual machine’s storage to improve read and write speeds.
5.4 Software Compatibility Issues
-
Issue: The diagnostic software is not compatible with the guest operating system or virtual machine environment.
-
Solution:
- Ensure that the guest operating system meets the minimum requirements for the diagnostic software.
- Install any necessary updates or patches for the diagnostic software.
- Check the software vendor’s website for compatibility information and troubleshooting tips.
- Try running the software in compatibility mode.
6. Best Practices for Optimal Performance
6.1 Dedicate Resources
Allocate sufficient CPU cores and RAM to the virtual machine to ensure optimal performance. A general guideline is to dedicate at least half of the host’s CPU cores and RAM to the VM.
6.2 Use SSD Storage
Store the virtual machine’s disk image on an SSD to improve read and write speeds. SSDs provide significantly faster performance compared to traditional hard drives, resulting in quicker boot times and application loading.
6.3 Keep Host OS Clean
Minimize the number of applications running on the host operating system to free up resources for the virtual machine. Close any unnecessary programs and services to reduce CPU and memory usage.
6.4 Regularly Update
Keep the virtual machine software, guest operating system, and diagnostic software up to date with the latest patches and updates. Updates often include performance improvements, bug fixes, and security enhancements.
6.5 Monitor Performance
Use performance monitoring tools to track CPU usage, memory usage, and disk I/O in the virtual machine. Identify any bottlenecks and adjust resource allocation accordingly.
7. Advantages of Using DTS-Monaco with C4/C6 in a Virtual Machine
7.1 Enhanced Car Coding Capabilities
DTS-Monaco is a powerful diagnostic and car coding tool used extensively in the automotive industry, especially for Mercedes-Benz vehicles. When used with C4/C6 interfaces in a virtual machine, it offers numerous advantages:
- Advanced Diagnostics: DTS-Monaco allows in-depth diagnostics of vehicle systems, enabling technicians to identify and resolve complex issues.
- Customized Car Coding: Technicians can customize vehicle functions and parameters to meet specific customer requirements, such as enabling or disabling certain features, adjusting performance settings, and more.
- ECU Programming: DTS-Monaco facilitates the programming and flashing of electronic control units (ECUs), ensuring that vehicles are running the latest software versions.
7.2 Streamlined Workflow with DTS-Monaco
Using DTS-Monaco in a virtual machine can significantly streamline the diagnostic and coding workflow:
- Centralized Environment: All diagnostic tools and software are consolidated into a single virtual environment, reducing the need to switch between multiple computers or applications.
- Remote Access: Technicians can access DTS-Monaco and the C4/C6 interface remotely, enabling them to perform diagnostics and coding from any location with an internet connection.
- Consistent Configuration: The virtual machine environment ensures consistent configuration and performance, regardless of the host computer being used.
 Car coding in Virtual Machine
7.3 Training and Support from DTS-MONACO.EDU.VN
DTS-MONACO.EDU.VN offers comprehensive training and support for automotive technicians looking to master DTS-Monaco and car coding:
- Detailed Information: Access in-depth information about DTS-Monaco software and its car coding features.
- Step-by-Step Guidance: Get detailed guidance on using DTS-Monaco, from basic setup to advanced coding procedures.
- Specialized Training Courses: Participate in training courses that provide hands-on experience with DTS-Monaco and car coding techniques for various vehicle models.
- Expert Support: Receive expert support and assistance from experienced professionals who can help you troubleshoot issues and optimize your workflow.
By leveraging the resources available at DTS-MONACO.EDU.VN, technicians can enhance their skills and knowledge, enabling them to provide top-notch diagnostic and car coding services to their customers.
8. Ensuring Security and Stability
8.1 Isolating Diagnostic Environment
Running diagnostic software in a virtual machine provides an isolated environment that protects the host operating system from potential security threats. If the diagnostic software becomes infected with malware, the host system remains unaffected.
8.2 Regular Backups
Regularly back up the virtual machine to prevent data loss in case of hardware failure or software corruption. Store backups in a secure location and test them periodically to ensure that they can be restored successfully.
8.3 Secure Network Configuration
Configure the network settings of the virtual machine to minimize the risk of unauthorized access. Use a firewall to block unwanted traffic and implement strong passwords for all user accounts.
8.4 Software Updates
Keep the virtual machine software, guest operating system, and diagnostic software up to date with the latest security patches. Updates often include critical security fixes that address vulnerabilities and protect against malware.
9. The Future of Automotive Diagnostics with Virtualization
9.1 Remote Diagnostics and Telematics
Virtualization enables remote diagnostics, allowing technicians to diagnose and repair vehicles from any location. Combined with telematics data, technicians can proactively identify potential issues and perform preventative maintenance, reducing downtime and improving customer satisfaction.
9.2 Cloud-Based Diagnostic Platforms
Cloud-based diagnostic platforms leverage virtualization to provide scalable and accessible diagnostic solutions. Technicians can access diagnostic tools and data from any device with an internet connection, eliminating the need for expensive hardware and software installations.
9.3 Integration with AI and Machine Learning
Integrating AI and machine learning technologies with virtualized diagnostic environments can enhance diagnostic accuracy and efficiency. AI algorithms can analyze diagnostic data to identify patterns and predict potential failures, enabling technicians to perform targeted repairs and prevent costly breakdowns.
10. Embrace the Power of Virtualization for Automotive Diagnostics
10.1 Revolutionize Your Automotive Diagnostics
By integrating C4/C6 diagnostic tools with virtual machine software, you can revolutionize your automotive diagnostics workflow. This approach offers numerous benefits, including cost savings, improved efficiency, enhanced flexibility, and increased security.
10.2 Master Car Coding with DTS-Monaco
Unlock the full potential of car coding with DTS-Monaco. By mastering this powerful tool, you can customize vehicle functions, program ECUs, and perform advanced diagnostics, providing top-notch services to your customers.
10.3 Elevate Your Skills with DTS-MONACO.EDU.VN
Elevate your skills and knowledge with DTS-MONACO.EDU.VN. Access detailed information, step-by-step guidance, specialized training courses, and expert support to become a proficient DTS-Monaco user and car coding expert.
Ready to take your automotive diagnostics to the next level? Visit DTS-MONACO.EDU.VN today to explore our comprehensive training programs, software solutions, and expert support services.
Address: 275 N Harrison St, Chandler, AZ 85225, United States
WhatsApp: +1 (641) 206-8880
Website: DTS-MONACO.EDU.VN
Frequently Asked Questions (FAQ)
1. Can I use a C4/C6 diagnostic tool with VMware or VirtualBox?
Yes, C4/C6 diagnostic tools can be used with VMware or VirtualBox by configuring proper USB and network passthrough, allowing the virtual machine to communicate with the vehicle’s systems.
2. What are the minimum hardware requirements for running a C4/C6 diagnostic tool in a virtual machine?
Minimum hardware requirements include an Intel Core i5 processor with at least 4 cores, 16 GB of RAM, a 256 GB SSD, USB 2.0/3.0 ports, and a Gigabit Ethernet adapter.
3. Which virtual machine software is recommended for C4/C6 diagnostic tools?
Both VMware Workstation Pro and VirtualBox are suitable for running C4/C6 diagnostic tools, with VMware Workstation Pro offering more advanced features while VirtualBox is a free, open-source alternative.
4. How do I configure USB passthrough in VMware or VirtualBox for my C4/C6 interface?
In VMware, add a USB controller in the VM settings and connect the C4/C6 interface via “VM” > “Removable Devices”. In VirtualBox, enable the USB controller in the VM settings and add a new USB filter for the C4/C6 interface.
5. What network settings should I use for my virtual machine to communicate with the vehicle?
Using a “Bridged Adapter” network connection in both VMware and VirtualBox allows the VM to obtain its own IP address on the network, facilitating direct communication with the vehicle.
6. What is DTS-Monaco, and why is it useful for car coding?
DTS-Monaco is a powerful diagnostic and car coding tool that allows in-depth diagnostics, customized car coding, and ECU programming, making it essential for advanced automotive repairs and customizations.
7. How can DTS-MONACO.EDU.VN help me with DTS-Monaco and car coding?
DTS-MONACO.EDU.VN offers detailed information, step-by-step guidance, specialized training courses, and expert support to help automotive technicians master DTS-MONACO and car coding techniques.
8. Is it safe to run diagnostic software in a virtual machine?
Yes, running diagnostic software in a virtual machine provides an isolated environment that protects the host operating system from potential security threats and software conflicts.
9. How can I improve the performance of my virtual machine when using diagnostic tools?
To improve performance, allocate sufficient CPU cores and RAM to the VM, use an SSD for storage, keep the host OS clean, regularly update software, and monitor performance to identify and resolve bottlenecks.
10. What are the future trends in automotive diagnostics and virtualization?
Future trends include remote diagnostics and telematics, cloud-based diagnostic platforms, and the integration of AI and machine learning technologies to enhance diagnostic accuracy and efficiency.