DTS Monaco can diagnose DoIP (Diagnostics over Internet Protocol) network configuration issues, but its capabilities are limited, mostly connecting if configured correctly. To unlock the full potential of your vehicle’s diagnostics and coding, DTS-MONACO.EDU.VN provides comprehensive training and software solutions. Explore advanced features and troubleshooting techniques to master car coding and diagnostics, ensuring seamless connectivity and optimal performance, alongside other benefits such as car programming and ECU flashing.
Contents
- 1. Understanding DTS Monaco and DoIP Network Diagnostics
- 1.1. What is DTS Monaco?
- 1.2. Basics of DoIP Networks in Modern Vehicles
- 1.3. Can DTS Monaco Identify DoIP Configuration Problems?
- 1.4. Limitations of DTS Monaco in Diagnosing DoIP Issues
- 1.5. Alternative Tools for DoIP Network Troubleshooting
- 1.6. Verifying Basic Connectivity
- 1.7. Interpreting Connection Errors
- 1.8. Importance of Correct ECU Configuration
- 1.9. Common DoIP Configuration Mistakes
- 1.10. How to Prevent DoIP Configuration Issues
- 2. Step-by-Step Guide to Diagnosing Network Problems with DTS Monaco
- 2.1. Initial Setup and Connection
- 2.2. Verifying ECU Reachability
- 2.3. Identifying Communication Errors
- 2.4. Analyzing Diagnostic Trouble Codes (DTCs)
- 2.5. Checking ECU Configuration Settings
- 2.6. Performing Communication Tests
- 2.7. Utilizing Generic Jobs
- 2.8. Checking Firewall Status
- 2.9. Making Variant Coding Changes
- 2.10. Finalizing Variant Coding Changes
- 3. Maximizing DTS Monaco for Effective Vehicle Diagnostics
- 3.1. Mastering Workspace Configuration
- 3.2. Effectively Using Diagnostic Services
- 3.3. Leveraging ECU Flashing Capabilities
- 3.4. Using Variant Coding for Customization
- 3.5. Staying Updated with Software Versions
- 3.6. Understanding SMR-D Files
- 3.7. Defeating Firewalls
- 3.8. Ensuring Coding Changes are Permanent
- 4. Overcoming Common Challenges in DTS Monaco Diagnostics
- 4.1. Addressing Connectivity Problems
- 4.2. Resolving Software Errors
- 4.3. Managing Data File Issues
- 4.4. Overcoming Firewall Restrictions
- 4.5. Addressing ECU Communication Errors
- 4.6. Dealing with Protocol Incompatibilities
- 4.7. Getting Support from Online Communities
- 5. Advanced Techniques for DoIP Diagnostics with DTS Monaco
- 5.1. Using Scripts to Automate Diagnostic Tasks
1. Understanding DTS Monaco and DoIP Network Diagnostics
DTS Monaco is a powerful diagnostic and car coding software used extensively in the automotive industry. While it offers a range of functionalities, its ability to diagnose complex network issues, particularly those related to DoIP, has limitations. Let’s explore what DTS Monaco can and cannot do in this context.
1.1. What is DTS Monaco?
DTS Monaco (Diagnostic Tool Set for Monaco) is a software designed for advanced diagnostics, ECU flashing, and car coding in modern vehicles. It’s used by automotive technicians and engineers to communicate with a vehicle’s electronic control units (ECUs), read diagnostic trouble codes (DTCs), perform calibrations, and modify vehicle parameters. DTS Monaco allows in-depth analysis and customization of vehicle functions, making it an essential tool for complex automotive repairs and enhancements.
1.2. Basics of DoIP Networks in Modern Vehicles
DoIP (Diagnostics over Internet Protocol) is a communication protocol used in modern vehicles for diagnostics and ECU programming. It allows diagnostic tools to communicate with vehicle ECUs over a standard Ethernet network. DoIP is essential for handling the increasing data transfer demands of advanced automotive systems. Key aspects of DoIP networks include:
- High-Speed Communication: Enables faster data transfer rates compared to traditional diagnostic protocols like CAN (Controller Area Network).
- Remote Diagnostics: Supports remote vehicle diagnostics and ECU programming over the internet.
- Ethernet-Based: Utilizes standard Ethernet hardware and infrastructure, making it scalable and cost-effective.
- Security: Includes security mechanisms to protect against unauthorized access and cyber threats.
1.3. Can DTS Monaco Identify DoIP Configuration Problems?
Yes, DTS Monaco can assist in identifying DoIP configuration issues to some extent, but it has limitations. Here’s a breakdown:
- Basic Connectivity Checks: DTS Monaco can verify if the vehicle’s ECUs are reachable over the DoIP network. It can detect if an ECU is online and responding to diagnostic requests.
- Address Resolution: DTS Monaco can check if the DoIP addresses are correctly configured and if the diagnostic tool can resolve the vehicle’s IP addresses.
- Limited Diagnostic Information: DTS Monaco can display some diagnostic information related to DoIP communication errors, such as timeout errors or failed connection attempts.
1.4. Limitations of DTS Monaco in Diagnosing DoIP Issues
While DTS Monaco offers some capabilities for DoIP diagnostics, it’s essential to recognize its limitations:
- Network Layer Issues: DTS Monaco is not designed to diagnose low-level network issues, such as Ethernet cable problems, switch configuration errors, or IP address conflicts.
- Firewall and Security Settings: DTS Monaco may not be able to identify if firewalls or security settings are blocking DoIP communication.
- Detailed Network Analysis: DTS Monaco does not provide detailed network analysis tools like packet sniffers or network analyzers, which are necessary for troubleshooting complex DoIP issues.
- Dependency on Correct Configuration: DTS Monaco primarily connects if the DoIP network is already configured correctly. It may struggle to establish a connection if there are significant configuration problems.
1.5. Alternative Tools for DoIP Network Troubleshooting
For comprehensive DoIP network troubleshooting, consider using these specialized tools:
- Network Analyzers (e.g., Wireshark): Capture and analyze network traffic to identify communication issues, protocol errors, and network bottlenecks.
- Ethernet Diagnostic Tools: Test Ethernet cables, switches, and network interfaces to ensure proper connectivity and performance.
- DoIP Simulation Tools: Simulate vehicle ECUs and diagnostic tools to test DoIP communication and identify configuration problems.
- Vehicle Network Diagnostic Tools: Provide advanced diagnostic capabilities for vehicle networks, including DoIP, CAN, and other communication protocols.
1.6. Verifying Basic Connectivity
To verify basic DoIP connectivity using DTS Monaco, follow these steps:
- Connect: Connect the diagnostic interface to the vehicle’s diagnostic port and the computer running DTS Monaco.
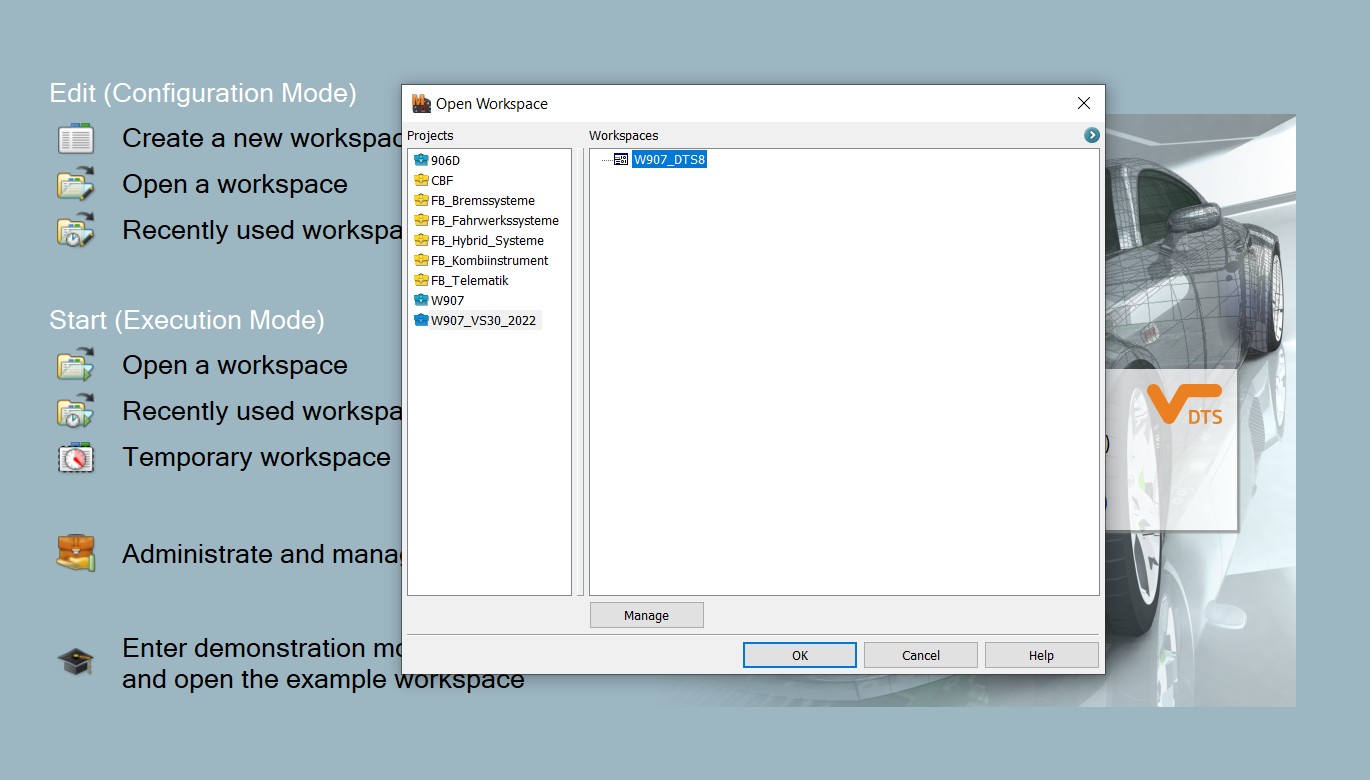
- Open Workspace: Launch DTS Monaco and open the appropriate workspace for the vehicle model.
- ECU Selection: Select an ECU that supports DoIP communication from the list of available ECUs.
- Establish Connection: Attempt to establish a connection with the selected ECU.
- Check Status: Check the connection status in DTS Monaco. If the connection is successful, DTS Monaco can communicate with the ECU. If not, it indicates a potential DoIP configuration issue.
1.7. Interpreting Connection Errors
When DTS Monaco fails to connect to an ECU over DoIP, it may display error messages. Here’s how to interpret common connection errors:
- Timeout Errors: Indicate that the diagnostic tool did not receive a response from the ECU within the expected time frame. This could be due to network congestion, incorrect IP addresses, or ECU communication problems.
- Connection Refused Errors: Suggest that the ECU is refusing the connection attempt. This could be due to firewall settings, security restrictions, or incorrect diagnostic session configuration.
- Address Resolution Errors: Indicate that the diagnostic tool cannot resolve the vehicle’s IP address. This could be due to DNS configuration issues or incorrect DoIP address settings.
- Protocol Errors: Suggest that there is a problem with the DoIP communication protocol. This could be due to incompatible protocol versions or incorrect protocol settings.
1.8. Importance of Correct ECU Configuration
Correct ECU configuration is crucial for successful DoIP communication. Ensure that the following settings are properly configured:
- IP Addresses: Verify that the vehicle’s ECUs and the diagnostic tool have valid and unique IP addresses within the same subnet.
- Subnet Mask: Ensure that the subnet mask is correctly configured on all devices.
- Gateway Address: Verify that the gateway address is correctly configured if the vehicle network is connected to an external network.
- DoIP Addresses: Ensure that the DoIP logical addresses are correctly assigned to the ECUs.
- Diagnostic Session Settings: Verify that the diagnostic session settings, such as the diagnostic protocol and communication parameters, are correctly configured.
1.9. Common DoIP Configuration Mistakes
Several common mistakes can lead to DoIP configuration issues. Here are some to watch out for:
- Incorrect IP Addresses: Using duplicate or invalid IP addresses can cause communication conflicts.
- Firewall Issues: Firewalls blocking DoIP communication ports can prevent the diagnostic tool from connecting to the vehicle’s ECUs.
- Incorrect Subnet Mask: An incorrect subnet mask can prevent devices from communicating with each other.
- DNS Configuration Problems: DNS configuration issues can prevent the diagnostic tool from resolving the vehicle’s IP addresses.
- Outdated Software: Using outdated DTS Monaco software or diagnostic interface firmware can lead to compatibility issues with newer DoIP implementations.
1.10. How to Prevent DoIP Configuration Issues
To prevent DoIP configuration issues, follow these best practices:
- Use a Network Scanner: A network scanner can detect network devices, identify IP address conflicts, and verify network connectivity.
- Consult Vehicle Documentation: Refer to the vehicle’s diagnostic documentation for specific DoIP configuration requirements and recommendations.
- Implement Firewall Rules: Configure firewalls to allow DoIP communication on the necessary ports.
- Keep Software Updated: Regularly update DTS Monaco software and diagnostic interface firmware to ensure compatibility with the latest DoIP implementations.
- Document Configuration: Document the DoIP configuration settings for each vehicle model to ensure consistency and facilitate troubleshooting.
By understanding the capabilities and limitations of DTS Monaco in diagnosing DoIP network configuration issues, automotive technicians can effectively troubleshoot vehicle communication problems and ensure proper diagnostic functionality. Remember that while DTS Monaco can help with basic connectivity checks, specialized network tools are often necessary for in-depth analysis and resolution of complex DoIP issues. Enhance your skills and knowledge with the resources available at DTS-MONACO.EDU.VN to become proficient in advanced automotive diagnostics and car coding.
2. Step-by-Step Guide to Diagnosing Network Problems with DTS Monaco
While DTS Monaco’s direct diagnostic capabilities for DoIP network issues are limited, it can still be used to identify some common problems. This section provides a step-by-step guide on how to use DTS Monaco to diagnose network problems.
2.1. Initial Setup and Connection
Before starting any diagnostic procedure, ensure that DTS Monaco is correctly installed and configured on your computer. Follow these steps for the initial setup and connection:
- Install DTS Monaco: Install the DTS Monaco software on your computer following the instructions provided by the software vendor.
- Connect Diagnostic Interface: Connect the diagnostic interface (e.g., a multiplexer or interface cable) to your computer via USB or Ethernet.
- Connect to Vehicle: Connect the diagnostic interface to the vehicle’s diagnostic port (usually the OBD-II port).
- Power On: Turn on the vehicle’s ignition to power on the electronic control units (ECUs).
- Launch DTS Monaco: Launch the DTS Monaco software on your computer.
- Select Workspace: Select the appropriate workspace for the vehicle model and diagnostic task you want to perform.
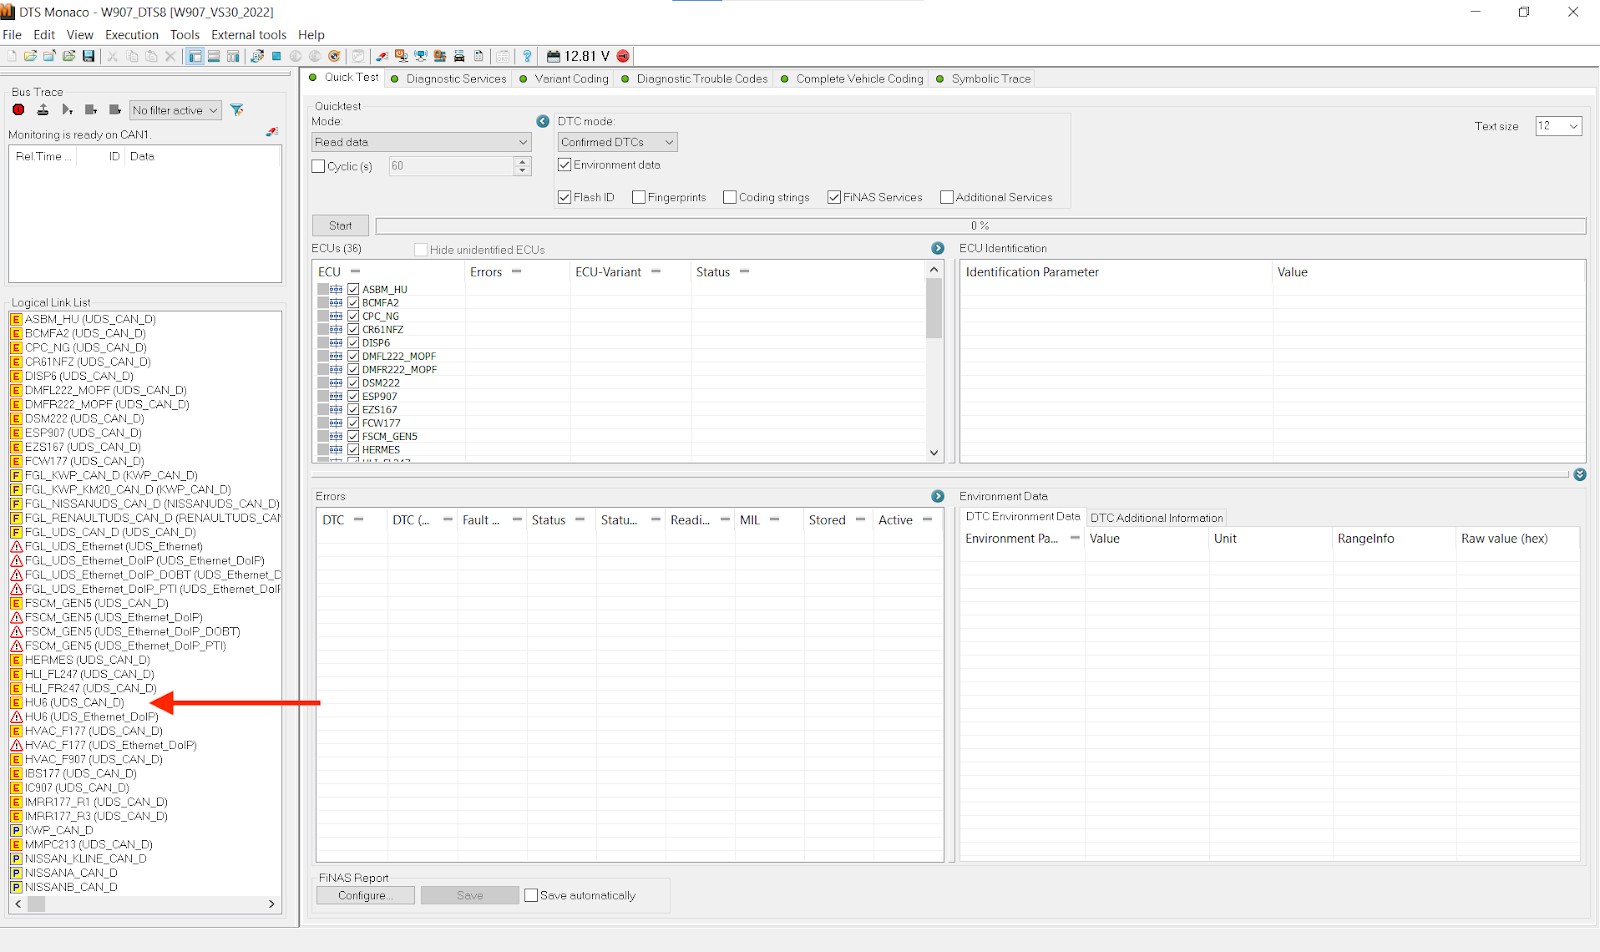
2.2. Verifying ECU Reachability
The first step in diagnosing network problems is to verify if DTS Monaco can reach the vehicle’s ECUs. Follow these steps:
- Open Project: Open the diagnostic project in DTS Monaco that corresponds to the vehicle you are working on.
- Check ECU List: Review the list of available ECUs in the project. This list should include all the ECUs that DTS Monaco can potentially communicate with.
- Attempt Connection: Attempt to connect to each ECU in the list by double-clicking on its name or selecting the “Connect” option.
- Monitor Connection Status: Monitor the connection status for each ECU. DTS Monaco will indicate whether the connection was successful or if there was an error.
- Record Results: Record the connection status for each ECU. Note which ECUs were successfully connected and which ones failed to connect.
If DTS Monaco cannot connect to one or more ECUs, it indicates a potential network problem. Proceed to the next steps to further diagnose the issue.
2.3. Identifying Communication Errors
When DTS Monaco fails to connect to an ECU, it will usually display an error message. These error messages can provide valuable clues about the nature of the network problem. Here’s how to identify and interpret communication errors:
-
Read Error Messages: Carefully read the error messages displayed by DTS Monaco when a connection fails.
-
Note Error Codes: Note any error codes or specific error descriptions provided in the error message.
-
Interpret Error Meaning: Use the error codes and descriptions to understand the nature of the communication problem. Common error messages include:
- “ECU not responding”: Indicates that the ECU is not communicating with the diagnostic tool.
- “Timeout error”: Suggests that the diagnostic tool did not receive a response from the ECU within the expected time frame.
- “Connection refused”: Indicates that the ECU is refusing the connection attempt.
- “Invalid address”: Suggests that the ECU’s address is incorrect or not recognized by the diagnostic tool.
- “Protocol error”: Indicates that there is a problem with the communication protocol between the diagnostic tool and the ECU.
-
Consult Documentation: Consult the DTS Monaco documentation or online resources to find more information about the specific error codes and their possible causes.
2.4. Analyzing Diagnostic Trouble Codes (DTCs)
Even if DTS Monaco can connect to some ECUs, there may still be underlying network problems that are causing intermittent communication issues or other malfunctions. Analyzing Diagnostic Trouble Codes (DTCs) can help identify these problems. Follow these steps:
-
Select ECU: Select an ECU that you were able to successfully connect to in DTS Monaco.
-
Request DTCs: Use DTS Monaco to request the DTCs stored in the ECU’s memory.
-
Review DTC List: Review the list of DTCs returned by the ECU. Look for any DTCs related to communication errors, network problems, or bus faults.
-
Interpret DTC Meaning: Use the DTC codes and descriptions to understand the nature of the network problem. Common DTCs related to network problems include:
- “U0001”: High-Speed CAN Communication Bus
- “U0100”: Lost Communication With ECM/PCM
- “U0155”: Lost Communication With Instrument Panel Cluster (IPC) Control Module
- “U0140”: Lost Communication With Body Control Module (BCM)
- “U0121”: Lost Communication With Anti-Lock Brake System (ABS) Control Module
-
Consult Documentation: Consult the vehicle’s service manual or online resources to find more information about the specific DTCs and their possible causes.
2.5. Checking ECU Configuration Settings
Incorrect ECU configuration settings can also cause network problems. Use DTS Monaco to check the ECU configuration settings and ensure they are properly configured:
- Select ECU: Select an ECU that you suspect may have incorrect configuration settings.
- Access Configuration Menu: Use DTS Monaco to access the ECU’s configuration menu or settings. The exact location of the configuration settings may vary depending on the ECU and vehicle model.
- Review Configuration Settings: Review the configuration settings related to network communication, bus addresses, and protocol settings.
- Verify Settings: Verify that the configuration settings are correct and match the specifications provided in the vehicle’s service manual or diagnostic documentation.
- Correct Settings: If you find any incorrect configuration settings, use DTS Monaco to correct them. Be careful when changing configuration settings, as incorrect settings can cause further problems.
2.6. Performing Communication Tests
DTS Monaco may offer some communication tests that can help diagnose network problems. These tests may include:
- Bus Monitoring: Monitor the communication activity on the vehicle’s network bus to identify any abnormalities or communication errors.
- Node Identification: Identify the nodes (ECUs) connected to the network bus and verify their presence and functionality.
- Data Transmission: Transmit test data over the network bus to verify the communication path and identify any transmission errors.
- Response Analysis: Analyze the responses received from the ECUs to verify their proper functioning and identify any response errors.
Follow the instructions provided in the DTS Monaco documentation to perform these communication tests and interpret the results.
2.7. Utilizing Generic Jobs
DTS Monaco includes a “Generic Jobs” feature that can be useful for diagnosing various ECU-related issues, including those affecting network communication. Here’s how to use it:
- Select ECU: Choose the ECU you want to test from the list of logical links.
- Access Generic Jobs: Right-click on the selected ECU and choose “New Tab for Logical Link”.
- Select Security Access: In the new tab, navigate to “Generic Jobs”.
- Choose Security Level: Select “Security Access Level 37” (for older vans) or “Security Access Level 3B” (for newer vans using EZS167 ECU).
- Transmit: Press the “Transmit” button.
- Check Response: Ensure there is no red text in the window below. For older vans, this indicates the firewall is off. For newer vans, check for “acknowledged” under “Response State”.
If you encounter any issues during these steps, refer to the documentation for specific troubleshooting tips.
2.8. Checking Firewall Status
Before attempting any variant coding or advanced diagnostics, it’s important to ensure that the firewall is disabled. DTS Monaco can help you check and disable the firewall using these steps:
- Open ECU Link: Open a new tab for the relevant ECU (EZS167 for newer vans, BCMFA2 for older vans).
- Navigate to Generic Jobs: Go to “Generic Jobs” in the new tab.
- Select Security Access Level: Choose the appropriate security access level (“Security Access Level 37” or “Security Access Level 3B”).
- Transmit: Click “Transmit”.
- Verify Response: Check the response in the window below. No red text and an “acknowledged” status indicate that the firewall is deactivated.
2.9. Making Variant Coding Changes
If you need to make changes to the vehicle’s configuration, follow these steps for variant coding:
- Open Relevant ECU: Open the ECU governing the features you want to change in a new tab.
- Extended Start: Select “Extended Start” and press “Transmit”.
- Check Acknowledgement: Ensure you see another “acknowledged” Response State.
- Variant Coding Tab: Go to the “Variant Coding” tab and select your ECU.
- Connect: If not connected, press “Connect”.
- Select Domain: Choose the relevant domain from the “Domain” list.
- Find Feature: Locate the feature you want to change in the “Fragment” column.
- Change Value: Double-click the value under “Meaning” and select the new value.
- Do Coding: Press the “Do Coding” button.
If everything goes correctly, the bar next to “Do Coding” will go to 100%, and the new value will be presented under the “Meaning” column.
2.10. Finalizing Variant Coding Changes
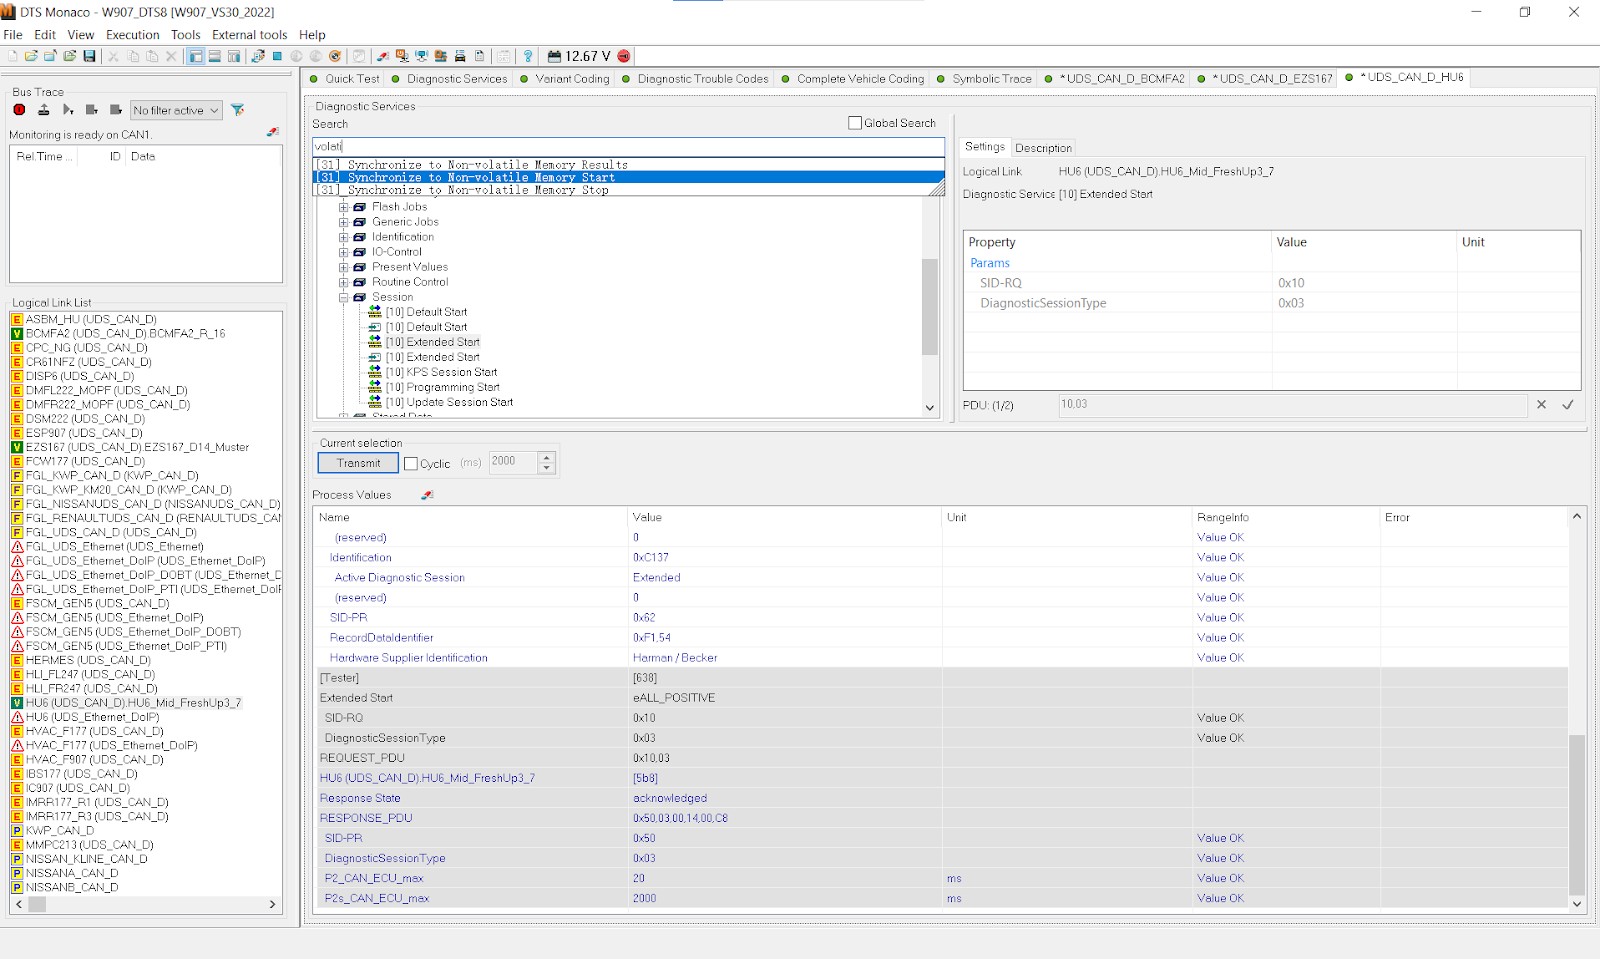
To make the new variant coding values permanent, you need to synchronize the changes to non-volatile memory and perform a hard reset of the ECU:
- Synchronize Memory Start: In the ECU tab, find “[31] Synchronize to Non-volatile Memory Start” in the “Diagnostic Services” search box and click “Transmit”.
- Check Response: Ensure you get an “acknowledged” Response State and no red text.
- Synchronize Memory Results: Next, click “[31] Synchronize to Non-volatile Memory Results” and then “Transmit”.
- Check Response: Again, ensure you get an “acknowledged” Response State.
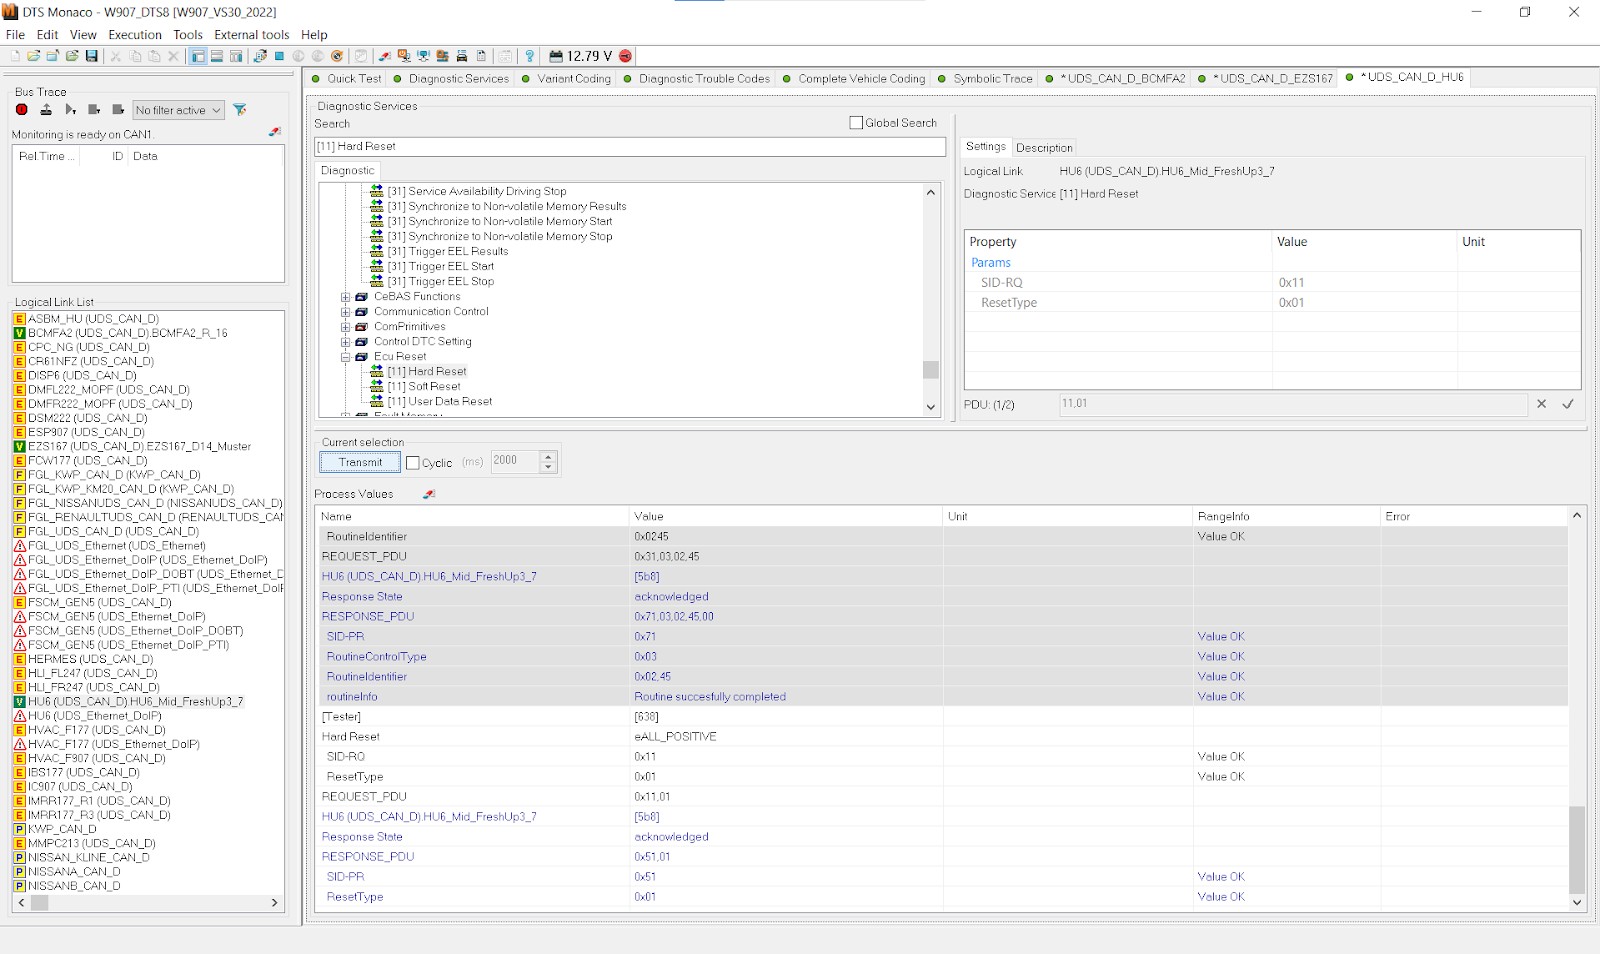
- Hard Reset: Perform a Hard Reset of the ECU using the appropriate function in DTS Monaco.
- Final Check: After the reset, turn off the van, open the driver’s door, wait a few minutes, and then turn the van back on to check if the changes are permanent.
By following these steps, you can use DTS Monaco to diagnose and potentially resolve network problems in modern vehicles. Remember to consult the vehicle’s service manual and DTS Monaco documentation for detailed information and troubleshooting tips. Enhance your skills and knowledge with the resources available at DTS-MONACO.EDU.VN to become proficient in advanced automotive diagnostics and car coding.
3. Maximizing DTS Monaco for Effective Vehicle Diagnostics
To effectively use DTS Monaco for vehicle diagnostics, it’s crucial to understand the software’s capabilities, limitations, and best practices. This section provides tips on maximizing DTS Monaco for effective vehicle diagnostics.
3.1. Mastering Workspace Configuration
A well-configured workspace is essential for efficient and accurate diagnostics. Follow these tips to master workspace configuration in DTS Monaco:
- Create Custom Workspaces: Create custom workspaces for each vehicle model or diagnostic task. This helps organize your projects and ensures that you are using the correct diagnostic data and settings.
- Import Correct Data: Import the correct diagnostic data (e.g., CFF files, SMR-D files) for the vehicle model and ECUs you want to diagnose. Using incorrect data can lead to inaccurate results or communication errors.
- Organize Logical Links: Organize the logical links (ECUs) in your workspace in a logical and intuitive manner. Group related ECUs together and use descriptive names to make it easier to find them.
- Customize Layout: Customize the layout of your workspace to suit your diagnostic workflow. Arrange the diagnostic windows, toolbars, and menus in a way that maximizes your efficiency.
- Save Workspace: Save your workspace configuration so you can easily reload it the next time you use DTS Monaco.
3.2. Effectively Using Diagnostic Services
Diagnostic Services are the heart of DTS Monaco, allowing you to interact with the vehicle’s ECUs and perform various diagnostic functions. Follow these tips to effectively use Diagnostic Services:
- Understand Service IDs: Understand the Service IDs (SID) and their corresponding functions. Refer to the vehicle’s service manual or diagnostic documentation for information about the available SIDs.
- Use Filters: Use filters to narrow down the list of available Diagnostic Services and quickly find the ones you need.
- Monitor Response Codes: Monitor the response codes returned by the ECUs after each Diagnostic Service request. The response codes indicate whether the request was successful or if there was an error.
- Interpret Data: Carefully interpret the data returned by the ECUs in response to Diagnostic Service requests. Use the vehicle’s service manual or diagnostic documentation to understand the meaning of the data.
- Log Sessions: Log your diagnostic sessions to record the Diagnostic Service requests and responses. This can be helpful for troubleshooting problems or documenting your diagnostic work.
3.3. Leveraging ECU Flashing Capabilities
DTS Monaco offers powerful ECU flashing capabilities that can be used to update the software or firmware on the vehicle’s ECUs. Follow these tips to safely and effectively leverage ECU flashing:
- Use Correct Flash Files: Use the correct flash files for the vehicle model and ECU you want to update. Using incorrect flash files can cause serious damage to the ECU.
- Follow Procedure: Follow the ECU flashing procedure provided in the vehicle’s service manual or diagnostic documentation.
- Maintain Power: Maintain a stable power supply to the vehicle during the ECU flashing process. Power interruptions can cause the flash to fail and damage the ECU.
- Monitor Progress: Monitor the progress of the ECU flashing process. DTS Monaco will provide status updates and error messages.
- Verify Operation: Verify the correct operation of the ECU after the flashing process is complete. Check for any DTCs or malfunctions.
3.4. Using Variant Coding for Customization
Variant coding allows you to customize the behavior and features of the vehicle’s ECUs. Follow these tips to effectively use variant coding in DTS Monaco:
- Back Up Coding Files: Back up the original coding files before making any changes. This allows you to restore the original settings if necessary.
 Backing up coding files for variant coding in DTS Monaco
 - Understand Coding Parameters: Understand the meaning of the coding parameters before making any changes. Refer to the vehicle’s service manual or diagnostic documentation for information about the available parameters.
- Document Changes: Document any coding changes you make. This helps you keep track of your modifications and makes it easier to troubleshoot problems.
- Test Thoroughly: Test the vehicle thoroughly after making coding changes. Check for any malfunctions or unexpected behavior.
- Use Online Resources: Utilize online forums and communities dedicated to DTS Monaco and vehicle coding. These resources can provide valuable insights and help you troubleshoot problems.
3.5. Staying Updated with Software Versions
Regularly updating DTS Monaco is essential for accessing the latest features, bug fixes, and vehicle diagnostic data. Follow these tips to stay updated:
- Check for Updates: Regularly check for software updates from the DTS Monaco vendor.
- Read Release Notes: Read the release notes for each software update. The release notes provide information about the new features, bug fixes, and known issues.
- Install Updates: Install software updates as soon as they are available.
- Update Data Files: Update your diagnostic data files (e.g., CFF files, SMR-D files) to ensure that you have the latest information for the vehicle models you are diagnosing.
- Maintain Compatibility: Maintain compatibility between the DTS Monaco software, diagnostic interface, and vehicle. Check for any compatibility issues before installing software updates.
3.6. Understanding SMR-D Files
When working with DTS Monaco, it’s important to understand the purpose and function of SMR-D files. These files contain crucial data needed for proper vehicle diagnostics and coding:
- Logical Links: SMR-D files include “Logical Links,” which are essential for connecting to different interfaces. Only the connected and active links will work.
 Logical links in DTS Monaco
 - Multiple Versions: Note that multiple versions of SMR-D files may be available due to the different interfaces that can connect.
3.7. Defeating Firewalls
To perform variant coding, you often need to disable the vehicle’s firewall. The method for doing this varies based on the vehicle model and year:
- Older Vans: For older vans, open the firewall via the BCMFA2 ECU by selecting “Security Access Level 37” in the Generic Jobs menu.
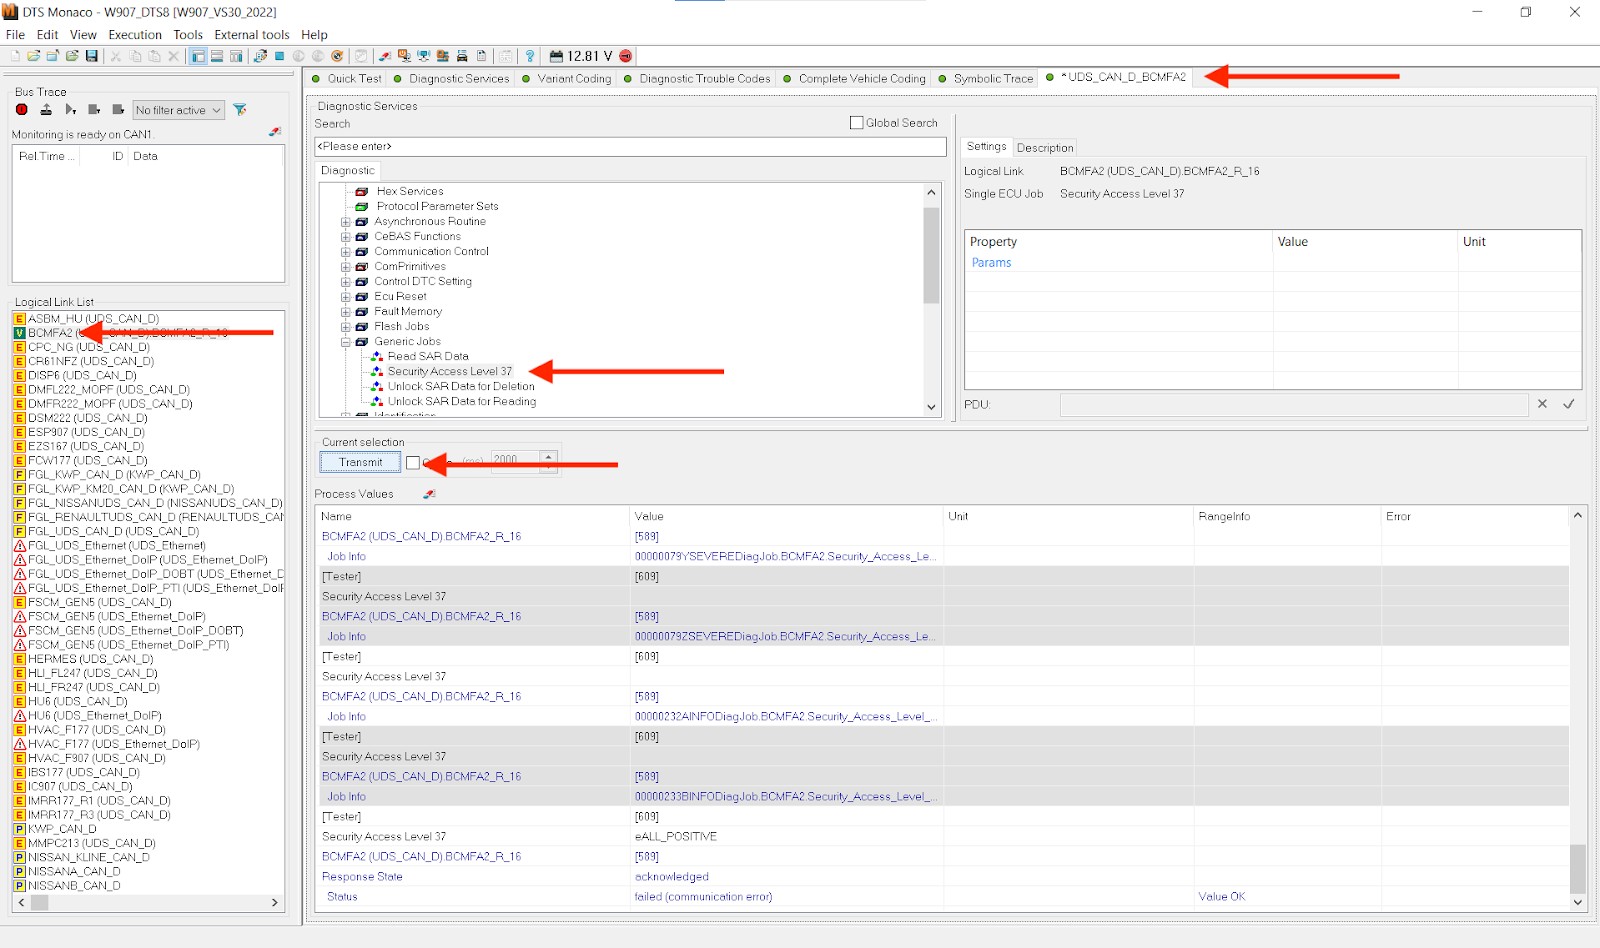 Defeating firewall using Security Access Level 37 in DTS Monaco
 - Newer Vans: For newer vans, use the EZS167 ECU and select “Security Access Level 3B”.
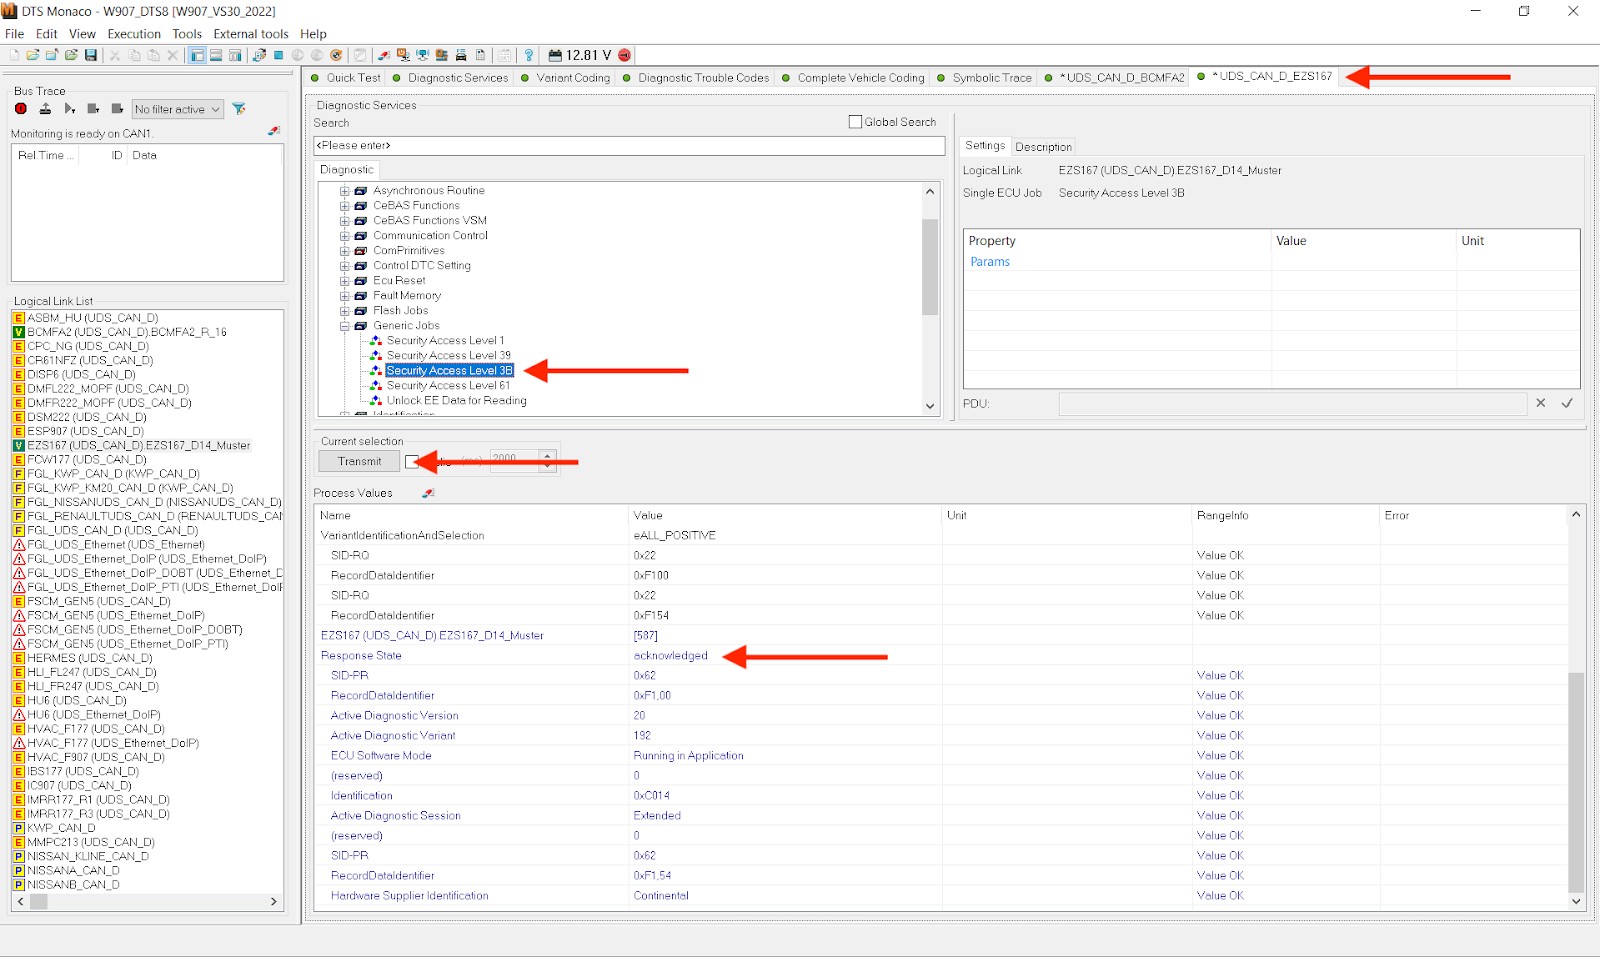 Defeating firewall using Security Access Level 3B in DTS Monaco
 - Verification: Always verify that the firewall is deactivated by checking for an “acknowledged” response and no red text.
3.8. Ensuring Coding Changes are Permanent
After performing variant coding, ensure that the changes are permanent by following these steps:
- Synchronize Memory: Synchronize the changes to non-volatile memory using the “Synchronize to Non-volatile Memory Start” and “Synchronize to Non-volatile Memory Results” functions.
 Synchronizing memory to make variant coding changes permanent in DTS Monaco
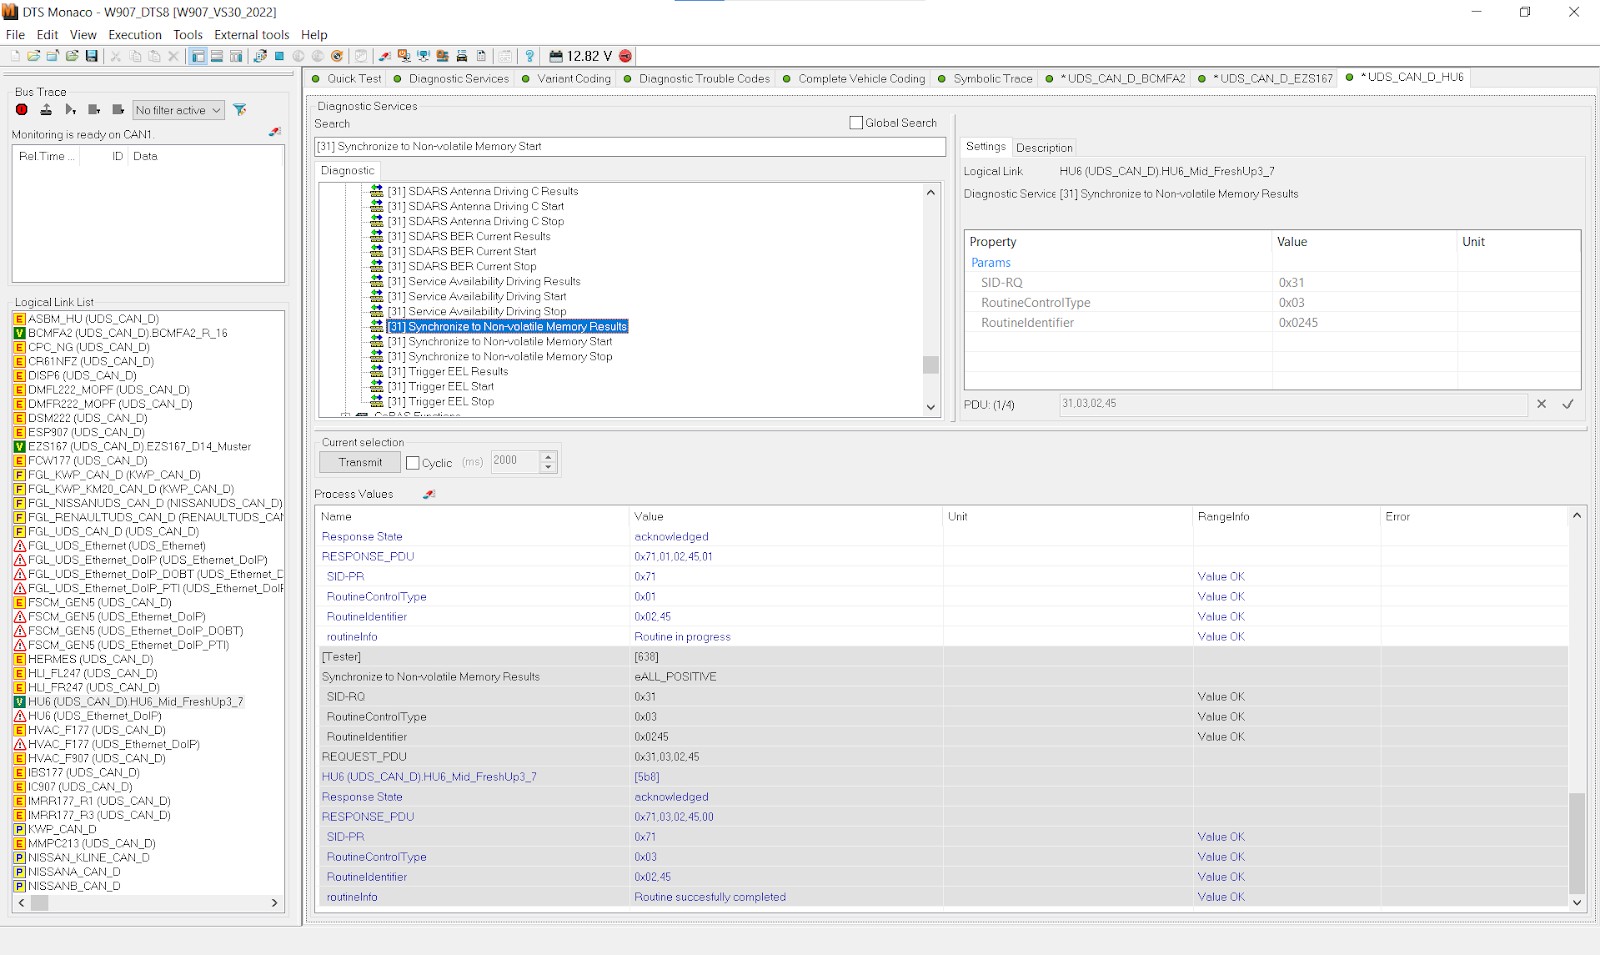 Synchronizing non-volatile memory results in DTS Monaco
 - Hard Reset: Perform a hard reset of the ECU.
 Performing a hard reset of the ECU in DTS Monaco
 - Final Verification: After the reset, verify that the changes are indeed permanent by checking the ECU settings.
By following these best practices, you can maximize the effectiveness of DTS Monaco for vehicle diagnostics and coding. Remember to consult the vehicle’s service manual and DTS Monaco documentation for detailed information and troubleshooting tips. Enhance your skills and knowledge with the resources available at DTS-MONACO.EDU.VN to become proficient in advanced automotive diagnostics and car coding.
4. Overcoming Common Challenges in DTS Monaco Diagnostics
Using DTS Monaco for vehicle diagnostics can present various challenges, from connectivity issues to software errors. This section outlines common challenges and offers practical solutions to overcome them.
4.1. Addressing Connectivity Problems
Connectivity problems are among the most frequent issues encountered when using DTS Monaco. Here are several strategies to address these challenges:
- Check Physical Connections: Ensure all physical connections are secure. Verify that the diagnostic interface is properly connected to both the vehicle’s OBD-II port and your computer.
- Verify Interface Compatibility: Confirm that your diagnostic interface is compatible with DTS Monaco and the vehicle you are trying to diagnose. Refer to the interface’s documentation for compatibility information.
- Update Interface Drivers: Ensure that you have the latest drivers installed for your diagnostic interface. Outdated drivers can cause communication problems.
- Test Different Ports: Try using different USB or Ethernet ports on your computer. Sometimes, certain ports may not function correctly.
- Check Vehicle Power: Ensure the vehicle’s battery is adequately charged. Low voltage can sometimes interfere with diagnostic communication.
4.2. Resolving Software Errors
Software errors in DTS Monaco can disrupt the diagnostic process. Here’s how to troubleshoot and resolve common software errors:
- Restart DTS Monaco: Close and restart DTS Monaco. This can often resolve minor software glitches.
- Update Software: Ensure that you are using the latest version of DTS Monaco. Software updates often include bug fixes and performance improvements.
- Reinstall Software: If the errors persist, try uninstalling and reinstalling DTS Monaco. This can resolve corrupted software installations.
- Check System Requirements: Verify that your computer meets the minimum system requirements for DTS Monaco. Insufficient hardware resources can cause software errors.
- Disable Antivirus: Temporarily disable your antivirus software, as it can sometimes interfere with DTS Monaco’s operation.
4.3. Managing Data File Issues
Incorrect or corrupted data files can lead to diagnostic errors. Follow these steps to manage data file issues:
- Verify Data File Compatibility: Ensure that the data files (e.g., CFF files, SMR-D files) are compatible with the vehicle model and ECU you are trying to diagnose.
- Download Fresh Files: Download fresh copies of the data files from a reliable source. Corrupted files can cause communication problems.
- Check File Integrity: Use checksum tools to verify the integrity of the data files. This ensures that the files have not been tampered with.
- Organize Files: Organize your data files in a logical and structured manner. This makes it easier to find the correct files when you need them.
- Back Up Files: Back up your data files to prevent data loss in case of hardware failures or software corruption.
4.4. Overcoming Firewall Restrictions
Firewall restrictions can prevent DTS Monaco from communicating with the vehicle’s ECUs. Here’s how to overcome firewall restrictions:
- Disable Firewall: Temporarily disable the firewall on your computer. This can allow DTS Monaco to communicate with the vehicle’s ECUs.
- Configure Firewall Rules: Configure the firewall rules to allow DTS Monaco to communicate on the necessary ports. Refer to the DTS Monaco documentation for information about the required ports.
- Check Vehicle Firewall: Check the vehicle’s firewall settings. Some vehicles have built-in firewalls that can block diagnostic communication.
4.5. Addressing ECU Communication Errors
ECU communication errors can occur due to various reasons. Here are some strategies to address these errors:
- Verify ECU Power: Ensure that the ECU is receiving power. Check the vehicle’s wiring and fuses.
- Check ECU Connections: Check the connections to the ECU. Loose or corroded connections can cause communication problems.
- Reset ECU: Try resetting the ECU by disconnecting the vehicle’s battery for a few minutes. This can sometimes resolve communication issues.
- Update ECU Software: Update the ECU software or firmware. Outdated software can cause communication problems.
- Replace ECU: If all else fails, the ECU may be faulty and need to be replaced.
4.6. Dealing with Protocol Incompatibilities
Protocol incompatibilities can prevent DTS Monaco from communicating with the vehicle’s ECUs. Here’s how to deal with protocol incompatibilities:
- Check Protocol Support: Verify that DTS Monaco supports the communication protocols used by the vehicle’s ECUs (e.g., CAN, DoIP, K-Line).
- Configure Protocol Settings: Configure the protocol settings in DTS Monaco to match the vehicle’s requirements.
- Update Protocol Definitions: Update the protocol definitions in DTS Monaco to ensure that you have the latest information about the communication protocols.
- Use Protocol Converters: Use protocol converters to translate between different communication protocols. This can be helpful when working with older vehicles.
4.7. Getting Support from Online Communities
Online communities can be a valuable resource for troubleshooting DTS Monaco problems. Here’s how to get support from online communities:
- Search Forums: Search online forums for discussions about DTS Monaco and vehicle diagnostics. You may find solutions to your problems in existing threads.
- Ask Questions: Post questions about your problems in the forums. Be sure to provide detailed information about your setup, the errors you are encountering, and the steps you have already taken to troubleshoot the problems.
- Follow Tutorials: Follow online tutorials and guides about DTS Monaco. These resources can provide step-by-step instructions for performing various diagnostic tasks.
- Share Knowledge: Share your knowledge and experiences with other users in the forums. This helps build a strong and supportive community.
By understanding these common challenges and implementing the solutions outlined above, you can overcome obstacles and effectively use DTS Monaco for vehicle diagnostics. Remember to consult the vehicle’s service manual and DTS Monaco documentation for detailed information and troubleshooting tips. Enhance your skills and knowledge with the resources available at DTS-MONACO.EDU.VN to become proficient in advanced automotive diagnostics and car coding.
5. Advanced Techniques for DoIP Diagnostics with DTS Monaco
While DTS Monaco has limited direct capabilities for diagnosing DoIP network issues, advanced users can employ specific techniques to enhance its utility. This section explores some advanced techniques for DoIP diagnostics using DTS Monaco, including leveraging scripts, custom diagnostic routines, and external tools.
5.1. Using Scripts to Automate Diagnostic Tasks
Scripts can automate repetitive diagnostic tasks, making it easier to identify and troubleshoot DoIP-related problems. Here’s how to leverage scripts in DTS Monaco:
- Learn Scripting Language: Familiarize yourself with the scripting language supported by DTS Monaco (e.g., OTX, Python).
- Identify Tasks: Identify diagnostic tasks that can be automated, such as ECU connection tests