Checking Readiness Monitor status using DTS Monaco is straightforward; use the Diagnostic Trouble Shooter (DTS) software to access the ECU and view the current status of each monitor, making it simpler to ensure your vehicle is ready for emissions testing. DTS-MONACO.EDU.VN offers comprehensive resources to help you master this process. By understanding how to use DTS Monaco effectively, you can optimize your car coding skills and stay ahead in the automotive industry with innovative and reliable diagnostic solutions.
Contents
- 1. What is Readiness Monitor Status and Why Is It Important?
- 1.1 Understanding Readiness Monitors
- 1.2 Why Readiness Monitors Matter
- 1.3 Real-World Implications
- 2. What is DTS Monaco and Why Use It?
- 2.1 Overview of DTS Monaco
- 2.2 Why Use DTS Monaco?
- 2.3 Benefits of Using DTS Monaco
- 3. Prerequisites Before Checking Readiness Monitor Status
- 3.1 Required Hardware
- 3.2 Software Installation and Configuration
- 3.3 Establishing a Stable Connection to the Vehicle
- 3.4 Verifying Software Compatibility
- 4. Step-by-Step Guide to Checking Readiness Monitor Status
- 4.1 Connecting to the Vehicle with DTS Monaco
- 4.2 Navigating to the Readiness Monitor Section
- 4.3 Interpreting the Readiness Monitor Status
- 4.4 Clearing Codes and Rechecking
- 5. Common Issues and Troubleshooting
- 5.1 Monitor Not Setting to Ready
- 5.2 Communication Errors
- 5.3 Incorrect Vehicle Profile
- 5.4 Addressing Complex Cases
- 6. Tips and Best Practices for Using DTS Monaco
- 6.1 Keeping Software Updated
- 6.2 Using a Stable Power Supply
- 6.3 Regularly Calibrating the Diagnostic Interface
- 6.4 Documenting Your Work
- 6.5 Seeking Training and Support
- 7. Advanced Techniques with DTS Monaco
- 7.1 ECU Flashing
- 7.2 Car Coding
- 7.3 Variant Coding
- 7.4 Creating Custom Diagnostic Routines
- 8. Staying Compliant with Emission Standards
- 8.1 Understanding Emission Regulations
- 8.2 Proper Diagnostic Procedures
- 8.3 Maintaining Accurate Records
- 8.4 Regular Vehicle Inspections
1. What is Readiness Monitor Status and Why Is It Important?
Readiness Monitors are diagnostic routines within a vehicle’s On-Board Diagnostic (OBD) system that assess the functionality of various emission control systems. Knowing their status is critical because it indicates whether a vehicle is ready for an emissions test.
1.1 Understanding Readiness Monitors
Readiness Monitors, also known as I/M (Inspection/Maintenance) Monitors, are integral to a vehicle’s On-Board Diagnostic (OBD) system. These monitors continuously evaluate the performance of emission control components and systems. When a monitor completes its diagnostic check without detecting any faults, it sets a “ready” or “complete” status. If a problem is detected, the monitor will set a “not ready” or “incomplete” status and may trigger the Malfunction Indicator Light (MIL), commonly known as the check engine light.
These monitors cover a wide array of systems, including:
- Catalyst Monitor: Evaluates the efficiency of the catalytic converter.
- Oxygen Sensor Monitor: Checks the functionality of the oxygen sensors.
- Evaporative System Monitor: Tests for leaks in the evaporative emission control system.
- EGR System Monitor: Assesses the performance of the Exhaust Gas Recirculation (EGR) system.
- Secondary Air System Monitor: Verifies the operation of the secondary air injection system.
- Fuel System Monitor: Monitors the fuel delivery system for proper function.
- Comprehensive Component Monitor: Checks various electrical components for proper operation.
1.2 Why Readiness Monitors Matter
Readiness Monitors play a crucial role in ensuring vehicles comply with emission standards. Here’s why their status is so important:
- Emissions Testing: Most states in the U.S. require vehicles to pass an emissions test as part of their registration process. If the Readiness Monitors are not in a “ready” state, the vehicle will fail the test, regardless of whether there are any active Diagnostic Trouble Codes (DTCs).
- Identifying Underlying Issues: Readiness Monitors can help identify potential problems with a vehicle’s emission control systems before they become severe. By monitoring the status of these systems, technicians can diagnose and address issues early, preventing costly repairs and reducing harmful emissions.
- Ensuring Proper Repairs: After performing repairs on emission control systems, it’s essential to verify that the Readiness Monitors are set to “ready.” This confirms that the repairs were successful and the vehicle is now operating within acceptable emission limits.
- Avoiding Drive Cycle Guesswork: Traditionally, getting Readiness Monitors to set required performing specific driving patterns, known as drive cycles. This process could be time-consuming and unreliable. Modern diagnostic tools like DTS Monaco can help streamline this process by providing detailed information about the status of each monitor and the conditions required to complete them.
According to the Environmental Protection Agency (EPA), proper functioning of emission control systems is vital for reducing air pollution and protecting public health. Readiness Monitors are a key component of this effort, ensuring that vehicles on the road meet the required emission standards.
1.3 Real-World Implications
The implications of Readiness Monitor status extend beyond just passing an emissions test. For vehicle owners, ensuring their car is in compliance can prevent fines and registration delays. For technicians, understanding and properly addressing Readiness Monitor status can improve diagnostic accuracy and customer satisfaction.
Moreover, with the increasing focus on environmental sustainability, ensuring vehicles operate cleanly is more important than ever. Readiness Monitors contribute to this goal by helping to identify and correct emission-related issues, leading to cleaner air and a healthier environment.
2. What is DTS Monaco and Why Use It?
DTS Monaco is a powerful diagnostic and car coding software widely used in the automotive industry. It allows advanced diagnostics, ECU programming, and parameter adjustments, making it invaluable for comprehensive vehicle maintenance and modifications.
2.1 Overview of DTS Monaco
DTS Monaco, short for “Diagnose, Test and Convert Monaco,” is a sophisticated software solution designed for automotive diagnostics, ECU programming, and car coding. Developed primarily for Mercedes-Benz vehicles, it is now widely used across various car brands due to its extensive capabilities and user-friendly interface.
At its core, DTS Monaco enables users to communicate directly with the Electronic Control Units (ECUs) in a vehicle. These ECUs control nearly every function of a modern car, from the engine and transmission to the braking system and infotainment features. With DTS Monaco, technicians can access and modify the software within these ECUs, allowing for advanced diagnostics, programming, and customization.
Key features of DTS Monaco include:
- Advanced Diagnostics: DTS Monaco can read and clear Diagnostic Trouble Codes (DTCs), view live data streams from sensors, and perform detailed component testing. This allows technicians to quickly identify and diagnose issues within the vehicle’s systems.
- ECU Programming: One of the most powerful features of DTS Monaco is its ability to program ECUs. This includes flashing new software onto an ECU, updating firmware, and even replacing a faulty ECU with a new one.
- Car Coding: DTS Monaco allows users to customize vehicle settings and enable or disable certain features. This can include anything from adjusting lighting settings and enabling comfort features to modifying engine parameters and improving performance.
- Flash Programming: Flash programming involves updating the software on a vehicle’s ECU to the latest version provided by the manufacturer. This can address software bugs, improve performance, and add new features to the vehicle. DTS Monaco simplifies the flash programming process with its intuitive interface and step-by-step instructions.
- Variant Coding: Variant coding involves configuring an ECU to match the specific options and features of a vehicle. This is particularly useful when replacing an ECU or retrofitting new components. DTS Monaco allows users to easily adjust the variant coding settings to ensure proper operation of all vehicle systems.
2.2 Why Use DTS Monaco?
There are several compelling reasons to use DTS Monaco for automotive diagnostics and car coding:
- Comprehensive Functionality: DTS Monaco offers a wide range of features, making it a versatile tool for various automotive tasks. Whether you need to diagnose a complex issue, program an ECU, or customize vehicle settings, DTS Monaco has you covered.
- User-Friendly Interface: Despite its advanced capabilities, DTS Monaco is designed with ease of use in mind. The software features an intuitive interface with clear menus and straightforward instructions, making it accessible to both experienced technicians and novice users.
- Extensive Vehicle Coverage: While originally developed for Mercedes-Benz vehicles, DTS Monaco supports a wide range of car brands and models. This makes it a valuable tool for independent repair shops and enthusiasts who work on multiple types of vehicles.
- Time-Saving: DTS Monaco can significantly reduce diagnostic and repair times. Its advanced features allow technicians to quickly identify and address issues, minimizing downtime and maximizing efficiency.
- Customization Options: With DTS Monaco, you can personalize your vehicle to your exact preferences. Whether you want to enable hidden features, improve performance, or enhance comfort, DTS Monaco gives you the power to tailor your car to your individual needs.
According to a study by the Automotive Management Institute (AMI), shops that invest in advanced diagnostic tools like DTS Monaco see a significant increase in customer satisfaction and repeat business. The ability to quickly and accurately diagnose issues, perform complex repairs, and offer customized solutions sets these shops apart from the competition.
2.3 Benefits of Using DTS Monaco
The benefits of using DTS Monaco extend beyond just technical capabilities. Here are some additional advantages:
- Increased Efficiency: DTS Monaco streamlines the diagnostic and repair process, allowing technicians to work more efficiently and complete more jobs in less time.
- Improved Accuracy: DTS Monaco provides precise and detailed information, reducing the risk of misdiagnosis and ensuring that repairs are performed correctly the first time.
- Enhanced Customer Satisfaction: By offering advanced diagnostic and customization services, shops can provide a higher level of customer satisfaction and build long-term relationships.
- Competitive Advantage: Investing in DTS Monaco gives shops a competitive edge by enabling them to offer services that other shops cannot. This can attract new customers and increase market share.
- Future-Proofing: As vehicles become increasingly complex, having a tool like DTS Monaco is essential for staying ahead of the curve. It ensures that technicians are equipped to handle the latest technologies and repair challenges.
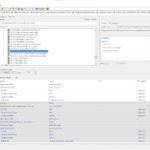
Alt text: DTS Monaco diagnostic software interface showing various modules and functions.
3. Prerequisites Before Checking Readiness Monitor Status
Before diving into checking the Readiness Monitor status with DTS Monaco, ensure you have the necessary hardware and software setup, and a stable connection to the vehicle.
3.1 Required Hardware
To effectively use DTS Monaco for checking Readiness Monitor status, you will need the following hardware components:
-
Laptop: A laptop running a compatible version of Windows is essential. The laptop should have sufficient processing power, memory, and storage to run DTS Monaco and related software smoothly.
-
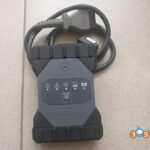
Diagnostic Interface: A diagnostic interface device, also known as a Vehicle Communication Interface (VCI), is necessary to establish communication between the laptop and the vehicle’s diagnostic port. Popular options include:
- Mercedes-Benz C4/C5/C6: These are official diagnostic interfaces used by Mercedes-Benz dealerships. They provide full compatibility with Mercedes-Benz vehicles and support all diagnostic and programming functions.
- J2534 Pass-Thru Devices: These are third-party diagnostic interfaces that comply with the SAE J2534 standard. They can be used with various vehicle brands and are a cost-effective alternative to the official interfaces. Examples include the Drew Technologies MongoosePro and the Bosch MVCI.
-
OBD II Cable: An OBD II (On-Board Diagnostics II) cable is used to connect the diagnostic interface to the vehicle’s OBD II port. This port is typically located under the dashboard on the driver’s side.
-
Stable Power Supply: A stable power supply or battery maintainer is crucial during diagnostic and programming procedures. This ensures that the vehicle’s battery voltage remains constant, preventing data corruption or damage to the ECUs.
3.2 Software Installation and Configuration
Once you have the necessary hardware, you will need to install and configure the DTS Monaco software on your laptop:
- Install DTS Monaco: Follow the installation instructions provided with the DTS Monaco software. Make sure to install all necessary drivers and components.
- Configure the Diagnostic Interface: Configure DTS Monaco to recognize and communicate with your diagnostic interface. This typically involves selecting the correct interface type and communication port in the software settings.
- Update Software and Databases: Ensure that your DTS Monaco software and diagnostic databases are up to date. This will provide you with the latest vehicle information, diagnostic routines, and programming files.
- Create a Project: In DTS Monaco, create a new project for the specific vehicle you are working on. This will allow you to save your settings and configurations for future use.
3.3 Establishing a Stable Connection to the Vehicle
A reliable connection between the laptop, diagnostic interface, and vehicle is critical for accurate and safe diagnostics. Follow these steps to establish a stable connection:
- Connect the Diagnostic Interface: Connect the diagnostic interface to the laptop via USB or Bluetooth, depending on the interface type.
- Connect the OBD II Cable: Plug the OBD II cable into the diagnostic interface and the vehicle’s OBD II port.
- Turn on the Vehicle Ignition: Turn the vehicle’s ignition to the “on” position, but do not start the engine. This will power up the vehicle’s ECUs and allow them to communicate with the diagnostic interface.
- Verify the Connection: In DTS Monaco, verify that the software can successfully communicate with the vehicle’s ECUs. This may involve running a quick diagnostic scan or checking the connection status in the software settings.
- Maintain a Stable Power Supply: Connect a stable power supply or battery maintainer to the vehicle’s battery to ensure a constant voltage during the diagnostic session.
According to a technical bulletin from Bosch, a stable power supply is essential during ECU programming and diagnostics to prevent data corruption and potential damage to the vehicle’s electronic systems. Fluctuations in voltage can interrupt the communication process and lead to irreversible errors.
3.4 Verifying Software Compatibility
Confirming the software’s compatibility with the vehicle model ensures smooth and accurate diagnostics. Refer to the software documentation for a list of supported vehicles.
- Check Vehicle Compatibility Lists: Before beginning any diagnostic procedure with DTS Monaco, review the vehicle compatibility lists provided by DTS-MONACO.EDU.VN. These lists specify the makes, models, and model years that are supported by the software.
- Verify ECU Compatibility: Different ECUs within a vehicle may have varying levels of support in DTS Monaco. Check that the specific ECU you plan to work with is fully supported by the software. This information can typically be found in the software documentation or online forums.
- Use the Correct Diagnostic Protocols: DTS Monaco supports various diagnostic protocols, such as CAN, K-Line, and J1850. Ensure that you are using the correct protocol for the vehicle you are working on. The correct protocol is typically specified in the vehicle’s service manual or diagnostic information.
- Test the Connection: Before performing any critical operations, test the connection between DTS Monaco and the vehicle’s ECUs. This can be done by running a simple diagnostic scan or reading live data from the ECUs. If the connection is successful and the data is being displayed correctly, you can proceed with confidence.
- Stay Updated: Vehicle technology is constantly evolving, and new models are introduced regularly. To ensure compatibility with the latest vehicles, keep your DTS Monaco software and diagnostic databases up to date. Updates are typically available from DTS-MONACO.EDU.VN.
By taking these steps to verify software compatibility, you can minimize the risk of errors and ensure that you are getting accurate and reliable diagnostic information. This will help you diagnose and repair vehicles more efficiently and effectively.
4. Step-by-Step Guide to Checking Readiness Monitor Status
Once the prerequisites are met, follow these steps to check the Readiness Monitor status using DTS Monaco.
4.1 Connecting to the Vehicle with DTS Monaco
Establishing a reliable connection is the first step in using DTS Monaco for any diagnostic procedure. A successful connection ensures that you can accurately read data from the vehicle’s ECUs and perform necessary tests.
- Launch DTS Monaco: Start by opening the DTS Monaco software on your laptop. Ensure that the software is properly installed and configured.
- Select a Project: Choose the appropriate project file for the vehicle you are working on. Project files contain specific settings and configurations tailored to different vehicle models and ECUs. Selecting the correct project file is essential for accurate diagnostics.
- Establish the Connection: In DTS Monaco, navigate to the connection settings and select your diagnostic interface from the list of available devices. Choose the appropriate communication protocol (e.g., CAN, K-Line) based on the vehicle’s specifications.
- Verify ECU Communication: Once the connection is established, verify that DTS Monaco can communicate with the vehicle’s ECUs. You can do this by running a quick ECU identification scan. This scan will list all the ECUs that are responding to the diagnostic interface.
- Check Connection Status: Monitor the connection status in DTS Monaco to ensure that the connection remains stable throughout the diagnostic session. A stable connection is crucial for avoiding data corruption and ensuring accurate results.
4.2 Navigating to the Readiness Monitor Section
After successfully connecting to the vehicle, the next step is to navigate to the section within DTS Monaco that displays the Readiness Monitor status. This section provides detailed information about the status of each emission-related monitor.
- Access Diagnostic Functions: In DTS Monaco, look for a menu or tab labeled “Diagnostics,” “OBD,” or “Readiness Monitors.” The exact wording may vary depending on the version of DTS Monaco you are using.
- Select Readiness Monitor Option: Within the diagnostic menu, find the option specifically for viewing Readiness Monitor status. This option may be labeled “I/M Readiness,” “Emission Readiness,” or similar.
- Initiate the Scan: Once you have selected the Readiness Monitor option, initiate the scan. DTS Monaco will communicate with the vehicle’s ECUs to retrieve the current status of each monitor. This process may take a few seconds to a few minutes, depending on the vehicle and the speed of the diagnostic interface.
- Review the Results: After the scan is complete, DTS Monaco will display a list of Readiness Monitors along with their current status. The status may be indicated as “Ready,” “Complete,” “Not Ready,” or “Incomplete.”
4.3 Interpreting the Readiness Monitor Status
Understanding the status of each monitor is essential for determining whether a vehicle is ready for an emissions test. Here’s how to interpret the different statuses:
- Ready/Complete: This status indicates that the monitor has run its diagnostic routine and has not detected any faults. A “Ready” or “Complete” status is required for most monitors to pass an emissions test.
- Not Ready/Incomplete: This status indicates that the monitor has not yet run its diagnostic routine or has detected a fault. A “Not Ready” or “Incomplete” status will typically cause a vehicle to fail an emissions test.
- Supported/Not Supported: Some vehicles may not support certain Readiness Monitors. In this case, the status will be indicated as “Supported” or “Not Supported.” This simply means that the monitor is not applicable to the specific vehicle.
According to the California Bureau of Automotive Repair, vehicles with more than one or two “Not Ready” monitors (depending on the model year) will fail the state’s smog check. Therefore, it’s essential to ensure that all applicable monitors are in a “Ready” state before submitting a vehicle for testing.
4.4 Clearing Codes and Rechecking
If any monitors are “Not Ready,” you may need to address the underlying issues and clear any Diagnostic Trouble Codes (DTCs). Here’s how to do it:
- Identify DTCs: Use DTS Monaco to read and record any Diagnostic Trouble Codes (DTCs) that are present in the vehicle’s ECUs. DTCs provide valuable information about the nature of the faults that have been detected.
- Address the Issues: Based on the DTCs, perform the necessary repairs or maintenance to address the underlying issues. This may involve replacing faulty sensors, repairing damaged wiring, or performing other corrective actions.
- Clear DTCs: After addressing the issues, use DTS Monaco to clear the DTCs from the vehicle’s ECUs. This will reset the Readiness Monitors and allow them to run their diagnostic routines again.
- Recheck Readiness Monitor Status: After clearing the DTCs, recheck the Readiness Monitor status to see if the monitors have transitioned to a “Ready” state. You may need to perform a drive cycle to allow the monitors to complete their diagnostic routines.
- Perform a Drive Cycle: A drive cycle is a specific driving pattern that is designed to allow the Readiness Monitors to run their diagnostic routines. The exact steps for performing a drive cycle vary depending on the vehicle make and model. Consult the vehicle’s service manual or online resources for detailed instructions.
- Monitor Progress: As you perform the drive cycle, continue to monitor the Readiness Monitor status in DTS Monaco. This will allow you to track the progress of each monitor and determine when they have reached a “Ready” state.
Alt text: Screenshot of DTS Monaco showing the readiness monitor status, highlighting ready and not ready indicators.
5. Common Issues and Troubleshooting
Encountering issues while checking Readiness Monitor status is not uncommon. Here are some common problems and how to troubleshoot them using DTS Monaco.
5.1 Monitor Not Setting to Ready
One of the most common issues is a Readiness Monitor that refuses to set to “Ready” even after clearing codes and performing a drive cycle. This can be frustrating, but there are several steps you can take to troubleshoot the problem:
- Verify Proper Drive Cycle: Ensure that you are performing the correct drive cycle for the vehicle make and model. Consult the vehicle’s service manual or online resources for detailed instructions. Even small deviations from the recommended drive cycle can prevent the monitors from setting.
- Check for Pending DTCs: Even if there are no active DTCs, there may be pending DTCs that are preventing the monitors from setting. Use DTS Monaco to check for pending DTCs and address any issues that are found.
- Inspect Sensors and Components: Inspect the sensors and components associated with the monitor that is not setting. This may involve checking wiring, connectors, and sensor readings. Use DTS Monaco to view live data from the sensors and compare the readings to the expected values.
- Check for Software Updates: Ensure that your DTS Monaco software and diagnostic databases are up to date. Outdated software may not have the latest diagnostic routines and may not be able to properly communicate with the vehicle’s ECUs.
- Consult Technical Resources: Consult technical resources such as online forums, service bulletins, and diagnostic guides for additional troubleshooting information. Other technicians may have encountered similar issues and may be able to offer valuable insights.
5.2 Communication Errors
Communication errors between DTS Monaco and the vehicle can also prevent you from checking Readiness Monitor status. Here are some common causes of communication errors and how to resolve them:
- Check the Diagnostic Interface: Ensure that the diagnostic interface is properly connected to the laptop and the vehicle’s OBD II port. Verify that the interface is powered on and that the drivers are installed correctly.
- Verify the Connection Settings: In DTS Monaco, check the connection settings to ensure that the correct diagnostic interface and communication protocol are selected.
- Inspect the OBD II Port: Inspect the vehicle’s OBD II port for damage or corrosion. A damaged OBD II port can prevent the diagnostic interface from making a proper connection.
- Check for Interference: Electromagnetic interference can sometimes disrupt the communication between DTS Monaco and the vehicle. Try moving the laptop away from potential sources of interference, such as power lines or other electronic devices.
- Restart the Software and Hardware: Sometimes, simply restarting the DTS Monaco software and the diagnostic interface can resolve communication errors.
5.3 Incorrect Vehicle Profile
Using an incorrect vehicle profile in DTS Monaco can lead to inaccurate diagnostic results and communication errors. Here’s how to ensure that you are using the correct vehicle profile:
- Verify Vehicle Information: Double-check the vehicle’s make, model, and year to ensure that you are selecting the correct profile in DTS Monaco.
- Use VIN Identification: Use the VIN (Vehicle Identification Number) identification feature in DTS Monaco to automatically identify the vehicle and select the correct profile.
- Compare ECU Data: After selecting the vehicle profile, compare the ECU data in DTS Monaco to the data listed in the vehicle’s service manual. This can help you verify that you have selected the correct profile.
According to a study by the National Institute for Automotive Service Excellence (ASE), using the correct diagnostic procedures and tools is essential for accurate and effective vehicle repairs. Incorrect diagnostic procedures can lead to misdiagnosis, unnecessary repairs, and increased costs.
5.4 Addressing Complex Cases
In some cases, checking Readiness Monitor status may require more advanced diagnostic techniques. Here are some tips for addressing complex cases:
- Use Advanced Diagnostic Functions: DTS Monaco offers a variety of advanced diagnostic functions, such as component testing, data logging, and waveform analysis. Use these functions to gather more detailed information about the vehicle’s systems and identify potential issues.
- Consult with Experts: Don’t hesitate to consult with experts or other experienced technicians for assistance. Online forums, technical support lines, and professional networks can provide valuable insights and guidance.
- Perform Thorough Inspections: Perform thorough inspections of the vehicle’s systems, including wiring, connectors, and components. Look for signs of damage, corrosion, or wear.
- Use OEM Diagnostic Information: Refer to the OEM (Original Equipment Manufacturer) diagnostic information for detailed troubleshooting procedures and specifications. OEM information is typically the most accurate and reliable source of information for diagnosing and repairing vehicles.
Alt text: Image depicting troubleshooting steps for communication errors with diagnostic tools in a car repair setting.
6. Tips and Best Practices for Using DTS Monaco
To maximize the effectiveness of DTS Monaco and ensure accurate results, follow these tips and best practices.
6.1 Keeping Software Updated
Regularly updating the DTS Monaco software and diagnostic databases is crucial for accessing the latest vehicle information, diagnostic routines, and programming files. Here’s why it’s important and how to do it:
- Access to New Vehicle Data: Vehicle technology is constantly evolving, and new models are introduced regularly. Software updates provide access to the latest vehicle data, ensuring that you can accurately diagnose and repair new vehicles.
- Improved Diagnostic Accuracy: Software updates often include improved diagnostic routines and bug fixes. This can help you diagnose issues more accurately and avoid misdiagnosis.
- Enhanced Functionality: Software updates may also add new features and functionality to DTS Monaco, making it an even more powerful and versatile tool.
- Security Updates: Software updates often include security patches that protect against malware and other threats. This is especially important for diagnostic tools that connect to the internet.
To keep your DTS Monaco software updated, follow these steps:
- Check for Updates Regularly: Check for software updates regularly by visiting the DTS-MONACO.EDU.VN website or using the update feature within the software.
- Download and Install Updates: Download and install any available updates following the instructions provided by DTS-MONACO.EDU.VN.
- Update Diagnostic Databases: In addition to updating the software, make sure to update the diagnostic databases as well. These databases contain vehicle-specific information that is essential for accurate diagnostics.
6.2 Using a Stable Power Supply
A stable power supply is essential during diagnostic and programming procedures to prevent data corruption and damage to the vehicle’s ECUs. Fluctuations in voltage can interrupt the communication process and lead to irreversible errors.
Here’s why a stable power supply is important and how to use one:
- Prevent Data Corruption: During programming procedures, data is being written to the vehicle’s ECUs. If the voltage fluctuates during this process, the data may become corrupted, rendering the ECU unusable.
- Avoid ECU Damage: Voltage fluctuations can also damage the vehicle’s ECUs, requiring costly repairs or replacements.
- Ensure Successful Programming: A stable power supply ensures that the programming process is completed successfully, without interruptions or errors.
To use a stable power supply, follow these steps:
- Connect the Power Supply: Connect a stable power supply or battery maintainer to the vehicle’s battery before beginning any diagnostic or programming procedures.
- Set the Voltage: Set the voltage on the power supply to the recommended level for the vehicle you are working on. This is typically around 13.5 volts.
- Monitor the Voltage: Monitor the voltage on the power supply throughout the diagnostic or programming procedure to ensure that it remains stable.
6.3 Regularly Calibrating the Diagnostic Interface
Calibrating the diagnostic interface ensures that it is providing accurate readings and communicating properly with the vehicle’s ECUs. Here’s why it’s important and how to do it:
- Maintain Accuracy: Over time, the components in the diagnostic interface can drift out of calibration, leading to inaccurate readings. Calibration ensures that the interface is providing accurate data.
- Ensure Proper Communication: Calibration also ensures that the interface is communicating properly with the vehicle’s ECUs. This is essential for successful diagnostics and programming.
- Follow Calibration Procedures: Follow the calibration procedures recommended by the manufacturer of the diagnostic interface. This typically involves using a calibration tool or software to adjust the interface’s settings.
6.4 Documenting Your Work
Documenting your work is essential for tracking progress, identifying patterns, and avoiding repeating mistakes. Here’s why it’s important and how to do it:
- Track Progress: Documenting your work allows you to track your progress on a diagnostic or repair job. This can help you stay organized and avoid getting sidetracked.
- Identify Patterns: By documenting your work, you can identify patterns that may not be immediately obvious. This can help you diagnose complex issues more quickly and effectively.
- Avoid Repeating Mistakes: Documenting your work also helps you avoid repeating mistakes. By reviewing your notes from previous jobs, you can learn from your errors and avoid making them again in the future.
- Create Detailed Notes: Create detailed notes about the steps you took, the results you obtained, and any issues you encountered.
- Save Diagnostic Data: Save any diagnostic data that you collect, such as DTCs, live data streams, and freeze frame data. This data can be invaluable for future troubleshooting.
- Organize Your Files: Organize your files in a logical manner so that you can easily find them when you need them.
According to a survey by the Automotive Service Association (ASA), shops that prioritize documentation and record-keeping tend to have higher levels of customer satisfaction and profitability.
6.5 Seeking Training and Support
Continuously seeking training and support is essential for staying up-to-date with the latest technologies and techniques. DTS-MONACO.EDU.VN provides comprehensive training and support resources to help you master DTS Monaco and other diagnostic tools.
- Online Courses: DTS-MONACO.EDU.VN offers a variety of online courses that cover topics such as DTS Monaco basics, advanced diagnostics, ECU programming, and car coding.
- In-Person Training: DTS-MONACO.EDU.VN also offers in-person training sessions at various locations. These sessions provide hands-on experience and personalized instruction from experienced trainers.
- Technical Support: DTS-MONACO.EDU.VN provides technical support to help you troubleshoot any issues that you may encounter while using DTS Monaco.
- Online Forums: DTS-MONACO.EDU.VN hosts online forums where you can connect with other technicians, ask questions, and share your knowledge.
By taking advantage of these training and support resources, you can stay ahead of the curve and provide the best possible service to your customers.
Alt text: A training session on using DTS Monaco, showing participants learning about the software interface and functions.
7. Advanced Techniques with DTS Monaco
Beyond basic diagnostics, DTS Monaco enables advanced techniques such as ECU flashing and car coding, allowing for extensive customization and upgrades.
7.1 ECU Flashing
ECU flashing involves updating the software on a vehicle’s ECU to the latest version provided by the manufacturer. This can address software bugs, improve performance, and add new features to the vehicle. DTS Monaco simplifies the flash programming process with its intuitive interface and step-by-step instructions.
- Access Flash Programming Function: In DTS Monaco, navigate to the flash programming function. This may be located in the “Programming” or “ECU Update” menu.
- Select the Correct Firmware: Select the correct firmware file for the vehicle’s ECU. The firmware file is typically provided by the vehicle manufacturer or a reputable aftermarket supplier.
- Follow On-Screen Instructions: Follow the on-screen instructions provided by DTS Monaco to initiate the flash programming process. This typically involves putting the vehicle into programming mode and selecting the appropriate options.
- Monitor Progress: Monitor the progress of the flash programming process. DTS Monaco will display a progress bar and provide status updates.
- Verify Success: After the flash programming process is complete, verify that the ECU has been successfully updated. This may involve reading the ECU’s software version or performing a diagnostic test.
7.2 Car Coding
Car coding involves customizing vehicle settings and enabling or disabling certain features. This can include anything from adjusting lighting settings and enabling comfort features to modifying engine parameters and improving performance. DTS Monaco allows users to easily adjust the coding settings to personalize the vehicle to their individual needs.
- Access Coding Function: In DTS Monaco, navigate to the coding function. This may be located in the “Coding” or “Configuration” menu.
- Select the ECU: Select the ECU that you want to code. Different ECUs control different functions of the vehicle, so it’s important to select the correct ECU for the changes you want to make.
- Adjust Coding Settings: Adjust the coding settings to your desired values. DTS Monaco will display a list of available coding options and their current settings.
- Apply Changes: Apply the changes to the ECU. DTS Monaco will write the new coding settings to the ECU, updating its configuration.
- Verify Changes: Verify that the changes have been successfully applied. This may involve testing the affected functions or reading the ECU’s coding data.
According to a report by SEMA (Specialty Equipment Market Association), car coding and customization are becoming increasingly popular among vehicle owners. The ability to personalize their vehicles to their individual tastes and preferences is a major draw for many consumers.
7.3 Variant Coding
Variant coding involves configuring an ECU to match the specific options and features of a vehicle. This is particularly useful when replacing an ECU or retrofitting new components. DTS Monaco allows users to easily adjust the variant coding settings to ensure proper operation of all vehicle systems.
- Access Variant Coding Function: In DTS Monaco, navigate to the variant coding function. This may be located in the “Coding” or “Configuration” menu.
- Select the ECU: Select the ECU that you want to code. Different ECUs control different functions of the vehicle, so it’s important to select the correct ECU for the changes you want to make.
- Enter Variant Coding Data: Enter the variant coding data for the vehicle. This data is typically provided by the vehicle manufacturer or a reputable aftermarket supplier.
- Apply Changes: Apply the changes to the ECU. DTS Monaco will write the new variant coding data to the ECU, updating its configuration.
- Verify Changes: Verify that the changes have been successfully applied. This may involve testing the affected functions or reading the ECU’s coding data.
7.4 Creating Custom Diagnostic Routines
For advanced users, DTS Monaco allows the creation of custom diagnostic routines to address specific issues or perform specialized tests.
- Access the Scripting Function: Open the scripting or macro function within DTS Monaco. This allows you to write custom scripts using a supported programming language.
- Define Diagnostic Steps: Define each step of the diagnostic routine, including ECU commands, data requests, and conditional statements.
- Test and Debug: Thoroughly test and debug the routine to ensure accuracy and reliability. Use test vehicles to validate the routine’s performance.
- Save and Share: Save the completed routine for future use and share it with other technicians if appropriate.
Alt text: Image illustrating the process of ECU flashing using DTS Monaco software on a laptop connected to a car.
8. Staying Compliant with Emission Standards
Ensuring vehicles meet emission standards is a critical responsibility for automotive technicians. Using DTS Monaco to check Readiness Monitor status is a key part of this process.
8.1 Understanding Emission Regulations
Emission regulations vary by state and region, so it’s important to stay informed about the specific requirements in your area.
- Research Local Regulations: Investigate the emission standards and testing procedures specific to your location. Contact local environmental agencies for detailed information.
- Stay Updated: Keep up-to-date with any changes to emission regulations. Subscribe to industry newsletters and participate in training sessions to stay informed.
- Comply with Federal Standards: Be aware of federal emission standards set by the EPA. These standards provide a baseline for state regulations.
8.2 Proper Diagnostic Procedures
Following proper diagnostic procedures is essential for accurately identifying and addressing emission-related issues.
- Use Reliable Tools: Utilize reliable diagnostic tools like DTS Monaco to check Readiness Monitor status and diagnose emission-related problems.
- Follow OEM Guidelines: Adhere to the diagnostic procedures recommended by the vehicle manufacturer. These procedures are designed to ensure accurate and effective diagnoses.
- Document Findings: Document all diagnostic findings, including DTCs, sensor readings, and test results. This information can be helpful for future troubleshooting and compliance audits.
8.3 Maintaining Accurate Records
Maintaining accurate records of diagnostic and repair work is crucial for demonstrating compliance with emission standards.
- Keep Detailed Records: Keep detailed records of all diagnostic and repair work performed on vehicles. Include the date of service, the vehicle’s VIN, a description of the problem, and the steps taken to resolve it.
- Store Records Securely: Store records securely and in an organized manner. Electronic records are often easier to manage and search.
- Comply with Retention Requirements: Comply with any record retention requirements specified by local or federal regulations.
8.4 Regular Vehicle Inspections
Regular vehicle inspections are essential for identifying and addressing emission-related issues before they become serious.
- Perform Routine Inspections: