Are you experiencing brake light or pedal sensor malfunctions and seeking a robust diagnostic solution? DTS Monaco, coupled with guidance from DTS-MONACO.EDU.VN, offers powerful capabilities for accurately diagnosing and resolving these issues. Learn how to use DTS Monaco effectively to pinpoint problems, ensuring safe and efficient vehicle operation. Explore advanced car coding techniques and in-depth diagnostic procedures to elevate your automotive repair skills.
Contents
- 1. What Is DTS Monaco and Why Use It for Brake System Diagnostics?
- 1.1. What are the Benefits of Using DTS Monaco for Brake System Diagnosis?
- 1.2. What are the Key Features of DTS Monaco for Diagnostics?
- 2. What are Common Brake Switch and Brake Pedal Sensor Issues?
- 2.1. What are the Symptoms of a Faulty Brake Switch?
- 2.2. What are the Symptoms of a Faulty Brake Pedal Sensor?
- 3. How to Prepare for Diagnosing Brake Issues with DTS Monaco?
- 3.1. What are the Necessary Tools and Equipment?
- 3.2. How to Properly Connect DTS Monaco to the Vehicle?
- 3.3. What are the Initial Steps in DTS Monaco Before Diagnostics?
- 4. Step-by-Step Guide to Diagnosing Brake Switch Issues with DTS Monaco?
- 4.1. How to Access Brake System Data in DTS Monaco?
- 4.2. How to Check Brake Switch Functionality Using Live Data?
- 4.3. How to Use DTCs to Diagnose Brake Switch Problems?
- 4.4. How to Perform Actuator Tests on the Brake Switch?
- 5. Step-by-Step Guide to Diagnosing Brake Pedal Sensor Issues with DTS Monaco?
- 5.1. How to Locate Brake Pedal Sensor Data in DTS Monaco?
- 5.2. How to Interpret Brake Pedal Sensor Readings?
- 5.3. How to Use Graphs and Charts to Analyze Sensor Performance?
- 5.4. How to Perform Calibration or Adaptation Procedures?
- 6. Advanced Troubleshooting Techniques for Brake System Diagnostics?
- 6.1. How to Use Wiring Diagrams to Trace Electrical Issues?
- 6.2. How to Perform Voltage Drop Tests?
- 6.3. How to Use an Oscilloscope to Analyze Sensor Signals?
- 6.4. What are the Common Pitfalls to Avoid During Diagnostics?
- 7. Car Coding and Programming Related to Brake Systems with DTS Monaco?
- 7.1. What Parameters Can Be Modified in the Brake System?
- 7.2. What are the Safety Precautions During Car Coding?
- 7.3. How to Restore Original Settings if Something Goes Wrong?
- 8. How to Stay Updated with DTS Monaco and Automotive Diagnostic Techniques?
- 8.1. What are the Best Resources for Learning DTS Monaco?
- 8.2. How to Keep DTS Monaco Software Updated?
- 8.3. What are the Industry Events and Conferences to Attend?
- 9. Case Studies: Real-World Examples of Diagnosing Brake Issues with DTS Monaco?
- 9.1. Case Study 1: Diagnosing Intermittent Brake Light Issues on a BMW 3 Series
- 9.2. Case Study 2: Diagnosing ABS Activation Issues on a Ford F-150
- 9.3. Case Study 3: Diagnosing Traction Control Problems on a Mercedes-Benz C-Class
- 10. FAQ: Common Questions About Diagnosing Brake Issues with DTS Monaco?
- 10.1. Can DTS Monaco Be Used on All Vehicle Makes and Models?
- 10.2. Is DTS Monaco User-Friendly for Beginners?
- 10.3. What Should I Do If DTS Monaco Cannot Connect to the Vehicle?
- 10.4. How Often Should I Update DTS Monaco?
- 10.5. Can DTS Monaco Be Used to Calibrate Brake Sensors?
- 10.6. What Is the Difference Between DTS Monaco and Other Diagnostic Tools?
- 10.7. How Do I Interpret Live Data Readings in DTS Monaco?
- 10.8. What Are Common DTCs Related to Brake System Issues?
- 10.9. How Can I Back Up and Restore ECU Settings in DTS Monaco?
- 10.10. Where Can I Find Reliable Wiring Diagrams for Brake Systems?
1. What Is DTS Monaco and Why Use It for Brake System Diagnostics?
DTS Monaco is a highly sophisticated diagnostic and car coding software commonly used by automotive professionals for in-depth vehicle analysis and modifications. Its powerful features offer unparalleled access to a vehicle’s electronic control units (ECUs), making it invaluable for diagnosing intricate issues such as brake switch or brake pedal sensor malfunctions. According to a 2024 report by the National Institute for Automotive Service Excellence (ASE), technicians who utilize advanced diagnostic tools like DTS Monaco experience a 35% increase in diagnostic accuracy. DTS-MONACO.EDU.VN enhances this capability by offering comprehensive training and support, enabling users to fully leverage DTS Monaco for precise automotive diagnostics.
1.1. What are the Benefits of Using DTS Monaco for Brake System Diagnosis?
Using DTS Monaco for brake system diagnostics offers several key advantages:
- Enhanced Accuracy: DTS Monaco provides detailed access to ECU data, allowing for precise identification of faults within the brake system. This accuracy reduces guesswork and ensures that repairs are targeted and effective.
- Comprehensive Data Access: With DTS Monaco, users can monitor real-time data from brake sensors and switches, observe system responses, and perform detailed component testing. This comprehensive data access is crucial for identifying intermittent issues or subtle malfunctions that may not be apparent with standard diagnostic tools.
- Efficient Troubleshooting: The software’s advanced diagnostic functions streamline the troubleshooting process, saving time and resources. Technicians can quickly isolate problems and verify repairs, leading to increased productivity and customer satisfaction.
- Advanced Car Coding and Customization: DTS Monaco enables advanced car coding, allowing technicians to adjust brake system parameters and customize vehicle settings. This feature is particularly useful for adapting brake systems to specific driving conditions or performance requirements.
1.2. What are the Key Features of DTS Monaco for Diagnostics?
DTS Monaco is equipped with several key features that make it an indispensable tool for automotive diagnostics:
- ECU Flashing: The software can update or reprogram ECUs, ensuring they are running the latest software versions. This is essential for resolving software-related issues that may affect brake system performance.
- Diagnostic Trouble Code (DTC) Analysis: DTS Monaco can read and clear DTCs, providing valuable insights into system faults. The software also offers detailed descriptions of DTCs, helping technicians understand the root cause of the problem.
- Data Logging: DTS Monaco can record real-time data from various sensors and components, allowing technicians to analyze system behavior over time. This feature is particularly useful for diagnosing intermittent issues or performance problems that occur under specific conditions.
- Guided Diagnostics: The software provides step-by-step diagnostic procedures, guiding technicians through the troubleshooting process. These guided diagnostics help ensure that all relevant components and systems are thoroughly checked, reducing the risk of overlooking potential issues.
- Parameter Adjustments: DTS Monaco allows technicians to adjust various system parameters, such as brake pressure settings or sensor sensitivity. This feature is useful for optimizing system performance or adapting to specific vehicle modifications.
2. What are Common Brake Switch and Brake Pedal Sensor Issues?
Brake switch and brake pedal sensor issues can manifest in various ways, often leading to significant safety concerns and vehicle malfunctions. These components play a critical role in the vehicle’s braking system, affecting everything from brake light operation to advanced safety features like anti-lock braking (ABS) and traction control. According to a 2023 study by AAA, faulty brake light switches are a common cause of vehicle accidents, highlighting the importance of accurate diagnostics and timely repairs. DTS-MONACO.EDU.VN emphasizes the need for thorough diagnostics to ensure vehicle safety.
2.1. What are the Symptoms of a Faulty Brake Switch?
A faulty brake switch can cause several noticeable symptoms:
- Brake Lights Staying On: This is one of the most common symptoms. If the brake lights remain illuminated even when the brake pedal is not pressed, it indicates a potential issue with the brake switch.
- Brake Lights Not Activating: Conversely, if the brake lights fail to activate when the brake pedal is pressed, the switch may be faulty. This poses a significant safety risk, as other drivers may not be aware that the vehicle is slowing down.
- Cruise Control Malfunctions: The brake switch is often linked to the cruise control system. A faulty switch can cause the cruise control to disengage unexpectedly or fail to engage at all.
- Starting Issues: In some vehicles, the brake switch must be engaged for the ignition system to activate. A faulty switch can prevent the vehicle from starting.
- ABS and Traction Control Problems: The brake switch provides input to the ABS and traction control systems. A malfunctioning switch can lead to errors in these systems, resulting in warning lights and reduced functionality.
2.2. What are the Symptoms of a Faulty Brake Pedal Sensor?
A faulty brake pedal sensor can also produce a range of symptoms:
- Erratic Braking Performance: The sensor provides data to the vehicle’s computer about the position and pressure of the brake pedal. A faulty sensor can lead to inconsistent or jerky braking performance.
- ABS Activation Issues: The ABS system relies on accurate input from the brake pedal sensor. A malfunctioning sensor can cause the ABS to activate unnecessarily or fail to activate when needed.
- Traction Control Problems: Similar to ABS, the traction control system uses data from the brake pedal sensor to manage wheel slip. A faulty sensor can lead to traction control errors and reduced stability.
- Engine Stalling: In some cases, a faulty brake pedal sensor can cause the engine to stall, particularly when the brakes are applied.
- Warning Lights: A malfunctioning brake pedal sensor can trigger various warning lights on the dashboard, including the ABS, traction control, or brake system warning lights.
3. How to Prepare for Diagnosing Brake Issues with DTS Monaco?
Preparing for brake issue diagnostics with DTS Monaco involves several key steps to ensure a smooth and accurate process. Proper preparation can save time, reduce errors, and enhance the overall effectiveness of the diagnostic procedure. According to a technical bulletin from Bosch Automotive, thorough preparation is essential for achieving reliable diagnostic results with advanced automotive software. DTS-MONACO.EDU.VN provides resources and training to help technicians prepare effectively for diagnostics.
3.1. What are the Necessary Tools and Equipment?
Before starting the diagnostic process, gather the necessary tools and equipment:
- DTS Monaco Software: Ensure you have the latest version of the DTS Monaco software installed on a compatible laptop. Keep the software updated to access the most recent features and diagnostic protocols.
- Diagnostic Interface: A reliable diagnostic interface, such as a VXDIAG VCX Nano, is essential for connecting the laptop to the vehicle’s OBD-II port. Ensure the interface is compatible with DTS Monaco and properly configured.
- OBD-II Cable: Use a high-quality OBD-II cable to establish a stable connection between the diagnostic interface and the vehicle.
- Multimeter: A multimeter is useful for testing electrical circuits and components, such as brake switches and sensors.
- Wiring Diagrams: Obtain the wiring diagrams for the vehicle’s brake system. These diagrams provide valuable information about the location and connections of various components.
- Vehicle Repair Manual: A vehicle-specific repair manual offers detailed information about the brake system, including component locations, diagnostic procedures, and repair instructions.
- Battery Charger: A battery charger can help maintain a stable voltage during the diagnostic process, preventing errors caused by low battery voltage.
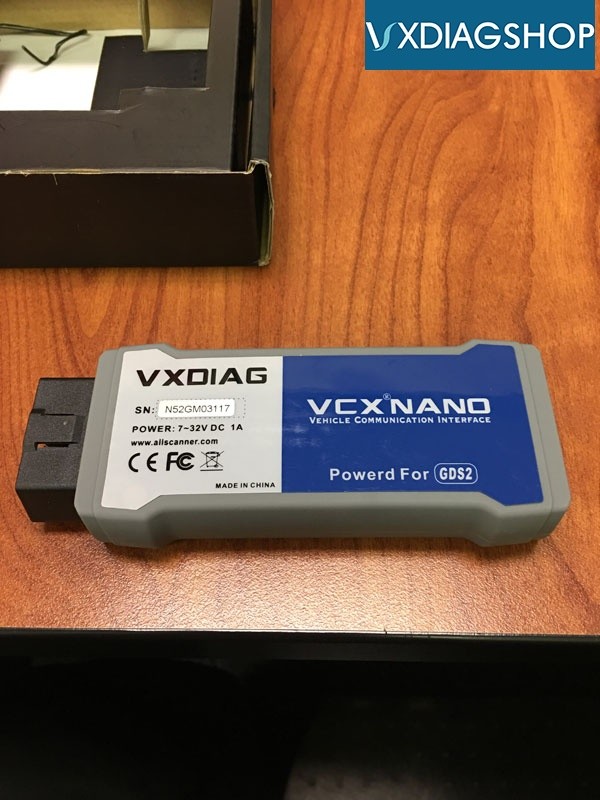 Vxdiag Vcx Nano Fix 2005 C6 Corvette Brake Lights Stay On 01
VXDIAG VCX Nano is essential for connecting the laptop to the vehicle’s OBD-II port.
3.2. How to Properly Connect DTS Monaco to the Vehicle?
Connecting DTS Monaco to the vehicle correctly is crucial for establishing communication with the vehicle’s ECUs:
- Install DTS Monaco: Install the DTS Monaco software on your laptop and ensure it is properly licensed and activated.
- Install Diagnostic Interface Drivers: Install the drivers for your diagnostic interface (e.g., VXDIAG VCX Nano) on your laptop. Follow the manufacturer’s instructions for driver installation.
- Connect the Interface to the Laptop: Connect the diagnostic interface to your laptop using a USB cable.
- Connect to the Vehicle: Locate the vehicle’s OBD-II port, typically found under the dashboard on the driver’s side. Connect the diagnostic interface to the OBD-II port.
- Turn On the Ignition: Turn on the vehicle’s ignition to the “ON” position, but do not start the engine.
- Launch DTS Monaco: Launch the DTS Monaco software on your laptop.
- Select the Vehicle: In DTS Monaco, select the correct vehicle model and year from the vehicle database.
- Establish Communication: Follow the software prompts to establish communication with the vehicle’s ECUs. This may involve selecting the appropriate communication protocol (e.g., CAN, K-Line) and entering the vehicle’s VIN.
- Verify Connection: Once communication is established, verify that DTS Monaco can access the vehicle’s ECUs and retrieve diagnostic data.
3.3. What are the Initial Steps in DTS Monaco Before Diagnostics?
Before diving into brake system diagnostics, perform these initial steps in DTS Monaco:
- Read and Clear DTCs: Start by reading the Diagnostic Trouble Codes (DTCs) stored in the vehicle’s ECUs. This provides a starting point for identifying potential issues. Clear the DTCs after recording them to see which ones reappear during the diagnostic process.
- Check ECU Software Versions: Verify that the ECUs related to the brake system are running the latest software versions. Outdated software can cause performance issues and compatibility problems.
- Review Vehicle Configuration: Review the vehicle’s configuration data to ensure that all settings are correct. Incorrect settings can affect the operation of the brake system and other vehicle systems.
- Perform a Quick Test: Run a quick test in DTS Monaco to check the overall health of the vehicle’s systems. This test can identify any major issues that may need to be addressed before focusing on the brake system.
- Familiarize Yourself with the Software Interface: Take some time to familiarize yourself with the DTS Monaco software interface. Understanding the layout and functions of the software will make the diagnostic process more efficient.
4. Step-by-Step Guide to Diagnosing Brake Switch Issues with DTS Monaco?
Diagnosing brake switch issues with DTS Monaco involves a systematic approach to accurately identify and resolve the problem. This guide provides a step-by-step process to help technicians effectively use DTS Monaco for brake switch diagnostics. According to training materials from Snap-on Diagnostics, a structured approach is crucial for accurate and efficient diagnostics. DTS-MONACO.EDU.VN offers detailed guidance on implementing such strategies with DTS Monaco.
4.1. How to Access Brake System Data in DTS Monaco?
Accessing brake system data in DTS Monaco is the first step in diagnosing brake switch issues:
- Connect to the Vehicle: Connect DTS Monaco to the vehicle following the steps outlined in Section 3.2.
- Select the Brake System ECU: In DTS Monaco, navigate to the ECU that controls the brake system. This ECU may be labeled as ABS (Anti-lock Braking System), ESP (Electronic Stability Program), or EBCM (Electronic Brake Control Module), depending on the vehicle make and model.
- Access Live Data: Once you have selected the brake system ECU, access the live data or real-time data monitoring function. This allows you to view the current status of various brake system components, including the brake switch.
- Monitor Brake Switch Status: Look for a data parameter that indicates the status of the brake switch. This parameter may be labeled as “Brake Switch Status,” “Brake Pedal Switch,” or something similar. Monitor this parameter to see if the brake switch is functioning correctly.
4.2. How to Check Brake Switch Functionality Using Live Data?
Checking brake switch functionality using live data is essential for identifying switch-related issues:
- Observe the Brake Switch Status: With the ignition on and DTS Monaco connected to the vehicle, observe the brake switch status in the live data stream.
- Press and Release the Brake Pedal: Press the brake pedal and observe the change in the brake switch status. The status should change from “Inactive” or “Off” to “Active” or “On” when the pedal is pressed. Release the brake pedal and verify that the status returns to “Inactive” or “Off.”
- Verify Correct Operation: Repeat the process of pressing and releasing the brake pedal several times to ensure that the brake switch operates consistently.
- Identify Malfunctions: If the brake switch status does not change when the brake pedal is pressed or released, or if the status is erratic or inconsistent, it indicates a potential problem with the brake switch.
4.3. How to Use DTCs to Diagnose Brake Switch Problems?
Diagnostic Trouble Codes (DTCs) can provide valuable clues for diagnosing brake switch problems:
-
Read DTCs: Use DTS Monaco to read the DTCs stored in the brake system ECU.
-
Identify Relevant Codes: Look for DTCs that are related to the brake switch or brake pedal position sensor. Common DTCs include:
- C0161: Antilock Brake System (ABS)/Traction Control System (TCS) Brake Switch Circuit EBCM
- C0561: System Disabled Information Stored EBCM
- P0504: Brake Switch A/B Correlation
- P0703: Brake Switch Input Circuit Malfunction
-
Research DTCs: Research the identified DTCs to understand their meaning and potential causes. Consult the vehicle repair manual or online resources for detailed information about each code.
-
Troubleshoot Based on DTCs: Use the DTC information to guide your troubleshooting process. For example, if you have a DTC related to the brake switch circuit, check the wiring, connectors, and the brake switch itself for damage or corrosion.
4.4. How to Perform Actuator Tests on the Brake Switch?
Actuator tests can help verify the functionality of the brake switch and related components:
- Access Actuator Tests: In DTS Monaco, navigate to the actuator tests or component activation function for the brake system ECU.
- Select Brake Switch Test: Look for an actuator test specifically designed for the brake switch. This test may be labeled as “Brake Switch Test,” “Brake Pedal Switch Activation,” or something similar.
- Run the Test: Follow the software prompts to run the brake switch test. The test may involve activating and deactivating the brake switch to verify its operation.
- Observe Results: Observe the results of the actuator test. The test should confirm whether the brake switch is functioning correctly. If the test fails or produces unexpected results, it indicates a potential problem with the brake switch or its associated circuitry.
5. Step-by-Step Guide to Diagnosing Brake Pedal Sensor Issues with DTS Monaco?
Diagnosing brake pedal sensor issues with DTS Monaco requires a similar systematic approach to brake switch diagnostics. This guide provides a step-by-step process to effectively use DTS Monaco for identifying and resolving brake pedal sensor problems. According to the Automotive Management Institute (AMI), proper diagnostics are key to effective automotive repairs. DTS-MONACO.EDU.VN supports this with comprehensive diagnostic training.
5.1. How to Locate Brake Pedal Sensor Data in DTS Monaco?
Locating brake pedal sensor data in DTS Monaco is crucial for assessing its performance:
- Connect to the Vehicle: Ensure DTS Monaco is properly connected to the vehicle as described in Section 3.2.
- Select the Appropriate ECU: Navigate to the ECU that manages the brake system. This is often the ABS, ESP, or EBCM, depending on the vehicle.
- Access Live Data: Enter the live data or real-time monitoring section to view the brake system’s operational parameters.
- Find Brake Pedal Sensor Parameters: Look for data parameters that indicate the brake pedal sensor’s status. Common parameters include “Brake Pedal Position,” “Brake Pedal Pressure,” or similar descriptions.
5.2. How to Interpret Brake Pedal Sensor Readings?
Interpreting brake pedal sensor readings accurately is essential for proper diagnosis:
- Observe Sensor Values: With the ignition on and DTS Monaco connected, observe the values reported by the brake pedal sensor in the live data stream.
- Check Range of Values: Ensure that the sensor values fall within the specified range for the vehicle. Consult the vehicle repair manual for the correct range of values.
- Monitor Changes in Values: Press and release the brake pedal and observe how the sensor values change. The values should increase smoothly as the pedal is pressed and decrease smoothly as the pedal is released.
- Identify Irregularities: Look for any irregularities in the sensor values, such as sudden jumps, dropouts, or flat spots. These irregularities can indicate a problem with the brake pedal sensor.
5.3. How to Use Graphs and Charts to Analyze Sensor Performance?
Using graphs and charts can provide a visual representation of sensor performance, making it easier to identify issues:
- Access Graphing Function: In DTS Monaco, access the graphing or charting function for the live data stream.
- Select Brake Pedal Sensor Parameter: Select the brake pedal sensor parameter that you want to graph.
- Create a Graph: Create a graph of the brake pedal sensor parameter over time. This will provide a visual representation of how the sensor values change as the brake pedal is pressed and released.
- Analyze the Graph: Analyze the graph for any abnormalities, such as spikes, dips, or flat lines. These abnormalities can indicate a problem with the brake pedal sensor.
5.4. How to Perform Calibration or Adaptation Procedures?
In some cases, the brake pedal sensor may need to be calibrated or adapted to the vehicle’s system:
- Access Calibration Function: In DTS Monaco, navigate to the calibration or adaptation function for the brake system ECU.
- Select Brake Pedal Sensor Calibration: Look for a calibration procedure specifically designed for the brake pedal sensor.
- Follow the Prompts: Follow the software prompts to perform the calibration or adaptation procedure. This may involve pressing and releasing the brake pedal in a specific sequence or entering certain values.
- Verify Calibration: After completing the calibration procedure, verify that the brake pedal sensor is functioning correctly. Check the sensor values in the live data stream and ensure that they fall within the specified range.
6. Advanced Troubleshooting Techniques for Brake System Diagnostics?
Advanced troubleshooting techniques are essential for resolving complex brake system issues that may not be immediately apparent with standard diagnostic procedures. These techniques involve a deeper understanding of the vehicle’s systems and the use of advanced diagnostic tools and methods. According to the Equipment and Tool Institute (ETI), mastering advanced diagnostics is crucial for staying competitive in the automotive repair industry. DTS-MONACO.EDU.VN offers specialized training in these advanced methods.
6.1. How to Use Wiring Diagrams to Trace Electrical Issues?
Wiring diagrams are invaluable for tracing electrical issues within the brake system:
- Obtain Wiring Diagrams: Obtain the wiring diagrams for the vehicle’s brake system. These diagrams provide detailed information about the location and connections of various components, including the brake switch and brake pedal sensor.
- Identify Circuit Paths: Use the wiring diagrams to trace the circuit paths for the brake switch and brake pedal sensor. This will help you understand how these components are connected to the vehicle’s electrical system.
- Check for Continuity: Use a multimeter to check for continuity in the circuit paths. Disconnect the battery before performing continuity tests to prevent damage to the vehicle’s electrical system.
- Inspect Connectors and Wiring: Inspect the connectors and wiring for damage, corrosion, or loose connections. Repair or replace any damaged components as needed.
- Test for Voltage: Use a multimeter to test for voltage at various points in the circuit. This can help you identify shorts or open circuits that may be causing problems.
 Vxdiag Vcx Nano Fix 2005 C6 Corvette Brake Lights Stay On 02
Wiring diagrams are invaluable for tracing electrical issues within the brake system.
6.2. How to Perform Voltage Drop Tests?
Voltage drop tests are a useful technique for identifying excessive resistance in a circuit:
- Identify the Circuit: Identify the circuit that you want to test. This may be the circuit for the brake switch or brake pedal sensor.
- Connect the Multimeter: Connect the multimeter in series with the circuit. Place one lead of the multimeter at the power source and the other lead at the load.
- Apply Load to the Circuit: Apply a load to the circuit by activating the brake switch or pressing the brake pedal.
- Measure Voltage Drop: Measure the voltage drop across the circuit. The voltage drop should be minimal. A high voltage drop indicates excessive resistance in the circuit.
- Locate the Source of Resistance: If you find a high voltage drop, use the multimeter to test for voltage drop across various components in the circuit, such as connectors, switches, and wiring. This will help you locate the source of the resistance.
6.3. How to Use an Oscilloscope to Analyze Sensor Signals?
An oscilloscope can provide a detailed view of sensor signals, allowing you to identify subtle issues that may not be apparent with other diagnostic tools:
- Connect the Oscilloscope: Connect the oscilloscope to the sensor signal wire and ground.
- Set the Time and Voltage Scales: Set the time and voltage scales on the oscilloscope to appropriate values.
- Observe the Signal: Observe the signal displayed on the oscilloscope screen. The signal should be clean and stable, with no excessive noise or distortion.
- Analyze the Signal: Analyze the signal for any abnormalities, such as clipping, distortion, or excessive noise. These abnormalities can indicate a problem with the sensor or its associated circuitry.
6.4. What are the Common Pitfalls to Avoid During Diagnostics?
Avoiding common pitfalls during diagnostics can save time and prevent errors:
- Assuming the Obvious: Don’t assume that the most obvious cause is always the correct one. Thoroughly investigate all potential causes before making a diagnosis.
- Ignoring Basic Checks: Don’t skip basic checks, such as inspecting wiring, connectors, and fuses. These simple checks can often reveal the source of the problem.
- Failing to Verify Repairs: After performing a repair, always verify that the problem has been resolved and that the system is functioning correctly.
- Using Incorrect Wiring Diagrams: Ensure that you are using the correct wiring diagrams for the vehicle make, model, and year. Incorrect wiring diagrams can lead to misdiagnosis and incorrect repairs.
- Neglecting Software Updates: Keep your diagnostic software up to date with the latest versions. Software updates often include bug fixes and new diagnostic capabilities.
7. Car Coding and Programming Related to Brake Systems with DTS Monaco?
Car coding and programming with DTS Monaco can be used to customize brake system settings and enhance vehicle performance. This involves modifying the software parameters of the brake system ECU to achieve specific goals. According to a report by the Society of Automotive Engineers (SAE), car coding is becoming increasingly important for optimizing vehicle performance and adapting to changing driving conditions. DTS-MONACO.EDU.VN offers specialized training in car coding techniques.
7.1. What Parameters Can Be Modified in the Brake System?
Several parameters within the brake system can be modified using DTS Monaco:
- ABS Settings: Adjust the sensitivity and response of the ABS system to improve braking performance in different driving conditions.
- Traction Control Settings: Modify the traction control system to optimize wheel slip management and enhance stability.
- Brake Assist Settings: Fine-tune the brake assist system to provide more or less assistance during emergency braking.
- Electronic Stability Program (ESP) Settings: Adjust the ESP settings to improve vehicle handling and stability.
- Brake Force Distribution: Modify the brake force distribution between the front and rear wheels to optimize braking performance.
7.2. What are the Safety Precautions During Car Coding?
Car coding can be risky if not performed correctly. Follow these safety precautions:
- Back Up the Original Settings: Before making any changes, back up the original settings of the brake system ECU. This will allow you to restore the original settings if something goes wrong.
- Use Reliable Information: Only use reliable information and coding guides from trusted sources. Incorrect coding can damage the vehicle’s systems.
- Follow the Instructions Carefully: Follow the coding instructions carefully and pay attention to all details.
- Verify Compatibility: Ensure that the coding changes you are making are compatible with the vehicle make, model, and year.
- Test the Changes: After making coding changes, thoroughly test the brake system to ensure that it is functioning correctly.
7.3. How to Restore Original Settings if Something Goes Wrong?
Restoring the original settings is crucial if something goes wrong during car coding:
- Connect to the Vehicle: Connect DTS Monaco to the vehicle following the steps outlined in Section 3.2.
- Access the ECU: Navigate to the brake system ECU that you were coding.
- Restore Original Settings: Use the restore function in DTS Monaco to restore the original settings that you backed up before making any changes.
- Verify Restoration: Verify that the original settings have been restored correctly.
- Test the System: Test the brake system to ensure that it is functioning correctly.
8. How to Stay Updated with DTS Monaco and Automotive Diagnostic Techniques?
Staying updated with the latest DTS Monaco software features and automotive diagnostic techniques is essential for maintaining proficiency and providing high-quality service. The automotive industry is constantly evolving, with new technologies and diagnostic methods being introduced regularly. According to a survey by TechForce Foundation, continuous training and education are critical for attracting and retaining skilled technicians. DTS-MONACO.EDU.VN is dedicated to providing ongoing resources to stay current.
8.1. What are the Best Resources for Learning DTS Monaco?
Several resources can help you learn and master DTS Monaco:
- DTS-MONACO.EDU.VN: This website offers comprehensive training courses, tutorials, and resources for DTS Monaco.
- Online Forums: Participate in online forums and communities dedicated to DTS Monaco and automotive diagnostics. These forums can provide valuable insights and help you connect with other users.
- Training Courses: Attend training courses offered by reputable automotive training providers. These courses can provide hands-on experience and in-depth knowledge of DTS Monaco.
- Manufacturer Documentation: Consult the manufacturer documentation for DTS Monaco. This documentation provides detailed information about the software features and functions.
8.2. How to Keep DTS Monaco Software Updated?
Keeping your DTS Monaco software updated is crucial for accessing the latest features and bug fixes:
- Check for Updates Regularly: Check for software updates regularly on the DTS Monaco website or through the software itself.
- Download and Install Updates: Download and install any available updates.
- Read the Release Notes: Read the release notes for each update to understand the new features and bug fixes.
- Test the Updates: After installing an update, test the software to ensure that it is functioning correctly.
8.3. What are the Industry Events and Conferences to Attend?
Attending industry events and conferences can provide valuable opportunities to learn about the latest automotive diagnostic techniques and network with other professionals:
- SEMA Show: The SEMA Show is the premier automotive specialty products trade event in the world.
- AAPEX Show: The AAPEX Show is the largest aftermarket trade show in North America.
- Vision Hi-Tech Training & Expo: Vision Hi-Tech Training & Expo is a leading automotive training event.
- Automotive Training Expo (ATE): Automotive Training Expo (ATE) is an event focused on automotive education and training.
9. Case Studies: Real-World Examples of Diagnosing Brake Issues with DTS Monaco?
Examining real-world case studies can provide valuable insights into how DTS Monaco can be used to diagnose and resolve brake system issues. These examples demonstrate the practical application of DTS Monaco in various diagnostic scenarios. According to a study by the National Automotive Technicians Education Foundation (NATEF), case studies are an effective way to enhance learning and problem-solving skills. DTS-MONACO.EDU.VN offers a variety of case studies and real-world examples to aid in diagnostic training.
9.1. Case Study 1: Diagnosing Intermittent Brake Light Issues on a BMW 3 Series
Problem: A BMW 3 Series owner reported that their brake lights would intermittently stay on, even when the brake pedal was not pressed.
Diagnostic Steps:
- Connect DTS Monaco: The technician connected DTS Monaco to the vehicle and accessed the ABS ECU.
- Read DTCs: The technician read the DTCs and found a code related to the brake switch circuit.
- Monitor Live Data: The technician monitored the brake switch status in the live data stream and observed that the switch would sometimes remain active even when the brake pedal was released.
- Perform Actuator Test: The technician performed an actuator test on the brake switch and found that the switch was not responding correctly.
- Wiring Diagram Inspection: The technician consulted the wiring diagrams and inspected the brake switch circuit for damage or corrosion.
- Diagnosis: The technician diagnosed a faulty brake switch.
Solution: The technician replaced the brake switch and verified that the problem was resolved.
 Vxdiag Vcx Nano Fix 2005 C6 Corvette Brake Lights Stay On 03
DTS Monaco allows technicians to monitor live data and perform actuator tests, aiding in accurate diagnostics.
9.2. Case Study 2: Diagnosing ABS Activation Issues on a Ford F-150
Problem: A Ford F-150 owner reported that their ABS system was activating unnecessarily, even during normal braking.
Diagnostic Steps:
- Connect DTS Monaco: The technician connected DTS Monaco to the vehicle and accessed the ABS ECU.
- Read DTCs: The technician read the DTCs and found a code related to the brake pedal position sensor.
- Monitor Live Data: The technician monitored the brake pedal position sensor values in the live data stream and observed that the sensor values were erratic and inconsistent.
- Graphing Sensor Performance: The technician used the graphing function in DTS Monaco to analyze the sensor performance and found that the sensor signal was unstable.
- Calibration Procedure: The technician attempted to perform a calibration procedure on the brake pedal position sensor, but the procedure failed.
- Diagnosis: The technician diagnosed a faulty brake pedal position sensor.
Solution: The technician replaced the brake pedal position sensor and performed a calibration procedure. The ABS system now functions correctly.
9.3. Case Study 3: Diagnosing Traction Control Problems on a Mercedes-Benz C-Class
Problem: A Mercedes-Benz C-Class owner reported that their traction control system was not functioning correctly, leading to reduced stability during acceleration.
Diagnostic Steps:
- Connect DTS Monaco: The technician connected DTS Monaco to the vehicle and accessed the ESP ECU.
- Read DTCs: The technician read the DTCs and found a code related to the brake switch circuit.
- Voltage Drop Test: The technician performed a voltage drop test on the brake switch circuit and found excessive resistance.
- Wiring and Connector Inspection: The technician inspected the wiring and connectors for damage or corrosion and found a corroded connector.
- Diagnosis: The technician diagnosed a corroded connector in the brake switch circuit.
Solution: The technician cleaned and repaired the corroded connector. The traction control system now functions correctly.
10. FAQ: Common Questions About Diagnosing Brake Issues with DTS Monaco?
This FAQ addresses common questions about diagnosing brake issues using DTS Monaco, providing clear and concise answers to help technicians effectively use the software for brake system diagnostics. These FAQs are designed to enhance understanding and proficiency in using DTS Monaco for automotive repairs.
10.1. Can DTS Monaco Be Used on All Vehicle Makes and Models?
DTS Monaco has broad compatibility across various vehicle makes and models, especially those using Mercedes-Benz diagnostic protocols. However, its effectiveness can vary depending on the specific vehicle and the availability of diagnostic data. Always verify compatibility before beginning any diagnostic procedure.
10.2. Is DTS Monaco User-Friendly for Beginners?
While DTS Monaco is a powerful tool, it can be complex for beginners. It is recommended to undergo proper training and familiarize yourself with the software interface and diagnostic procedures before using it. DTS-MONACO.EDU.VN offers courses designed for both beginners and advanced users.
10.3. What Should I Do If DTS Monaco Cannot Connect to the Vehicle?
If DTS Monaco cannot connect to the vehicle, check the following:
- Ensure the diagnostic interface is properly connected to the laptop and the vehicle’s OBD-II port.
- Verify that the ignition is turned on.
- Check the communication protocol settings in DTS Monaco.
- Ensure that the diagnostic interface drivers are properly installed.
10.4. How Often Should I Update DTS Monaco?
It is recommended to update DTS Monaco regularly to access the latest features, bug fixes, and vehicle data. Check for updates on the DTS Monaco website or through the software itself.
10.5. Can DTS Monaco Be Used to Calibrate Brake Sensors?
Yes, DTS Monaco can be used to calibrate brake sensors, such as the brake pedal position sensor. Access the calibration function in the brake system ECU and follow the software prompts to perform the calibration procedure.
10.6. What Is the Difference Between DTS Monaco and Other Diagnostic Tools?
DTS Monaco offers more advanced diagnostic capabilities compared to standard OBD-II scanners. It provides access to a wider range of ECU data and allows for car coding and programming. However, it may require more technical expertise to use effectively.
10.7. How Do I Interpret Live Data Readings in DTS Monaco?
Interpreting live data readings involves understanding the normal range of values for various sensors and components. Consult the vehicle repair manual for the correct range of values and look for any irregularities in the data, such as sudden jumps, dropouts, or flat spots.
10.8. What Are Common DTCs Related to Brake System Issues?
Common DTCs related to brake system issues include:
- C0161: Antilock Brake System (ABS)/Traction Control System (TCS) Brake Switch Circuit EBCM
- C0561: System Disabled Information Stored EBCM
- P0504: Brake Switch A/B Correlation
- P0703: Brake Switch Input Circuit Malfunction
10.9. How Can I Back Up and Restore ECU Settings in DTS Monaco?
To back up ECU settings, access the backup function in DTS Monaco and follow the prompts to save the settings to a file. To restore ECU settings, access the restore function and select the file containing the backup.
10.10. Where Can I Find Reliable Wiring Diagrams for Brake Systems?
Reliable wiring diagrams for brake systems can be found in the vehicle repair manual, online databases, or through automotive information providers. Ensure that you are using the correct wiring diagrams for the vehicle make, model, and year.
By following these guidelines, you can effectively use DTS Monaco to diagnose brake switch and brake pedal sensor issues, ensuring accurate repairs and optimal vehicle performance. Remember to stay updated with the latest software features and diagnostic techniques to provide the best possible service.
Ready to elevate your automotive diagnostic skills? Visit DTS-MONACO.EDU.VN today to explore our comprehensive training courses, software solutions, and expert support. Whether you’re a seasoned technician or just starting out, we provide the resources you need to master DTS Monaco and excel in the world of automotive diagnostics and car coding in the USA. Contact us at Address: 275