Diagnosing inaccurate outside temperature displays using DTS Monaco is a vital skill for automotive technicians, and DTS-MONACO.EDU.VN offers comprehensive resources. This guide provides a step-by-step approach to identifying and resolving these issues using advanced diagnostic tools and techniques, ensuring accurate temperature readings and optimal vehicle performance using car coding techniques and diagnostic software. Discover expert tips and solutions with our in-depth DTS Monaco support.
Contents
- 1. Understanding the Basics of Temperature Display Systems
- 1.1 What Components Make Up the Outside Temperature Display System?
- 1.2 Why is Accurate Temperature Measurement Important?
- 2. Identifying Common Causes of Inaccurate Temperature Readings
- 2.1 What are the Usual Suspects Behind Temperature Display Problems?
- 2.2 How Does Sensor Placement Affect Accuracy?
- 3. Preparing for Diagnostics with DTS Monaco
- 3.1 What is DTS Monaco, and Why Use It for Diagnostics?
- 3.2 What Equipment and Software Do You Need?
- 4. Step-by-Step Guide to Diagnosing Temperature Display Issues with DTS Monaco
- 4.1 How Do You Connect DTS Monaco to the Vehicle?
- 4.2 What Data Should You Monitor in DTS Monaco?
- 4.3 How to Interpret Fault Codes Related to Temperature Sensors
- 4.4 How Do You Perform Actuation Tests to Verify Sensor Functionality?
- 5. Advanced Diagnostic Techniques
- 5.1 What is Data Logging, and How Can It Help?
- 5.2 How Can You Use DTS Monaco to Recalibrate the Temperature Sensor?
- 5.3 Diagnosing Wiring Issues with DTS Monaco
- 6. Common Repair Procedures
- 6.1 How to Replace a Faulty Temperature Sensor
- 6.2 How to Repair Damaged Wiring
- 6.3 Addressing Corrosion Issues
- 7. Preventative Maintenance Tips
- 7.1 How Can You Prevent Future Temperature Display Issues?
- 7.2 What Are the Best Practices for Sensor Maintenance?
- 8. Utilizing DTS-MONACO.EDU.VN Resources
- 8.1 How Does DTS-MONACO.EDU.VN Assist in Diagnostics?
- 8.2 What Training Courses are Available for DTS Monaco?
- 9. Case Studies: Real-World Examples
- 9.1 Scenario 1: Inaccurate Temperature Reading Due to a Faulty Sensor
- 9.2 Scenario 2: Intermittent Temperature Display Issues Caused by Wiring Problems
- 10. Frequently Asked Questions (FAQ)
- 10.1 How Do I Know If My Temperature Sensor is Faulty?
- 10.2 Can I Recalibrate the Temperature Sensor Without DTS Monaco?
- 10.3 Where is the Temperature Sensor Typically Located?
- 10.4 How Often Should I Inspect the Temperature Sensor?
- 10.5 What Type of Wire Should I Use to Repair Damaged Wiring?
- 10.6 Can Corrosion Affect the Temperature Reading?
- 10.7 What Does an “Open Circuit” Fault Code Mean?
- 10.8 Is it Necessary to Disconnect the Battery Before Replacing the Temperature Sensor?
- 10.9 How Can I Prevent Corrosion on the Sensor Connectors?
- 10.10 What Should I Do If the Temperature Reading is Always Too High?
- Summary
1. Understanding the Basics of Temperature Display Systems
1.1 What Components Make Up the Outside Temperature Display System?
The outside temperature display system consists of the temperature sensor, wiring harness, the instrument cluster, and the vehicle’s ECU (Engine Control Unit). The sensor measures the ambient temperature and sends a signal to the ECU, which then relays the information to the instrument cluster for display.
Expanding on these components:
- Temperature Sensor: Typically a thermistor, its resistance changes with temperature variations, placed in the front of the vehicle to accurately measure outside air.
- Wiring Harness: Connects the temperature sensor to the ECU and instrument cluster, transmitting the temperature data as an analog or digital signal.
- Instrument Cluster: Displays the temperature reading to the driver, converting the signal from the ECU into a visual representation.
- ECU (Engine Control Unit): Acts as the central processing unit, receiving the temperature signal, processing it, and sending it to the instrument cluster.
- Display Unit: The display unit is part of the instrument cluster which displays the outside temperature to the driver.
- Communication Bus: The car’s communication network, like CAN bus, enables data transfer between the ECU and instrument cluster.
1.2 Why is Accurate Temperature Measurement Important?
Accurate temperature readings are essential for several reasons, including the proper functioning of the climate control system, engine management, and driver information. Incorrect readings can lead to discomfort, reduced fuel efficiency, and potential engine damage.
Reasons why accurate temperature measurement matters:
- Climate Control System: The automatic climate control system relies on accurate outside temperature readings to regulate the cabin temperature effectively.
- Engine Management: Some vehicles use outside temperature data to adjust engine parameters, such as air-fuel mixture, to optimize performance and efficiency.
- Driver Information: Accurate temperature readings provide drivers with important information about the external environment, enabling them to make informed decisions while driving.
- Safety Systems: Some advanced safety systems, like automatic emergency braking, can adjust their sensitivity based on ambient temperature.
- Defogging systems: Accurate temperature data can affect how well the defogging system performs.
2. Identifying Common Causes of Inaccurate Temperature Readings
2.1 What are the Usual Suspects Behind Temperature Display Problems?
Several factors can cause inaccurate temperature readings, including a faulty sensor, wiring issues, corrosion, ECU malfunction, or instrument cluster problems.
Typical causes of inaccurate temperature readings:
- Faulty Sensor: A damaged or degraded temperature sensor is the most common cause, resulting in inaccurate resistance readings.
- Wiring Issues: Damaged, corroded, or loose wiring can disrupt the signal between the sensor, ECU, and instrument cluster.
- Corrosion: Corrosion on sensor connectors or wiring terminals can impede electrical conductivity, leading to inaccurate readings.
- ECU Malfunction: While less common, a malfunctioning ECU can misinterpret or fail to process the temperature signal correctly.
- Instrument Cluster Problems: Issues within the instrument cluster itself, such as faulty display components, can cause incorrect temperature display.
- Software Issues: Sometimes, the car’s software can have bugs that cause incorrect readings.
- Physical damage: Damage to the sensor or its wiring from accidents or road debris can affect readings.
2.2 How Does Sensor Placement Affect Accuracy?
The location of the temperature sensor significantly impacts its accuracy. Sensors placed near heat sources, such as the engine or radiator, may provide artificially high readings.
Here’s how sensor placement affects accuracy:
- Proximity to Heat Sources: Sensors near the engine, radiator, or exhaust system can be influenced by radiant heat, leading to inflated temperature readings.
- Exposure to Direct Sunlight: Direct sunlight can also affect sensor readings, especially if the sensor is not shielded properly.
- Airflow: Sensors should be placed in an area with good airflow to ensure they accurately reflect the ambient temperature.
- Shielding: Adequate shielding around the sensor can protect it from radiant heat and other environmental factors, improving accuracy.
- OEM Location: Sticking to the original equipment manufacturer’s (OEM) specified location ensures reliability.
- Height from Ground: The sensor should be at a certain height from the ground to avoid being affected by road heat.
3. Preparing for Diagnostics with DTS Monaco
3.1 What is DTS Monaco, and Why Use It for Diagnostics?
DTS Monaco is a powerful diagnostic and coding tool used by automotive technicians to diagnose and repair complex vehicle systems. It allows direct access to the vehicle’s ECUs, enabling advanced diagnostics, coding, and programming.
Why DTS Monaco is preferred for diagnostics:
- Direct ECU Access: DTS Monaco provides direct communication with the vehicle’s ECUs, allowing technicians to read and write data, perform diagnostic tests, and execute coding functions.
- Advanced Diagnostics: It supports comprehensive diagnostic procedures, including reading fault codes, viewing live data, performing actuation tests, and analyzing system parameters.
- Coding and Programming: DTS Monaco enables technicians to perform coding and programming functions, such as calibrating sensors, adapting control units, and activating new features.
- Customization: It offers extensive customization options, allowing technicians to tailor diagnostic procedures and coding functions to specific vehicle requirements.
- Efficiency: Streamlines the diagnostic process, saving time and improving accuracy.
- Comprehensive: It provides detailed information about the vehicle’s systems, aiding in accurate diagnostics.
3.2 What Equipment and Software Do You Need?
To perform diagnostics with DTS Monaco, you need a laptop with the DTS Monaco software installed, a compatible diagnostic interface (e.g., a multiplexer), and the appropriate vehicle communication protocols (e.g., CAN, K-Line).
Necessary equipment and software:
- Laptop: A Windows-based laptop with sufficient processing power and memory to run DTS Monaco.
- DTS Monaco Software: The DTS Monaco software application, properly licensed and installed on the laptop. DTS-MONACO.EDU.VN is the best place to start!
- Diagnostic Interface: A compatible diagnostic interface (multiplexer) that connects the laptop to the vehicle’s diagnostic port (OBD-II).
- Vehicle Communication Protocols: Support for the vehicle’s communication protocols, such as CAN (Controller Area Network), K-Line, and Ethernet.
- OBD-II Cable: Connects the diagnostic interface to the car’s OBD-II port.
- Power Supply: Ensures a stable power supply to the car during diagnostics.
4. Step-by-Step Guide to Diagnosing Temperature Display Issues with DTS Monaco
4.1 How Do You Connect DTS Monaco to the Vehicle?
Connect the diagnostic interface to the vehicle’s OBD-II port and the laptop via USB or Bluetooth. Launch DTS Monaco and select the appropriate vehicle model and communication protocol.
Steps to connect DTS Monaco to the vehicle:
- Locate OBD-II Port: Find the OBD-II port, usually located under the dashboard on the driver’s side.
- Connect Diagnostic Interface: Plug the diagnostic interface into the OBD-II port.
- Connect to Laptop: Connect the diagnostic interface to the laptop using a USB cable or Bluetooth.
- Launch DTS Monaco: Open the DTS Monaco software on the laptop.
- Select Vehicle Model: Choose the correct vehicle model and year from the software’s vehicle selection menu.
- Select Communication Protocol: Select the appropriate communication protocol (e.g., CAN, K-Line) based on the vehicle’s specifications.
- Establish Connection: Initiate the connection between the software and the vehicle, following the on-screen prompts.
- Verify Connection: Confirm that the connection is successful by checking for a “Connected” status in the software.
4.2 What Data Should You Monitor in DTS Monaco?
Monitor the outside temperature sensor data in real-time to compare it with the actual ambient temperature. Check for any fault codes related to the temperature sensor or related systems.
Data to monitor in DTS Monaco:
- Outside Temperature Sensor Reading: Monitor the live data stream from the outside temperature sensor to see the current temperature reading.
- Ambient Temperature Reading: Compare the sensor reading with a reliable ambient temperature source (e.g., a thermometer) to identify discrepancies.
- Fault Codes: Check for any diagnostic trouble codes (DTCs) related to the temperature sensor, wiring, ECU, or instrument cluster.
- Sensor Voltage: Monitor the voltage signal from the temperature sensor to ensure it is within the specified range.
- ECU Temperature Parameters: Check other temperature-related parameters in the ECU to see if they correlate with the outside temperature reading.
- Wiring Continuity: Check the wiring for continuity to ensure that the signal is transmitted correctly.
- Grounding: Ensure that the sensor is properly grounded.
4.3 How to Interpret Fault Codes Related to Temperature Sensors
Fault codes such as “Open circuit,” “Short to ground,” or “Implausible signal” indicate specific issues with the sensor or its wiring. Refer to the vehicle’s service manual for detailed descriptions and troubleshooting steps.
Interpreting fault codes for temperature sensors:
- Open Circuit: Indicates a break in the wiring or a disconnected sensor.
- Short to Ground: Suggests that the sensor wire is contacting the vehicle’s chassis, causing a short circuit.
- Short to Voltage: Means the sensor wire is contacting a voltage source, leading to an incorrect signal.
- Implausible Signal: Indicates that the sensor is sending a signal that is outside the expected range.
- Signal High/Low: Points to the sensor’s signal being either too high or too low, often due to a faulty sensor or wiring issue.
- Intermittent Signal: Shows that the signal is unstable, likely due to loose wiring or corrosion.
- Sensor Calibration Fault: Indicates that the sensor needs to be calibrated.
4.4 How Do You Perform Actuation Tests to Verify Sensor Functionality?
Use DTS Monaco to perform actuation tests on the temperature display system. This can include simulating different temperature values to see if the instrument cluster responds accordingly.
Steps for actuation tests:
- Access Actuation Tests: Navigate to the actuation tests section in DTS Monaco.
- Select Temperature Sensor Test: Choose the test related to the outside temperature sensor.
- Simulate Temperature Values: Input different temperature values to simulate changes in ambient temperature.
- Monitor Instrument Cluster Response: Observe the instrument cluster to see if the temperature display changes accordingly.
- Verify Wiring and Connections: Check the wiring and connections of the sensor to ensure they are secure and free of corrosion.
- Check ECU Response: Monitor the ECU’s response to the simulated values.
- Compare to Specifications: Compare the actual response to the expected response based on the vehicle’s specifications.
5. Advanced Diagnostic Techniques
5.1 What is Data Logging, and How Can It Help?
Data logging involves recording sensor data over a period to identify intermittent issues or trends. Use DTS Monaco to log the outside temperature sensor data while driving to see if the readings fluctuate unexpectedly.
Benefits of data logging:
- Identifying Intermittent Issues: Data logging can capture temporary or intermittent problems that may not be apparent during a static diagnostic test.
- Analyzing Trends: By recording data over time, technicians can identify patterns or trends in sensor behavior, helping to diagnose underlying issues.
- Real-World Conditions: Data logging allows technicians to monitor sensor performance under real-world driving conditions, providing a more accurate assessment.
- Troubleshooting Complex Problems: It is helpful in troubleshooting complex or elusive problems that are difficult to diagnose through conventional methods.
- Validating Repairs: Data logging can be used to validate the effectiveness of repairs by comparing sensor performance before and after the fix.
- Detailed Analysis: It gives a detailed overview of the sensor’s performance, aiding in accurate diagnostics.
- Historical Data: Provides historical data that can be used for future reference.
5.2 How Can You Use DTS Monaco to Recalibrate the Temperature Sensor?
If the temperature sensor is slightly off but still functional, you may be able to recalibrate it using DTS Monaco. Access the calibration function in the software and follow the on-screen instructions.
Recalibrating the temperature sensor:
- Access Calibration Function: Navigate to the calibration function in DTS Monaco.
- Follow On-Screen Instructions: Follow the prompts to initiate the calibration process.
- Enter Calibration Values: Input the appropriate calibration values based on a reliable temperature source.
- Verify Calibration: Check the temperature sensor reading after calibration to ensure it is accurate.
- Check Sensor Specifications: Before recalibrating, check the sensor’s specifications to make sure it’s within the acceptable range.
- Use Accurate Instruments: Use accurate temperature measurement instruments during calibration.
- Document Calibration: Keep a record of the calibration settings for future reference.
5.3 Diagnosing Wiring Issues with DTS Monaco
DTS Monaco can help diagnose wiring issues by monitoring the voltage and resistance of the sensor circuit. Use the software to perform continuity tests and check for shorts to ground or voltage.
Diagnosing wiring issues:
- Continuity Tests: Use DTS Monaco to perform continuity tests on the wiring harness to check for breaks or disconnections.
- Voltage Monitoring: Monitor the voltage signal from the temperature sensor to ensure it is within the specified range.
- Resistance Checks: Measure the resistance of the sensor circuit to identify any abnormalities or excessive resistance.
- Short to Ground/Voltage Tests: Check for shorts to ground or voltage using DTS Monaco’s diagnostic functions.
- Inspect Connectors: Check the sensor connectors for corrosion or damage.
- Check Wiring Diagrams: Consult the vehicle’s wiring diagrams to ensure correct connections.
- Use a Multimeter: Use a multimeter to manually check the wiring for continuity and shorts.
6. Common Repair Procedures
6.1 How to Replace a Faulty Temperature Sensor
If the temperature sensor is faulty, replace it with a new one. Ensure the new sensor is compatible with the vehicle and install it according to the manufacturer’s instructions.
Steps to replace a temperature sensor:
- Disconnect Battery: Disconnect the vehicle’s battery to prevent electrical shorts.
- Locate Sensor: Find the temperature sensor, usually located in the front of the vehicle.
- Disconnect Connector: Disconnect the electrical connector from the sensor.
- Remove Old Sensor: Remove the old sensor, typically held in place by a clip or screw.
- Install New Sensor: Install the new sensor, ensuring it is securely in place.
- Reconnect Connector: Reconnect the electrical connector to the sensor.
- Reconnect Battery: Reconnect the vehicle’s battery.
- Test Sensor: Use DTS Monaco to verify that the new sensor is working correctly.
6.2 How to Repair Damaged Wiring
Repair any damaged wiring by splicing in new wire sections or replacing the entire wiring harness. Use proper soldering and insulation techniques to ensure a reliable connection.
Repairing damaged wiring:
- Identify Damage: Locate the damaged section of the wiring harness.
- Disconnect Wiring: Disconnect the wiring harness from the sensor and ECU.
- Cut Damaged Section: Cut out the damaged section of the wiring.
- Splice New Wire: Splice in a new section of wire using solder and heat-shrink tubing.
- Insulate Connections: Properly insulate all connections to prevent shorts and corrosion.
- Reconnect Wiring: Reconnect the wiring harness to the sensor and ECU.
- Test Repair: Use DTS Monaco to test the repaired wiring for continuity and proper signal transmission.
6.3 Addressing Corrosion Issues
Clean any corroded connectors or terminals with a wire brush or electrical contact cleaner. Apply dielectric grease to prevent future corrosion.
Addressing corrosion issues:
- Disconnect Connectors: Disconnect the corroded connectors or terminals.
- Clean Corrosion: Clean the corroded surfaces using a wire brush or electrical contact cleaner.
- Apply Dielectric Grease: Apply a thin layer of dielectric grease to the connectors or terminals to prevent future corrosion.
- Reconnect Connectors: Reconnect the connectors or terminals.
- Test Connection: Use DTS Monaco to test the connection for proper conductivity.
7. Preventative Maintenance Tips
7.1 How Can You Prevent Future Temperature Display Issues?
Regularly inspect the temperature sensor and wiring for damage or corrosion. Keep the sensor clean and free from debris.
Preventative maintenance tips:
- Regular Inspections: Regularly inspect the temperature sensor and wiring for damage or corrosion.
- Cleaning: Keep the sensor clean and free from debris.
- Wiring Protection: Protect the wiring harness from damage by securing it properly and avoiding sharp bends or chafing.
- Corrosion Prevention: Apply dielectric grease to connectors and terminals to prevent corrosion.
- Software Updates: Keep the vehicle’s software up to date to ensure proper functioning of the temperature display system.
- Professional Check-ups: Have a professional technician check the system during routine maintenance.
7.2 What Are the Best Practices for Sensor Maintenance?
Follow the manufacturer’s recommended maintenance schedule for the temperature sensor. Replace the sensor if it shows signs of degradation or malfunction.
Best practices for sensor maintenance:
- Follow Manufacturer’s Schedule: Adhere to the manufacturer’s recommended maintenance schedule for the temperature sensor.
- Replace When Necessary: Replace the sensor if it shows signs of degradation or malfunction, such as inaccurate readings or intermittent issues.
- Use OEM Parts: Use original equipment manufacturer (OEM) parts to ensure compatibility and reliability.
- Proper Installation: Ensure proper installation of the sensor, following the manufacturer’s instructions.
- Regular Cleaning: Clean the sensor regularly to remove dirt and debris.
- Check Connections: Periodically check the sensor’s connections to ensure they are secure.
8. Utilizing DTS-MONACO.EDU.VN Resources
8.1 How Does DTS-MONACO.EDU.VN Assist in Diagnostics?
DTS-MONACO.EDU.VN offers detailed guides, training courses, and technical support to help technicians effectively use DTS Monaco for diagnosing and repairing automotive systems, including temperature display issues.
Ways DTS-MONACO.EDU.VN assists in diagnostics:
- Detailed Guides: Providing comprehensive guides on using DTS Monaco for various diagnostic procedures.
- Training Courses: Offering structured training courses to enhance technicians’ skills in using DTS Monaco.
- Technical Support: Providing technical support to address specific diagnostic challenges and queries.
- Software Updates: Keeping users informed about the latest software updates and features.
- Community Forum: Offering a community forum for technicians to share knowledge and experiences.
- Resource Library: Providing a library of resources, including manuals, wiring diagrams, and troubleshooting tips.
8.2 What Training Courses are Available for DTS Monaco?
DTS-MONACO.EDU.VN provides various training courses covering basic to advanced diagnostics, coding, and programming using DTS Monaco. These courses are designed for technicians of all skill levels.
Available training courses:
- Basic Diagnostics: Covers the fundamentals of using DTS Monaco for reading fault codes and viewing live data.
- Advanced Diagnostics: Focuses on advanced diagnostic techniques, such as actuation tests, data logging, and component testing.
- Coding and Programming: Teaches technicians how to perform coding and programming functions using DTS Monaco.
- Customization: Explains how to customize DTS Monaco for specific vehicle requirements and diagnostic procedures.
- Troubleshooting: Offers training on how to troubleshoot common issues encountered while using DTS Monaco.
- Hands-On Training: Provides hands-on training sessions using real vehicles and diagnostic equipment.
- Online Courses: Offers online courses for remote learning and convenience.
9. Case Studies: Real-World Examples
9.1 Scenario 1: Inaccurate Temperature Reading Due to a Faulty Sensor
A technician uses DTS Monaco to diagnose a vehicle with an inaccurate temperature display. The fault codes indicate an “Implausible signal” from the temperature sensor. The technician replaces the sensor, and the temperature reading returns to normal.
Steps in the scenario:
- Customer Complaint: The customer reports an inaccurate temperature display.
- Initial Inspection: The technician performs a visual inspection of the sensor and wiring.
- DTS Monaco Connection: The technician connects DTS Monaco to the vehicle.
- Fault Code Diagnosis: DTS Monaco identifies an “Implausible signal” fault code for the temperature sensor.
- Sensor Replacement: The technician replaces the faulty temperature sensor.
- Verification: After replacement, the technician uses DTS Monaco to verify that the new sensor is working correctly and the temperature reading is accurate.
9.2 Scenario 2: Intermittent Temperature Display Issues Caused by Wiring Problems
A technician uses data logging with DTS Monaco to identify intermittent temperature display issues. The data log reveals fluctuations in the temperature reading, indicating a wiring problem. The technician repairs the damaged wiring, resolving the issue.
Steps in the scenario:
- Customer Complaint: The customer reports intermittent temperature display issues.
- Initial Inspection: The technician performs a visual inspection but finds no obvious problems.
- Data Logging: The technician uses DTS Monaco to log temperature sensor data while driving.
- Data Analysis: The data log reveals fluctuations in the temperature reading.
- Wiring Inspection: The technician inspects the wiring harness and identifies a damaged section.
- Wiring Repair: The technician repairs the damaged wiring.
- Verification: After the repair, the technician performs another data log to verify that the temperature reading is stable.
10. Frequently Asked Questions (FAQ)
10.1 How Do I Know If My Temperature Sensor is Faulty?
Inaccurate temperature readings, fault codes related to the temperature sensor, or intermittent display issues can indicate a faulty sensor.
10.2 Can I Recalibrate the Temperature Sensor Without DTS Monaco?
In some cases, you may be able to recalibrate the temperature sensor using other diagnostic tools, but DTS Monaco provides the most comprehensive and accurate calibration options.
10.3 Where is the Temperature Sensor Typically Located?
The temperature sensor is usually located in the front of the vehicle, often behind the front grille or bumper.
10.4 How Often Should I Inspect the Temperature Sensor?
You should inspect the temperature sensor during regular vehicle maintenance, typically every 12 months or 12,000 miles.
10.5 What Type of Wire Should I Use to Repair Damaged Wiring?
Use automotive-grade wire that is the same gauge as the original wiring to ensure proper conductivity and durability.
10.6 Can Corrosion Affect the Temperature Reading?
Yes, corrosion on the sensor connectors or wiring terminals can impede electrical conductivity and lead to inaccurate readings.
10.7 What Does an “Open Circuit” Fault Code Mean?
An “Open circuit” fault code indicates a break in the wiring or a disconnected sensor.
10.8 Is it Necessary to Disconnect the Battery Before Replacing the Temperature Sensor?
Yes, disconnecting the battery is recommended to prevent electrical shorts during the replacement process.
10.9 How Can I Prevent Corrosion on the Sensor Connectors?
Apply dielectric grease to the connectors to prevent moisture and corrosion.
10.10 What Should I Do If the Temperature Reading is Always Too High?
Check the sensor location to ensure it is not near any heat sources, such as the engine or radiator.
Summary
Diagnosing inaccurate outside temperature displays using DTS Monaco involves understanding the system components, identifying common causes of issues, performing diagnostic tests, and implementing appropriate repairs. DTS-MONACO.EDU.VN provides valuable resources, training courses, and technical support to help technicians master these skills. By following the steps outlined in this guide, automotive technicians can accurately diagnose and resolve temperature display problems, ensuring optimal vehicle performance and customer satisfaction. For in-depth training and advanced solutions, visit DTS-MONACO.EDU.VN and elevate your diagnostic expertise today. Don’t let temperature display issues slow you down – explore our comprehensive DTS Monaco resources now!
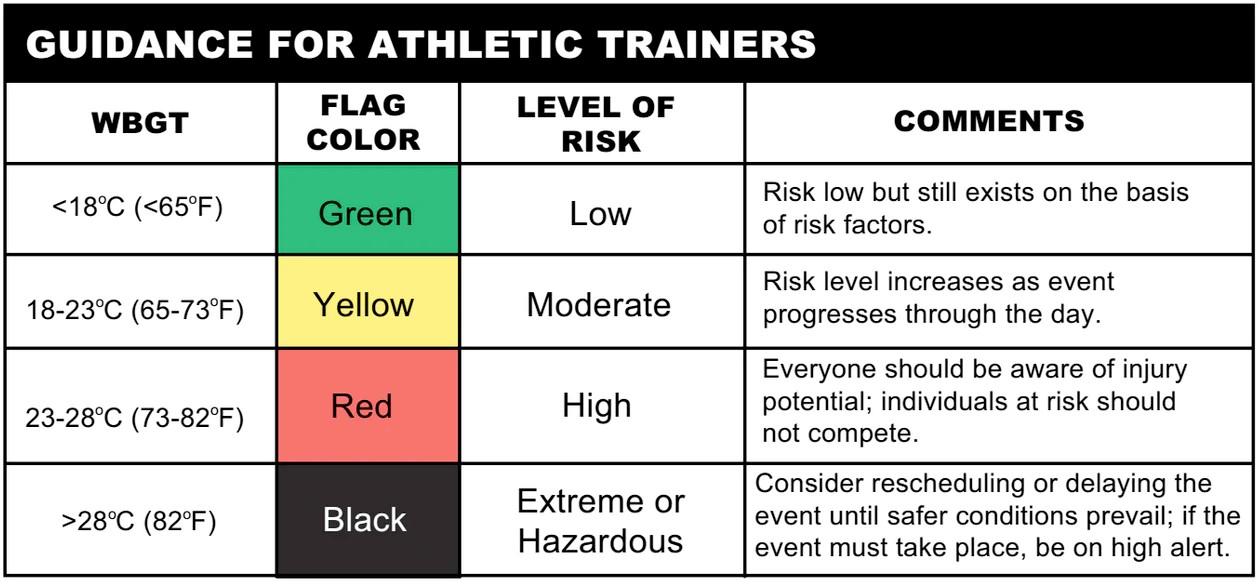 Guidance for Athletic Trainers