This article explains how ECOM handles diagnostic communication requiring secure pairing with the VCI. Finding it challenging to navigate ECOM diagnostic communication with secure pairing and VCI? DTS-MONACO.EDU.VN offers comprehensive solutions to streamline your car coding and automotive diagnostic processes. Learn the secure pairing process, explore ECOM/driver implementation nuances, and elevate your automotive diagnostic expertise.
Contents
- 11. Understanding Firewall Policy Parameters in ECOM Communication
- 11.1. Essential Traffic Flow Parameters
- 11.2. Practical Application
- 12.1. Navigating the GUI
- 12.2. Step-by-Step: Creating a Policy by IP Address
- 12.3. Example GUI Configuration
- 12.4. Displaying Logic Between Firewall Policy Objects in the GUI
- 12.5. Enabling Advanced Policy Options in the GUI
- 13.1. Accessing the CLI
- 13.2. Basic CLI Commands
- 13.3. Example CLI Configuration
- 13.4. Firewall Anti-Replay Option Per Policy
- 14.1. Understanding Policy Views
- 14.2. Example – Move a Policy by Policy ID:
- 14.3. Using Policy Match
- 14.4. Sample Configuration
- 14.5. Practical Application
- 15.1. Predefined Services
- 15.2. Custom Services
- 15.3. Service Groups
- 15.4. Example Scenario
- 16.1. Policy Change Summary
- 16.2. Policy Expiration
- 16.3. Example Scenario
- 17.1. Hardware Acceleration
- 17.2. TCP Maximum Segment Size (MSS)
- 17.3. Adjusting Session Time-to-Live (TTL)
1. What is ECOM in Automotive Diagnostics?
ECOM, short for Ethernet Communication, is a hardware interface used in modern automotive diagnostics. It facilitates communication between a diagnostic device (like a laptop running diagnostic software) and the vehicle’s electronic control units (ECUs) via Ethernet. It’s a crucial component in car coding and advanced vehicle diagnostics. Essentially, ECOM enables faster and more reliable data transfer compared to older interfaces like CAN (Controller Area Network).
2. What is VCI in Automotive Diagnostics?
VCI stands for Vehicle Communication Interface. It’s a hardware device that acts as a bridge between the diagnostic tool and the vehicle’s communication network. The VCI translates the diagnostic tool’s commands into a format the vehicle’s ECUs can understand, and vice versa. This is vital for tasks like car coding, ECU flashing, and reading diagnostic trouble codes (DTCs).
3. What is Secure Pairing and Why Is It Necessary?
Secure pairing is the process of establishing a trusted and encrypted connection between the ECOM interface/VCI and the diagnostic software. This is necessary to:
- Prevent Unauthorized Access: Secures the vehicle’s ECUs from malicious attacks or unauthorized modifications.
- Protect Sensitive Data: Encrypts diagnostic data to prevent eavesdropping and data breaches.
- Ensure Data Integrity: Guarantees that the data transmitted between the diagnostic tool and the vehicle is not tampered with.
- Meet Automotive Security Standards: Adheres to industry standards for secure vehicle communication.
4. How Does ECOM Handle Diagnostic Communication Requiring Secure Pairing with the VCI?
ECOM’s handling of secure pairing heavily relies on the specific ECOM/driver implementation. Here’s a breakdown of the key aspects:
- Authentication: The ECOM interface/VCI and the diagnostic software must authenticate each other. This often involves exchanging digital certificates or using challenge-response mechanisms.
- Encryption: All communication between the ECOM interface/VCI and the diagnostic software is encrypted using strong encryption algorithms.
- Key Management: Secure storage and management of cryptographic keys are essential for secure pairing. This might involve hardware security modules (HSMs) or secure software containers.
- Session Management: A secure session is established after successful authentication and encryption. The session is typically time-limited and requires periodic re-authentication.
- Role-Based Access Control: ECOM systems often implement role-based access control, allowing different levels of access to diagnostic functions based on user roles.
5. What Are the Different ECOM/Driver Implementations Affect Secure Pairing?
The specific implementation of the ECOM interface and its driver software significantly impacts how secure pairing is handled. Key differences include:
| Implementation Aspect | Description | Impact on Secure Pairing |
|---|---|---|
| Authentication Methods | Different implementations may use varying authentication protocols, such as TLS, X.509 certificates, or proprietary methods. | Affects the level of security and complexity of the authentication process. Some methods are more resistant to attacks than others. |
| Encryption Algorithms | The choice of encryption algorithms (e.g., AES, RSA) and key lengths varies across implementations. | Determines the strength of the encryption and the computational overhead. Stronger algorithms provide better security but may require more processing power. |
| Key Storage and Management | Some implementations store cryptographic keys in hardware security modules (HSMs), while others rely on software-based key storage. | HSMs offer a higher level of security as they protect keys from unauthorized access. Software-based storage is more vulnerable to attacks if not implemented correctly. |
| Firmware Security | The security of the ECOM interface’s firmware is crucial. Vulnerabilities in the firmware can be exploited to bypass security mechanisms. | Regular firmware updates and security audits are necessary to address vulnerabilities and maintain the integrity of the secure pairing process. |
| Diagnostic Protocols | The diagnostic protocols used (e.g., UDS, DoIP) can influence the secure pairing process. Some protocols have built-in security features, while others require additional security layers. | Requires the integration of secure pairing mechanisms with the diagnostic protocols. This might involve extending the protocols or using security gateways. |
| Driver Architecture | The architecture of the ECOM driver can affect the security and performance of secure pairing. A well-designed driver should minimize the attack surface and provide secure APIs for diagnostic applications. | Affects the ease of integrating secure pairing features into diagnostic applications. A modular and well-documented driver can simplify the development and deployment of secure diagnostic tools. |
| Compliance Standards | Adherence to industry standards such as SAE J2534, ISO 22900, and ISO 27001 ensures a baseline level of security and interoperability. | Facilitates the development of secure and interoperable diagnostic tools. Compliance with these standards demonstrates a commitment to security best practices. |
| Session Management | The approach to managing secure sessions, including session timeouts, re-authentication mechanisms, and key rotation strategies, impacts overall security. | Affects the resilience of the secure pairing process to session hijacking and replay attacks. Robust session management is essential for maintaining the integrity of the secure connection. |
| Error Handling | Secure and informative error handling during the pairing process is important for troubleshooting and preventing security vulnerabilities. | Requires implementing secure error handling routines that do not expose sensitive information or create opportunities for attackers to exploit vulnerabilities. |
| Update Mechanism | The method for updating the ECOM firmware and drivers can impact the security of the secure pairing process. A secure update mechanism is essential for preventing malicious updates. | Affects the ability to patch security vulnerabilities and deploy new security features. A secure update mechanism ensures that only authorized updates are installed. |
Understanding these differences is critical for selecting the right ECOM interface and driver for your diagnostic needs.
6. What are the key steps for secure pairing with ECOM and VCI?
The exact steps may vary depending on the specific ECOM/driver implementation, but here’s a general overview:
- Establish Physical Connection: Connect the ECOM interface/VCI to the vehicle’s diagnostic port (typically OBD-II).
- Launch Diagnostic Software: Start the diagnostic software on your computer.
- Select ECOM Interface/VCI: Choose the appropriate ECOM interface/VCI in the diagnostic software’s settings.
- Initiate Pairing Process: Start the secure pairing process within the diagnostic software. This might involve entering a security code, pressing a button on the VCI, or following on-screen prompts.
- Authentication: The ECOM interface/VCI and the diagnostic software exchange credentials (e.g., digital certificates) to authenticate each other.
- Encryption: A secure, encrypted communication channel is established.
- Verification: The diagnostic software verifies that the secure pairing was successful.
- Begin Diagnostics: You can now begin performing diagnostic tasks securely.
7. What Security Standards and Protocols Relate to ECOM Secure Pairing?
Several security standards and protocols are relevant to secure pairing with ECOM:
- SAE J2534: A standard for vehicle communication interfaces. While it doesn’t mandate specific security mechanisms, it provides a framework for secure communication.
- ISO 22900: A standard for modular vehicle communication interfaces. It includes security requirements for diagnostic communication.
- ISO 27001: A standard for information security management systems (ISMS). It provides a framework for managing security risks in diagnostic systems.
- TLS (Transport Layer Security): A cryptographic protocol that provides secure communication over a network. Often used for encrypting communication between the diagnostic tool and the vehicle.
- X.509 Certificates: Digital certificates used for authentication and encryption. They provide a way to verify the identity of the ECOM interface/VCI and the diagnostic software.
- DoIP (Diagnostics over Internet Protocol): An automotive diagnostic protocol that uses Ethernet as the communication medium. It includes security mechanisms for secure diagnostic communication.
8. Common Issues and Troubleshooting Tips for Secure Pairing?
Here are some common issues and troubleshooting tips for secure pairing:
| Issue | Possible Cause(s) | Troubleshooting Tip(s) |
|---|---|---|
| Pairing Failed | Incorrect security code, outdated drivers, incompatible software, faulty ECOM interface/VCI. | Double-check the security code, update drivers and software, ensure compatibility, test with a known-good ECOM interface/VCI. |
| Communication Errors | Weak signal, interference, damaged cables, incorrect configuration. | Check the physical connections, use shielded cables, verify the configuration settings, try a different location to minimize interference. |
| Driver Installation Problems | Corrupted driver files, operating system incompatibility, insufficient permissions. | Re-download the drivers, ensure compatibility with your operating system, run the installer as an administrator, disable antivirus software temporarily. |
| Certificate Validation Errors | Expired certificates, invalid certificates, missing root certificates. | Verify the certificate validity dates, ensure the certificates are properly installed, update the root certificates on your system. |
| Firewall/Antivirus Interference | Firewall or antivirus software blocking communication. | Add exceptions for the diagnostic software and ECOM interface/VCI in your firewall and antivirus settings, temporarily disable firewall/antivirus to test if it’s the cause. |
| Firmware Issues | Corrupted firmware, outdated firmware. | Update the ECOM interface/VCI firmware to the latest version, if possible. Contact the manufacturer for support if the firmware update fails. |
| Protocol Mismatch | Diagnostic software and vehicle using different communication protocols. | Ensure that the diagnostic software supports the vehicle’s communication protocol and that the ECOM interface/VCI is configured to use the correct protocol. |
| Hardware Conflict | Other devices on the system interfering with the ECOM interface/VCI. | Disconnect unnecessary USB devices, try a different USB port, update chipset drivers, check for hardware conflicts in Device Manager. |
| Power Supply Issues | Insufficient power to the ECOM interface/VCI. | Ensure the ECOM interface/VCI is properly powered. Use a powered USB hub if necessary. Check the vehicle’s battery voltage to ensure it’s within the required range. |
| Network Configuration Problems | Incorrect IP address, subnet mask, gateway settings. (Especially relevant for DoIP) | Verify the network configuration settings, ensure the IP address is in the correct range, check the subnet mask and gateway settings, test network connectivity using ping. |
| Security Software Conflicts | Security software preventing the pairing process or blocking network communications. | Review security software logs to identify blocked processes. Configure the security software to allow communication with the ECOM interface/VCI, or temporarily disable the security software to test if it’s the cause. |
| Incorrect Passcode or PIN Entry | Entering the wrong passcode or PIN during the pairing process. | Double-check the passcode or PIN and ensure it is entered correctly. Passcodes may be case-sensitive. If the passcode is unknown, contact the vehicle manufacturer or a certified technician for assistance. |
| Vehicle Immobilizer Interference | The vehicle’s immobilizer system preventing diagnostic access without proper authorization. | Ensure that the vehicle is in the correct mode for diagnostic access. Some vehicles require a specific key sequence or procedure to enable diagnostic functions. |
| Unsupported Vehicle | Attempting to pair with a vehicle that is not supported by the diagnostic software or ECOM interface/VCI. | Verify that the vehicle make, model, and year are supported by the diagnostic software and ECOM interface/VCI. Check the compatibility list provided by the manufacturer. |
| Faulty Onboard Diagnostics (OBD) Port | Damaged or improperly wired OBD port on the vehicle. | Inspect the OBD port for any signs of damage or corrosion. Check the wiring to ensure that all pins are properly connected. Try using a different vehicle to see if the issue persists. |
9. What are the implications of failing to secure pairing?
Failing to secure pairing can have serious consequences:
- Unauthorized Access to ECUs: Attackers could gain control of the vehicle’s ECUs, potentially causing damage or compromising safety.
- Data Theft: Sensitive diagnostic data could be stolen and used for malicious purposes.
- Malware Injection: Attackers could inject malware into the vehicle’s systems.
- Legal and Regulatory Issues: Failure to comply with security standards could result in legal and regulatory penalties.
- Reputational Damage: Security breaches can damage the reputation of automotive service providers and manufacturers.
10. How can DTS-MONACO.EDU.VN Help with Secure Pairing and ECOM Diagnostics?
DTS-MONACO.EDU.VN offers comprehensive resources and support for ECOM diagnostics and secure pairing:
- In-depth Information: Detailed articles and guides on ECOM technology, secure pairing protocols, and best practices.
- Training Courses: Hands-on training courses on car coding, ECU programming, and advanced diagnostics using DTS-Monaco software.
- Software Solutions: Access to powerful diagnostic software like DTS-Monaco, designed for secure and efficient vehicle diagnostics.
- Expert Support: Access to a team of experienced automotive diagnostic professionals who can provide guidance and support.
| Service | Description | Benefits |
|---|---|---|
| Comprehensive Information | Providing detailed articles and guides on ECOM technology, secure pairing protocols, and best practices. | – Enhanced understanding of secure pairing and ECOM diagnostics. – Up-to-date knowledge of industry standards and best practices. – Informed decision-making regarding diagnostic tools and procedures. |
| Hands-On Training Courses | Offering practical training on car coding, ECU programming, and advanced diagnostics using DTS-Monaco software. | – Skill enhancement in car coding and ECU programming. – Proficiency in using DTS-Monaco software for secure diagnostics. – Hands-on experience with real-world diagnostic scenarios. – Increased confidence in performing complex diagnostic tasks. |
| Powerful Software Solutions | Granting access to advanced diagnostic software like DTS-Monaco, specifically designed for secure and efficient vehicle diagnostics. | – Streamlined diagnostic processes for efficiency and accuracy. – Enhanced security features to protect vehicle ECUs. – User-friendly interface for simplified navigation. – Real-time data analysis and reporting capabilities. |
| Expert Guidance and Support | Providing support from experienced automotive diagnostic professionals who offer guidance and support. | – Access to specialized knowledge and expertise. – Personalized assistance with complex diagnostic challenges. – Prompt resolution of technical issues. – Guidance in implementing secure diagnostic practices. |
| Certification Programs | Offering certification programs that validate skills and knowledge in ECOM diagnostics and secure pairing. | – Industry recognition of expertise in secure pairing and ECOM diagnostics. – Career advancement opportunities. – Increased credibility among employers and clients. – Demonstration of commitment to professional development and adherence to industry standards. |
| Customized Solutions | Developing tailored solutions to meet the specific diagnostic and security needs of automotive service providers and manufacturers. | – Optimized diagnostic processes for unique business requirements. – Enhanced security measures customized to specific vehicle models and systems. – Seamless integration with existing diagnostic tools and workflows. – Improved efficiency and accuracy in diagnostic tasks. |
| Regular Updates and Patches | Providing frequent software updates and security patches to address emerging threats and vulnerabilities. | – Protection against the latest security threats. – Maintained software performance and reliability. – Compatibility with new vehicle models and diagnostic protocols. – Compliance with evolving industry standards and regulations. |
| Community Forums and Resources | Facilitating community forums and knowledge-sharing platforms for technicians to exchange insights, tips, and solutions. | – Access to a broad network of experienced technicians and experts. – Collaborative problem-solving and knowledge sharing. – Real-time insights into common diagnostic challenges and solutions. – Opportunities for continuous learning and professional growth. |
| Compliance and Regulatory Assistance | Assisting automotive service providers and manufacturers in meeting relevant compliance and regulatory requirements for secure diagnostic communications. | – Ensured adherence to industry standards and regulations. – Minimized risk of legal and financial penalties. – Improved data protection and privacy practices. – Enhanced reputation as a responsible and compliant service provider. |
Don’t let secure pairing challenges hold you back. Visit DTS-MONACO.EDU.VN today to explore our software, training courses, and support services.
11. Understanding Firewall Policy Parameters in ECOM Communication
For ECOM (Ethernet Communication) to effectively and securely facilitate diagnostic procedures in modern vehicles, understanding firewall policy parameters is crucial. These parameters act as gatekeepers, ensuring only authorized and safe data packets traverse the network. Let’s examine the critical firewall policy parameters that influence ECOM’s functionality.
11.1. Essential Traffic Flow Parameters
These parameters govern the flow of traffic through the firewall, ensuring that communication adheres to established rules.
-
Incoming Interface(s): Specifies the interface through which the traffic enters the FortiGate unit. This could be a physical Ethernet port, a VPN tunnel, or a virtual WAN link.
-
Outgoing Interface(s): Specifies the interface through which the traffic exits the FortiGate unit. Similar to incoming interfaces, this is not limited to physical interfaces.
-
Source Address(es): Defines the acceptable source IP addresses for traffic. This can be a broad range (e.g., “all”) or a specific set of addresses.
-
Destination Address(es): Specifies the target IP addresses for traffic. Similar to source addresses, this can be a wide range or specific addresses.
-
User(s) Identity: Based on user authentication, this parameter specifies which users or groups are permitted to send or receive traffic.
-
Service(s): Represents the TCP/IP suite port numbers used for communication. This parameter helps identify the type of traffic (e.g., HTTP, HTTPS).
-
Schedule: Sets a time frame during which the policy is active, such as specific hours of the day or days of the week.
11.2. Practical Application
When configuring a firewall policy, all of these parameters must align with the expected traffic characteristics for ECOM to function correctly. For instance, if diagnostic software on a laptop (source address) needs to communicate with an ECU (destination address) over a specific port (service), the firewall policy must permit this traffic.
Traffic flow initiated from each direction requires a policy, that is, if sessions can be initiated from both directions, each direction requires a policy.
Just because packets can go from point A to point B on port X does not mean that the traffic can flow from point B to point A on port X. A policy must be configured for each direction.
When designing a policy, there is often reference to the traffic flow, but most communication is two-way so trying to determine the direction of the flow might be confusing. If traffic is HTTP web traffic, the user sends a request to the website, but most of the traffic flow will be coming from the website to the user or in both directions? For the purposes of determining the direction for a policy, the important factor is the direction of the initiating communication. The user is sending a request to the website, so this is the initial communication; the website is responding so the traffic is from the user’s network to the Internet.
12. Exploring Configurations in the GUI for ECOM Settings
Configuring firewall policies through a Graphical User Interface (GUI) streamlines the setup process and enhances manageability. In the context of ECOM, the GUI allows technicians to define precise rules for diagnostic communication.
12.1. Navigating the GUI
Modern firewalls offer intuitive GUIs that simplify policy creation and management. Common steps include:
- Accessing the Firewall: Log in to the firewall’s management interface through a web browser.
- Navigating to Policy Settings: Locate the “Firewall Policy” or similar section.
- Creating a New Policy: Click the “Create New” or equivalent button to start a new policy configuration.
- Configuring Parameters: Fill in the necessary fields for each parameter, such as incoming/outgoing interfaces, source/destination addresses, services, and schedule.
12.2. Step-by-Step: Creating a Policy by IP Address
- From the Dashboard > FortiView Sources page, choose any entry.
- Click Create policy > Create firewall policy by IP address. The Create New Policy pane opens.
- The Incoming interface field is auto-filled with the correct interface and the Source field is auto-filled with a new staged object and a green icon.
- Hover over the icon and a warning is shown: This entry does not exist yet. If selected, it will be automatically created when the form is submitted. Check that the stage object has the correct IP address.
- Staged objects can be customized by clicking Customize.
- Fill in all other fields with the necessary data and save the policy.
- When the policy is successfully created, a green notification displays in the top right of the window. Click Show in list to view the policy that was created.
12.3. Example GUI Configuration
Let’s say a technician needs to create a policy that allows communication between a diagnostic laptop (IP address: 192.168.1.100) and an ECU (IP address: 10.0.0.50) using the UDS protocol over TCP port 2000. The GUI configuration would involve:
- Incoming Interface: LAN
- Outgoing Interface: Vehicle Network
- Source Address: 192.168.1.100
- Destination Address: 10.0.0.50
- Service: Custom Service (TCP port 2000)
- Action: Accept
12.4. Displaying Logic Between Firewall Policy Objects in the GUI
The FortiOS GUI can display the logical AND relationship in firewall policies between source and destination objects, including security posture tags when enabled, to help you configure firewall policies.
- Go to Policy & Objects > Firewall Policy, and click Create New. The Create New Policy pane opens.
- In the Source & Destination section, click Show Logic.
12.5. Enabling Advanced Policy Options in the GUI
- Advanced policy options can be enabled so that you can configure the options in the GUI.
config system settings set gui-advanced-policy enable endAdvanced policy options are now available when creating or editing a policy in the GUI:
- To enable configuring TCP sessions without SYN:
config system settings set tcp-session-without-syn enable endTCP sessions without SYN can now be configured when creating or editing a policy in the GUI:
13. Command Line Interface (CLI) Configurations for ECOM Settings
For advanced users who prefer precise control and automation, the Command Line Interface (CLI) provides a powerful means to configure firewall policies. CLI configurations are especially valuable in complex network environments.
13.1. Accessing the CLI
Firewalls typically offer several ways to access the CLI:
- Console Cable: Direct connection via a serial console.
- SSH: Secure remote access over the network.
- Web-Based CLI: Access through the firewall’s web interface.
13.2. Basic CLI Commands
| Command Category | Command Example | Description |
|---|---|---|
| Policy Creation | config firewall policy edit 1 |
Creates or edits a firewall policy with ID 1. |
| Interface Settings | set srcintf "port1"set dstintf "port2" |
Specifies the source and destination interfaces for the policy. |
| Address Settings | set srcaddr "192.168.1.0/24"set dstaddr "10.0.0.0/24" |
Defines the source and destination IP address ranges. |
| Service Settings | set service "UDS_TCP" |
Assigns a predefined or custom service to the policy. |
| Action Settings | set action accept |
Sets the action for matching traffic (e.g., accept, deny). |
| Logging Settings | set logtraffic all |
Enables logging for all traffic matching the policy. |
| NAT Settings | set nat enable |
Enables Network Address Translation (NAT) for the policy. |
| Policy Activation | end |
Applies the changes and activates the policy. |
| Commit Changes | commit |
Save the changes |
13.3. Example CLI Configuration
To create a policy that allows diagnostic traffic from a specific subnet to an ECU, the CLI commands might look like this:
config firewall policy
    edit 1
        set srcintf "LAN"
        set dstintf "Vehicle_Network"
        set srcaddr "192.168.1.0/24"
        set dstaddr "10.0.0.50"
        set service "UDS_TCP"
        set action accept
        set logtraffic all
    next
end
13.4. Firewall Anti-Replay Option Per Policy
When the global anti-replay option is disabled, the FortiGate does not check TCP flags in packets. The per policy anti-replay option overrides the global setting. This allows you to control whether or not TCP flags are checked per policy.
To enable the anti-replay option so TCP flags are checked using the CLI:
config firewall policy edit 1
    set name "policyid-1"
    set srcintf "wan2"
    set dstintf "wan1"
    set srcaddr "all"
    set dstaddr "all"
    set action accept
    set schedule "always"
    set service "ALL"
    set anti-replay enable
    set logtraffic all
    set nat enable
next
end
ECOM Diagnostic Communication Setup
14. Policy Views and Policy Match in ECOM Setups
Efficient policy management and accurate matching are crucial for ensuring smooth ECOM operations. Firewall systems offer different policy views and tools to verify policy effectiveness.
14.1. Understanding Policy Views
- Interface Pair View: Displays policies grouped by incoming and outgoing interface pairs, making it easy to visualize traffic flow.
- Sequence Grouping View: Organizes policies based on the order in which they are checked, allowing administrators to prioritize rules.
- By Sequence: Lists policies in a linear sequence, simplifying the process of moving policies by ID.
14.2. Example – Move a Policy by Policy ID:
- Go to Policy & Objects > Firewall Policy.
- Select the policy you want to move.
- Select More > Move by ID. The Move by ID pane is displayed.
- Define the new location of the policy:
- Select whether the policy should be moved Above or Below the policy ID you will define in the next step.
- In the Destination policy ID field, enter the ID of the destination policy or select it from the dropdown menu.
- If you do not want to automatically view the new location of the policy, disable Jump to policy after move. This feature is enabled by default.
- Click OK. The policy will be moved to the new location.
14.3. Using Policy Match
Policy Match is a valuable tool for verifying that traffic is being handled by the correct policy. It allows you to input specific traffic parameters (source/destination IP, port, protocol) and determine which policy the traffic matches.
14.4. Sample Configuration
This example uses the TCP protocol to show how policy match works:
- On a Policy & Objects policy list page, click Policy match and enter the traffic parameters.
- Click Find matching policy to display the policy match results.
14.5. Practical Application
If a technician is experiencing connectivity issues with ECOM, Policy Match can help identify whether the traffic is being blocked by an incorrect or missing policy.
15. Streamlining ECOM Operations with Customized Services and Service Groups
Effective service management is key to optimizing ECOM performance and security. Firewalls allow you to define custom services and group them for easier policy creation.
15.1. Predefined Services
Firewalls come with a range of predefined services for common protocols and applications. These can be used as-is or customized to fit specific needs.
15.2. Custom Services
Creating custom services allows you to define specific port ranges and protocols used in ECOM communication. This is particularly useful for proprietary or less common diagnostic protocols.
To configure a custom service in the GUI:
- Go to Policy & Objects > Services.
- Go to the Services tab and click Create new.
- Configure the service parameters as needed.
- Click OK.
15.3. Service Groups
Service groups allow you to combine multiple services into a single object. This simplifies policy creation by allowing you to apply multiple services with a single rule.
To configure a service group in the GUI:
- Go to Policy & Objects > Services.
- Go to the Service Groups tab and click Create new. The New Service Group page is displayed.
- Enter the Name of the group.
- (Optional) Enter a comment and select a color for the service group.
- Select the group type.
- Click the Members field and select the services and service groups to include in the group.
- Click OK.
15.4. Example Scenario
A technician might create a service group called “Diagnostic_Protocols” that includes services for UDS, KWP2000, and CAN-TP. This group can then be used in a firewall policy to allow all diagnostic traffic with a single rule.
 ECOM Security Workflow Configuration
16. Leveraging Policy Change Summaries and Expiration for ECOM
To enhance security and accountability, firewalls offer features like policy change summaries and policy expiration. These features are particularly useful in ECOM environments where changes need to be tracked and policies may have a limited lifespan.
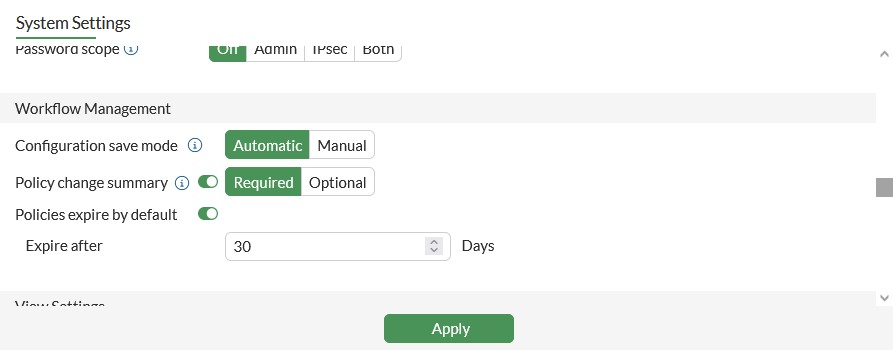
16.1. Policy Change Summary
The policy change summary feature requires administrators to provide a reason for any policy modification. This creates an audit trail that can be used to track changes and identify potential issues.
- Disable: users will not be prompted to add a summary when editing a policy.
- Required: the Policy change summary will be enabled and will require users to add a summary when editing or creating a firewall policy.
- Optional: the Policy change summary will be enabled but users can leave the summary empty, if preferred, when editing or creating a firewall policy.
16.2. Policy Expiration
Policy expiration allows administrators to set an expiration date for a policy. This is useful for temporary policies or policies that need to be reviewed periodically.
- Disable: the firewall policy will not expire. This is the default setting for Policy expiration.
- Default: the firewall policy will expire after the default number of days.
- Specify: the firewall policy will expire at a set date and time.
16.3. Example Scenario
A technician might create a temporary policy to allow remote access for a specific diagnostic procedure. By setting an expiration date, the policy will be automatically disabled after a set period, reducing the risk of unauthorized access.
17. Advanced Firewall Features to Enhance ECOM Diagnostics
Beyond the basics, several advanced firewall features can further optimize ECOM diagnostics. These include hardware acceleration, TCP Maximum Segment Size (MSS) adjustment, and session Time-to-Live (TTL) management.
17.1. Hardware Acceleration
Hardware acceleration offloads certain firewall tasks to dedicated hardware, improving performance. This is particularly beneficial in high-traffic ECOM environments.
- Typically, hardware acceleration on a specific firewall policy is disabled for one of two purposes:
- To allow CLI commands such as the packet sniffer and debug flow to display all traffic matching the policy since traffic offloaded by SPU hardware on a FortiGate device is not visible by those CLI tools.
- To troubleshoot any possible issues arising by using hardware acceleration.
17.2. TCP Maximum Segment Size (MSS)
The TCP maximum segment size (MSS) is the maximum amount of data that can be sent in a TCP segment. The MSS is the MTU size of the interface minus the 20 byte IP header and 20 byte TCP header. By reducing the TCP MSS, you can effectively reduce the MTU size of the packet.
To configure TCP MSS in a firewall policy:
config firewall policy edit <policy id="">
    set srcintf "internal"
    set dstintf "wan1"
    set srcaddr "10.10.10.6"
    set dstaddr "all"
    set schedule "always"
    set service "ALL"
    set tcp-mss-sender 1448
    set tcp-mss-receiver 1448
next
end
17.3. Adjusting Session Time-to-Live (TTL)
A session is a communication channel between two devices or applications across the network. Sessions allow FortiOS