Replacing a steering angle sensor is crucial for maintaining your vehicle’s stability and safety features. At DTS-MONACO.EDU.VN, we provide in-depth knowledge and advanced techniques, including car coding with DTS-Monaco, to ensure a seamless replacement and calibration process, enhancing vehicle performance and safety. Keep reading to discover key strategies and troubleshooting methods to keep your car in top condition, covering essential aspects like sensor types and diagnostic codes.
Contents
- 1. Understanding the Steering Angle Sensor
- What is a Steering Angle Sensor and What Does it Do?
- What are the Different Types of Steering Angle Sensors?
- How Does the Steering Angle Sensor Interact with Vehicle Stability Systems?
- 2. Identifying a Faulty Steering Angle Sensor
- What are the Common Symptoms of a Failing Steering Angle Sensor?
- What Diagnostic Trouble Codes (DTCs) are Associated with Steering Angle Sensors?
- How Can You Test the Steering Angle Sensor’s Performance?
- 3. Preparing for Steering Angle Sensor Replacement
- What Tools and Materials are Required for the Replacement?
- What Safety Precautions Should You Take Before Starting the Replacement?
- How Do You Prepare the Vehicle for the Replacement Procedure?
- 4. Step-by-Step Guide to Replacing the Steering Angle Sensor
- Step 1: Disconnecting the Battery
- Step 2: Removing the Dash Panel
- Step 3: Disconnecting the Airbag and Horn
- Step 4: Removing the Steering Wheel
- Step 5: Removing the Tilt Lever and Plastic Covers
- Step 6: Removing the Ignition Tumbler
- Step 7: Removing the Clock Spring
- Step 8: Disconnecting Connectors and Removing the Multifunction Switch
- Step 9: Removing the Tilt Section
- Step 10: Replacing the Steering Angle Sensor
- Step 11: Reassembling the Steering Column
- Step 12: Completing the Reassembly
- Step 13: Reinstalling the Steering Wheel and Final Components
- Step 14: Finishing Up
- Step 15: Resetting and Final Checks
- 5. Calibrating the New Steering Angle Sensor
- Why is Calibration Necessary After Replacement?
- What Tools are Needed for Calibration?
- How to Perform the Calibration Process Using Diagnostic Tools
- 6. Advanced Techniques: Car Coding with DTS-Monaco
- What is Car Coding and Why is it Important?
- How Does DTS-Monaco Enhance the Steering Angle Sensor Replacement Process?
- Step-by-Step Guide to Using DTS-Monaco for Steering Angle Sensor Calibration
- 7. Troubleshooting Common Issues
- What to Do If the Engine Won’t Start After Replacing the Steering Angle Sensor
- How to Address Calibration Errors
- Dealing with Recurring DTCs After Replacement
- 8. Maintaining Optimal Steering System Performance
- Regular Inspections and Maintenance Tips
- The Importance of Proper Wheel Alignment
- Best Practices for Avoiding Steering Angle Sensor Issues
- 9. Understanding Steering Geometry and Its Impact
- How Does Steering Geometry Affect the Steering Angle Sensor?
- What are Caster, Camber, and Toe, and Why are They Important?
- How to Check and Correct Steering Geometry
- 10. The Future of Steering Angle Sensor Technology
- Advancements in Steering Angle Sensor Design
- Integration with Advanced Driver-Assistance Systems (ADAS)
- The Role of Steering Angle Sensors in Autonomous Vehicles
- FAQ: Steering Angle Sensors
- 1. What is the purpose of a steering angle sensor?
- 2. How do I know if my steering angle sensor is bad?
- 3. Can I drive with a bad steering angle sensor?
- 4. How much does it cost to replace a steering angle sensor?
- 5. Do I need to calibrate a new steering angle sensor?
- 6. What tools are needed to calibrate a steering angle sensor?
- 7. Can I replace the steering angle sensor myself?
- 8. What is car coding and why is it important for SAS replacement?
- 9. How does DTS-Monaco enhance the steering angle sensor replacement process?
- 10. Where can I get training on using DTS-Monaco for car coding?
1. Understanding the Steering Angle Sensor
What is a Steering Angle Sensor and What Does it Do?
A steering angle sensor (SAS) is a critical component that monitors the steering wheel’s position and rate of rotation. Its primary function is to provide data to the vehicle’s computer, enabling systems like Electronic Stability Control (ESC) and Traction Control to function correctly. This ensures optimal handling and stability, especially during challenging driving conditions. The SAS detects the angle and speed at which the steering wheel is turned, allowing the car’s computer to make necessary adjustments to maintain control.
What are the Different Types of Steering Angle Sensors?
There are two main types of steering angle sensors: analog and digital. Analog sensors use variable voltage readings to determine the steering angle, while digital sensors employ LED lights to transmit angle information to the vehicle’s computer. Each type has its strengths, but both serve the same fundamental purpose of providing accurate steering data. Analog sensors are known for their simplicity and robustness, while digital sensors offer higher precision and reliability.
How Does the Steering Angle Sensor Interact with Vehicle Stability Systems?
The steering angle sensor plays a vital role in vehicle stability by communicating with the Anti-lock Braking System (ABS), Electronic Stability Control (ESC), and Traction Control System (TCS). By detecting discrepancies between the driver’s intended direction and the vehicle’s actual path, the SAS enables these systems to make precise adjustments, preventing skidding and maintaining control. For instance, if the vehicle begins to understeer or oversteer, the SAS will signal the ESC to apply braking force to individual wheels, correcting the vehicle’s trajectory.
2. Identifying a Faulty Steering Angle Sensor
What are the Common Symptoms of a Failing Steering Angle Sensor?
A faulty steering angle sensor can manifest in several ways. Common symptoms include an illuminated engine light, activation of the Traction Control Light, a loose feeling in the steering wheel, and changes in the car’s handling after a front-end alignment. If you notice any of these signs, it’s essential to investigate further to determine if the SAS is the root cause. These symptoms may also overlap with other issues, so a thorough diagnosis is crucial.
What Diagnostic Trouble Codes (DTCs) are Associated with Steering Angle Sensors?
Several DTCs are associated with steering angle sensors. Common codes include C0051, C0052, C0053, and C0054. These codes can be retrieved using an OBD-II scanner and can help pinpoint specific issues with the SAS. Addressing these codes promptly can prevent further complications and ensure the vehicle’s safety systems operate correctly. Referencing the vehicle’s service manual for detailed code descriptions is always recommended.
How Can You Test the Steering Angle Sensor’s Performance?
To test the steering angle sensor’s performance, start by checking if the engine light is on and retrieving any stored DTCs. Next, conduct a test drive, intentionally attempting to oversteer and understeer the vehicle. If the SAS is functioning correctly, the ABS module should engage to correct the vehicle’s path. If the ABS module does not respond, the SAS may be faulty. Consulting with a certified technician is advisable for accurate diagnosis and repairs.
3. Preparing for Steering Angle Sensor Replacement
What Tools and Materials are Required for the Replacement?
Replacing a steering angle sensor requires several specialized tools and materials. These include:
- Allen wrench set (SAE / Metric)
- Boxed-end wrenches
- Cross-tip screwdriver
- Flathead screwdriver
- Protective gloves
- Ratchet with metric and standard sockets
- Safety glasses
- Slip joint pliers
- Snap ring pliers
- Steering wheel puller kit
- Torque bit set
- Wheel chocks
Having all the necessary tools on hand will streamline the replacement process and minimize potential complications.
What Safety Precautions Should You Take Before Starting the Replacement?
Safety is paramount when replacing a steering angle sensor. Always disconnect the battery to prevent accidental airbag deployment and electrical shocks. Wear safety glasses to protect your eyes from debris. Ensure the vehicle is parked on a level surface and secured with wheel chocks. Following these precautions will help ensure a safe and successful replacement.
How Do You Prepare the Vehicle for the Replacement Procedure?
To prepare the vehicle, park it on a flat, hard surface and engage the parking brake. Place wheel chocks around the tires to prevent any movement. Open the hood and disconnect the negative battery cable to disable power to the steering column and airbag. This step is crucial for preventing accidents during the replacement procedure.
4. Step-by-Step Guide to Replacing the Steering Angle Sensor
Step 1: Disconnecting the Battery
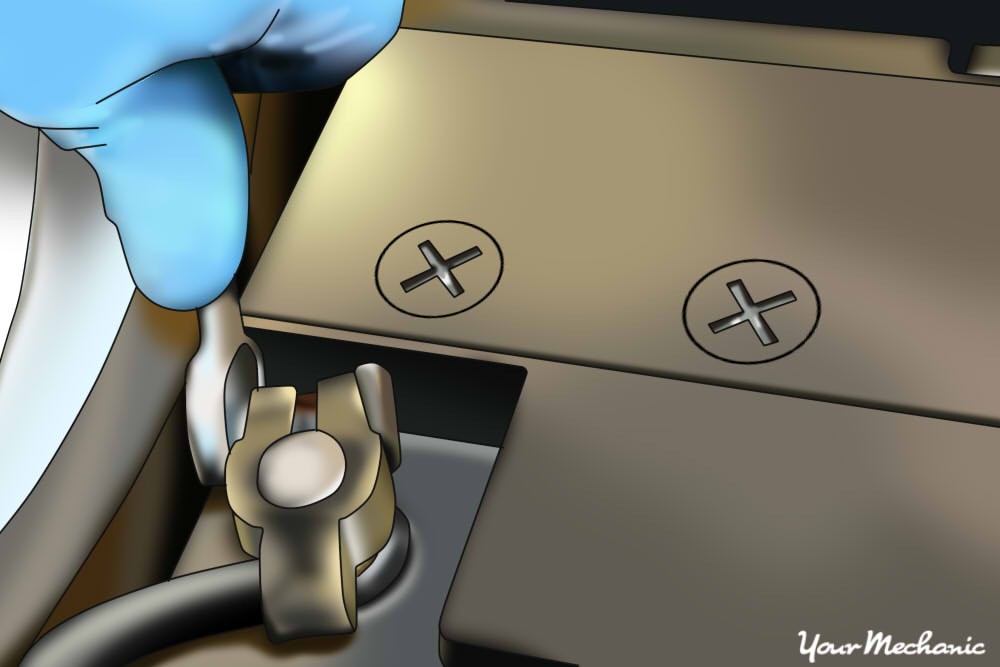
Open the vehicle’s hood and disconnect the negative cable from the battery. This disables power to the steering column and airbag, ensuring safety during the replacement. Wait at least 15 minutes after disconnecting the battery before proceeding to the next steps, allowing any residual electricity to dissipate.
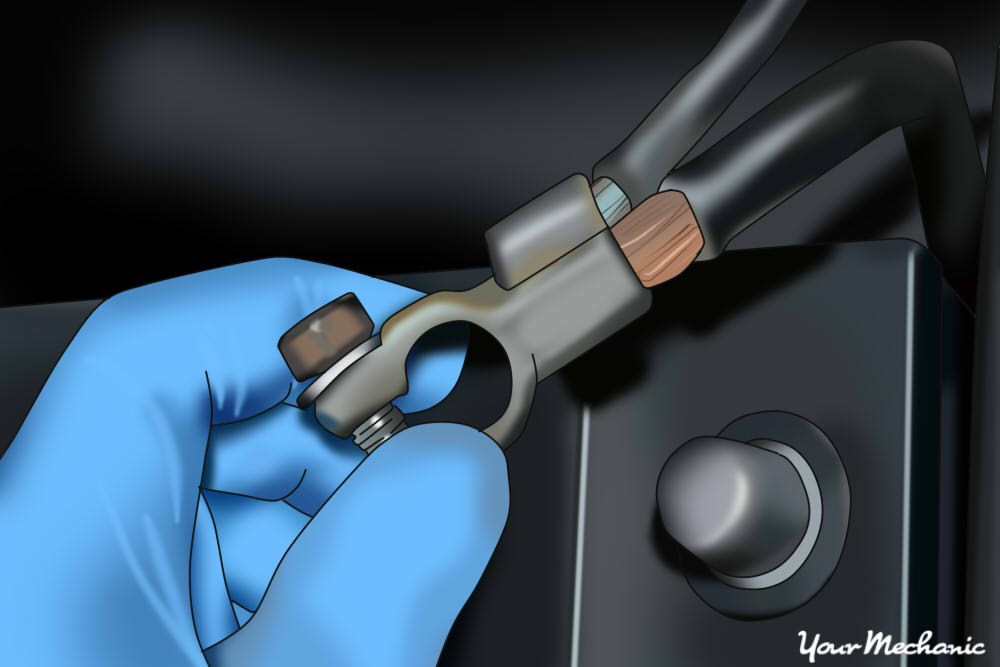 Disconnect battery cable to disable power to the steering column and airbag
Step 2: Removing the Dash Panel
Remove the mounting screws to the dash panel to access the mounting nuts at the steering wheel base. Gently pull off the dash panel, taking care not to damage any clips or wiring. This step provides the necessary access to the components behind the steering wheel.
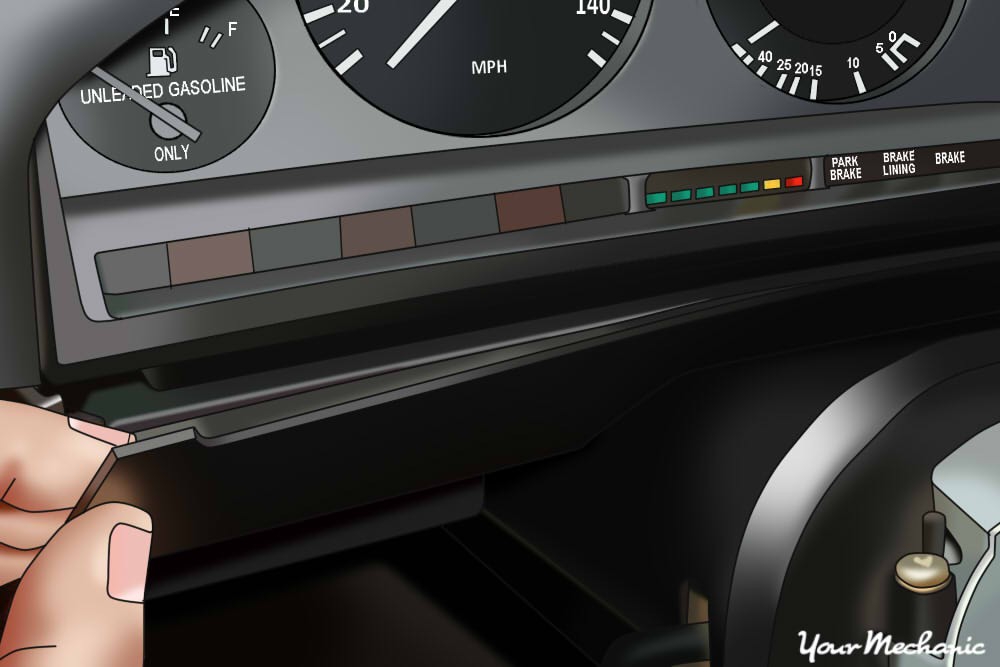 Remove the dash panel to access the mounting nuts at the steering wheel base
Step 3: Disconnecting the Airbag and Horn
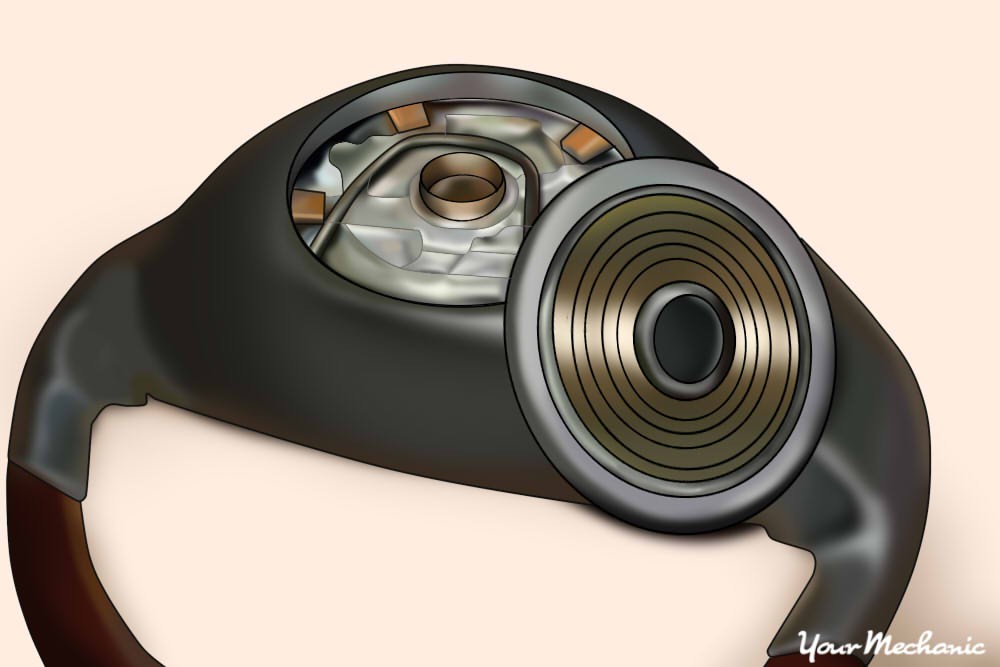
Disconnect the yellow power wire to the airbag, marking its location for reassembly. Remove the horn button, being careful to catch the spring underneath. Disconnecting these components ensures they are safely out of the way during the steering wheel removal.
 Disconnect the yellow power wire for the airbag and remove the horn button
Step 4: Removing the Steering Wheel
Remove the mounting nut or bolt securing the steering wheel, holding the steering wheel in place to prevent movement. Use a steering wheel puller kit to safely remove the steering wheel assembly from the steering column. This step requires caution to avoid damaging the steering column or the steering wheel itself.
Step 5: Removing the Tilt Lever and Plastic Covers
Remove the tilt lever using slip joint pliers to access the steering column covers. Remove the plastic covers by unscrewing the mounting screws on each side, noting any hidden screws. Removing these covers exposes the internal components of the steering column.
Step 6: Removing the Ignition Tumbler
Turn the key to the start position and use a dental pick to release the pin in the pinhole. Gently remove the ignition tumbler from the steering column. This step allows access to the clock spring and other components behind the ignition tumbler.
Step 7: Removing the Clock Spring
Remove the plastic clips to take out the clock spring, disconnecting any brackets that may interfere. The clock spring is a delicate component, so handle it with care to avoid damage. Mark the orientation of the clock spring before removal to ensure proper reinstallation.
 Remove the clock spring carefully
Step 8: Disconnecting Connectors and Removing the Multifunction Switch
Disconnect the connectors in the lower portion of the steering column. Take out the multifunction switch, disconnecting its electrical harness. These steps clear the way for removing the tilt section of the steering column.
Step 9: Removing the Tilt Section
Use snap ring pliers to remove the snap ring connecting the tilt section to the steering shaft. Carefully remove the tilt spring with a large flat screwdriver, noting that it is under pressure. Remove the mounting screws on the tilt section and the nut and bolt securing the steering shaft to the u-joint. Slide the tilt section out of the vehicle. This step requires precision to avoid injury from the compressed tilt spring.
Step 10: Replacing the Steering Angle Sensor
Remove the steering angle sensor from the steering shaft, unplugging its harness. Connect the new steering angle sensor and install it onto the steering shaft. Before reassembling, consider replacing the tilt bearing on the back of the tilt section. This ensures smooth operation of the tilt mechanism.
Step 11: Reassembling the Steering Column
Install the tilt section back into the vehicle, securing it with the bolt and nut on the u-joint. Torque the nut to finger tight and an additional 1/8 turn. Reinstall the mounting screws securing the tilt section to the steering column. Use the large screwdriver to reinstall the tilt spring. This part can be challenging due to the spring’s tension.
 Install the snap ring onto the steering shaft
Step 12: Completing the Reassembly
Install the snap ring onto the steering shaft, securing it to the tilt section. Reinstall the multifunction switch, ensuring the harness is correctly connected. Reconnect the connectors in the lower part of the steering column.
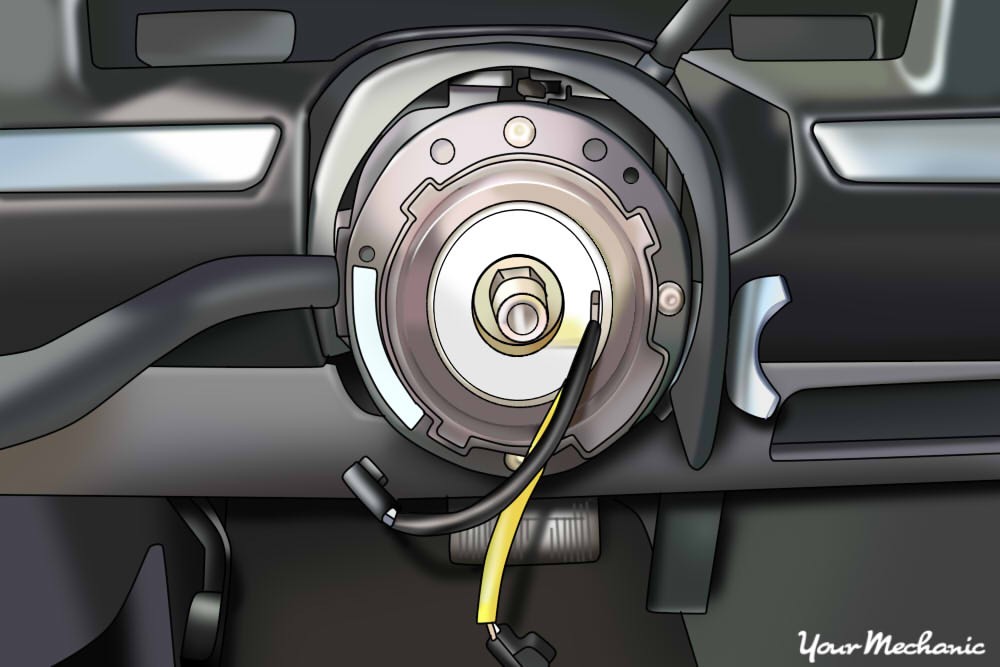 Put the clock spring into the steering column
Put the clock spring back into the steering column, reinstalling any brackets and plastic clips. Reinstall the key tumbler into the steering column, removing the key to lock it in place. Install the plastic covers, securing them with the mounting screws, including the hidden screw in the back. Reinstall the tilt lever onto the steering column.
Step 13: Reinstalling the Steering Wheel and Final Components
Put the steering wheel on the steering shaft and install the mounting nut, tightening it securely without over-tightening. Reconnect the yellow wire for the airbag to the marked connector. Connect the power supply to the horn and place the horn spring onto the steering column. Snap the horn and airbag onto the steering column.
Step 14: Finishing Up
Install the mounting bolts onto the back of the steering column, pushing in on the tilt section if necessary. Put the dash panel back onto the dashboard and secure it with the mounting screws. Reconnect the ground cable to the battery’s negative post and tighten the clamp, ensuring a good connection.
 Reconnect the ground cable to the battery’s negative post
Step 15: Resetting and Final Checks
Since the power was completely depleted, reset all vehicle settings, such as the radio, electric seats, and mirrors. Remove the wheel chocks. Following these steps ensures that the vehicle is fully reassembled and ready for testing.
5. Calibrating the New Steering Angle Sensor
Why is Calibration Necessary After Replacement?
Calibration is crucial after replacing a steering angle sensor to ensure the vehicle’s stability systems function accurately. The calibration process aligns the sensor’s readings with the vehicle’s actual steering angle, enabling systems like ESC and TCS to operate effectively. Without proper calibration, these systems may provide incorrect corrections, leading to unsafe driving conditions.
What Tools are Needed for Calibration?
Calibration typically requires a diagnostic scan tool capable of reading and programming the SAS module. Advanced tools like DTS-Monaco are particularly useful for comprehensive calibration and car coding. These tools allow technicians to fine-tune the sensor’s parameters, ensuring optimal performance.
How to Perform the Calibration Process Using Diagnostic Tools
To perform the calibration, connect the diagnostic tool to the vehicle’s OBD-II port and navigate to the SAS module. Follow the tool’s prompts to initiate the calibration procedure, which usually involves turning the steering wheel to specific angles as directed. Once the calibration is complete, verify the sensor’s readings and clear any related DTCs. Consulting the vehicle’s service manual and the diagnostic tool’s instructions is essential for accurate calibration.
6. Advanced Techniques: Car Coding with DTS-Monaco
What is Car Coding and Why is it Important?
Car coding involves reprogramming a vehicle’s electronic control units (ECUs) to enable or modify certain features. It is essential for customizing vehicle settings, retrofitting components, and ensuring optimal performance after replacing parts like the steering angle sensor. Car coding can unlock advanced functionalities and improve the overall driving experience.
How Does DTS-Monaco Enhance the Steering Angle Sensor Replacement Process?
DTS-Monaco is a powerful diagnostic and car coding tool that offers advanced capabilities for SAS replacement. It allows technicians to perform precise calibration, configure sensor parameters, and troubleshoot complex issues. DTS-Monaco provides a user-friendly interface and comprehensive diagnostic functions, making the replacement process more efficient and accurate.
Step-by-Step Guide to Using DTS-Monaco for Steering Angle Sensor Calibration
- Connect DTS-Monaco: Connect the DTS-Monaco interface to the vehicle’s OBD-II port and establish communication with the SAS module.
- Access Calibration Functions: Navigate to the calibration functions within the DTS-Monaco software, selecting the appropriate procedure for the specific vehicle model.
- Follow On-Screen Instructions: Follow the on-screen instructions to perform the calibration, which may involve turning the steering wheel to specific angles.
- Verify Calibration: Verify the calibration by checking the sensor’s readings and ensuring they match the vehicle’s actual steering angle.
- Clear DTCs: Clear any DTCs related to the SAS to finalize the calibration process.
By using DTS-Monaco, technicians can ensure the SAS is perfectly calibrated, optimizing the vehicle’s stability and handling. At DTS-MONACO.EDU.VN, we offer comprehensive training and resources for mastering DTS-Monaco, empowering technicians to excel in car coding and diagnostics. Contact us at Whatsapp: +1 (641) 206-8880 or visit our website DTS-MONACO.EDU.VN. Address: 275 N Harrison St, Chandler, AZ 85225, United States.
7. Troubleshooting Common Issues
What to Do If the Engine Won’t Start After Replacing the Steering Angle Sensor
If the engine won’t start after replacing the steering angle sensor, there may be an issue with the immobilizer system. Ensure the key is properly programmed and recognized by the vehicle. Check all connections to the SAS and related modules. If the problem persists, further diagnosis of the steering angle sensor circuitry may be necessary.
How to Address Calibration Errors
Calibration errors can occur if the procedure is not followed correctly or if there is an underlying issue with the sensor or related systems. Double-check the connections and ensure the diagnostic tool is compatible with the vehicle. Refer to the vehicle’s service manual and the diagnostic tool’s instructions for troubleshooting steps.
Dealing with Recurring DTCs After Replacement
If DTCs related to the steering angle sensor reappear after replacement and calibration, there may be an issue with the sensor itself or the wiring harness. Inspect the wiring for damage and ensure the sensor is properly installed. In some cases, a faulty ECU may be the cause, requiring further diagnosis and repair.
8. Maintaining Optimal Steering System Performance
Regular Inspections and Maintenance Tips
Regular inspections are key to maintaining optimal steering system performance. Check the power steering fluid level and condition, inspect the steering linkage for wear, and ensure the tires are properly inflated. Addressing minor issues early can prevent major problems down the road.
The Importance of Proper Wheel Alignment
Proper wheel alignment is crucial for ensuring even tire wear and optimal handling. Misalignment can cause the steering angle sensor to provide inaccurate readings, affecting the performance of stability systems. Schedule regular wheel alignments to maintain proper steering system function.
Best Practices for Avoiding Steering Angle Sensor Issues
To avoid steering angle sensor issues, avoid harsh driving conditions that can stress the steering system. Be mindful of potholes and other road hazards that can damage the sensor. Ensure the vehicle is properly maintained, following the manufacturer’s recommended service intervals.
9. Understanding Steering Geometry and Its Impact
How Does Steering Geometry Affect the Steering Angle Sensor?
Steering geometry, which includes factors like caster, camber, and toe, significantly impacts the steering angle sensor. Incorrect steering geometry can cause the sensor to operate outside its designed parameters, leading to inaccurate readings and compromised stability control. Proper alignment ensures the SAS functions correctly and provides accurate data to the vehicle’s computer.
What are Caster, Camber, and Toe, and Why are They Important?
- Caster: The angle of the steering axis relative to the vertical axis, affecting steering stability and return.
- Camber: The angle of the wheel relative to the vertical axis, affecting tire wear and handling.
- Toe: The angle of the wheels relative to each other, affecting steering response and stability.
Maintaining these angles within the manufacturer’s specifications is crucial for optimal steering performance and SAS function.
How to Check and Correct Steering Geometry
Checking and correcting steering geometry requires specialized equipment, such as an alignment rack. Technicians use these tools to measure the caster, camber, and toe angles and make adjustments as needed. Regular alignment checks are essential, especially after replacing suspension components or experiencing a significant impact.
10. The Future of Steering Angle Sensor Technology
Advancements in Steering Angle Sensor Design
Advancements in steering angle sensor design are focused on improving accuracy, reliability, and integration with advanced driver-assistance systems (ADAS). Modern sensors are more compact, durable, and capable of providing real-time data for enhanced stability control and autonomous driving features.
Integration with Advanced Driver-Assistance Systems (ADAS)
Steering angle sensors are integral to ADAS functionalities such as lane keeping assist, adaptive cruise control, and automatic emergency braking. These systems rely on accurate steering data to make precise adjustments, ensuring safe and reliable operation. The integration of SAS technology with ADAS is driving innovation in automotive safety and convenience.
The Role of Steering Angle Sensors in Autonomous Vehicles
In autonomous vehicles, steering angle sensors play a critical role in maintaining vehicle control and safety. These sensors provide the necessary data for self-driving systems to navigate roads, avoid obstacles, and respond to changing conditions. As autonomous technology evolves, the importance of accurate and reliable steering angle sensors will continue to grow.
FAQ: Steering Angle Sensors
1. What is the purpose of a steering angle sensor?
The steering angle sensor (SAS) measures the steering wheel’s position and rate of rotation, providing data to the vehicle’s computer for systems like ESC and TCS to function correctly, ensuring stability and control.
2. How do I know if my steering angle sensor is bad?
Common symptoms include an illuminated engine light, activation of the Traction Control Light, a loose feeling in the steering wheel, and changes in the car’s handling after a front-end alignment.
3. Can I drive with a bad steering angle sensor?
Driving with a bad steering angle sensor can compromise the vehicle’s stability and safety systems, potentially leading to accidents. It’s best to address the issue as soon as possible.
4. How much does it cost to replace a steering angle sensor?
The cost to replace a steering angle sensor can vary, but typically ranges from $200 to $600, depending on the vehicle make and model, as well as labor costs.
5. Do I need to calibrate a new steering angle sensor?
Yes, calibration is crucial after replacing a steering angle sensor to ensure the vehicle’s stability systems function accurately.
6. What tools are needed to calibrate a steering angle sensor?
Calibration typically requires a diagnostic scan tool capable of reading and programming the SAS module. Advanced tools like DTS-Monaco are particularly useful.
7. Can I replace the steering angle sensor myself?
While it’s possible to replace the steering angle sensor yourself, it requires specialized tools and knowledge. Professional installation is recommended to ensure proper calibration and safety.
8. What is car coding and why is it important for SAS replacement?
Car coding involves reprogramming a vehicle’s electronic control units (ECUs) to enable or modify certain features, ensuring optimal performance after replacing parts like the steering angle sensor.
9. How does DTS-Monaco enhance the steering angle sensor replacement process?
DTS-Monaco is a powerful diagnostic and car coding tool that offers advanced capabilities for SAS replacement, allowing precise calibration and configuration of sensor parameters.
10. Where can I get training on using DTS-Monaco for car coding?
At DTS-MONACO.EDU.VN, we offer comprehensive training and resources for mastering DTS-Monaco, empowering technicians to excel in car coding and diagnostics. Contact us at Whatsapp: +1 (641) 206-8880 or visit our website DTS-MONACO.EDU.VN. Address: 275 N Harrison St, Chandler, AZ 85225, United States.
Eager to dive deeper into the world of car coding and diagnostics? Visit DTS-MONACO.EDU.VN today and discover how our software, training, and support can revolutionize your automotive repair skills! Contact us at Whatsapp: +1 (641) 206-8880 or visit our website DTS-MONACO.EDU.VN. Address: 275 N Harrison St, Chandler, AZ 85225, United States. Unlock your potential and elevate your expertise with DTS-MONACO.EDU.VN.