Is your engine oil level giving you confusing readings? You’ve come to the right place! This guide, brought to you by DTS-MONACO.EDU.VN, will explain the common causes of incorrect engine oil level readings, and provide actionable solutions. Learn how to diagnose and address these issues, ensuring your engine stays properly lubricated. Dive in to discover LSI keywords like oil consumption, coolant leaks, and fuel dilution and get your car running smoothly!
Contents
- 1. Understanding the Basics of Engine Oil Level
- 2. Identifying a Low Oil Level: Causes and Symptoms
- 2.1. Oil Leaks
- 2.1.1. Common Leak Locations
- 2.1.2. Diagnosing Oil Leaks
- 2.1.3. Repairing Oil Leaks
- 2.2. Excessive Oil Consumption
- 2.2.1. Causes of Oil Consumption
- 2.2.2. Symptoms of Oil Consumption
- 2.2.3. Addressing Oil Consumption
- 2.3. Infrequent Oil Changes
- 2.3.1. Impact of Delayed Oil Changes
- 2.3.2. Recommended Oil Change Intervals
- 2.3.3. Choosing the Right Oil
- 3. Addressing a High Oil Level: Causes and Concerns
- 3.1. Coolant Leaks
- 3.1.1. How Coolant Enters the Oil
- 3.1.2. Symptoms of Coolant Leak
- 3.1.3. Addressing Coolant Leaks
- 3.2. Fuel Dilution
- 3.2.1. Causes of Fuel Dilution
- 3.2.2. Symptoms of Fuel Dilution
- 3.2.3. Addressing Fuel Dilution
- 3.3. Overfilling the Engine
- 3.3.1. Risks of Overfilling
- 3.3.2. Correcting an Overfilled Engine
- 4. Factors Affecting Dipstick Readings
- 4.1. Engine Temperature
- 4.1.1. Cold vs. Hot Readings
- 4.1.2. Best Practices for Checking
- 4.2. Vehicle Angle
- 4.2.1. Impact of Slopes
- 4.2.2. Ensuring a Level Surface
- 4.3. Dipstick Condition
- 4.3.1. Damage and Debris
- 4.3.2. Maintaining Your Dipstick
- 5. The Role of Diagnostic Tools in Oil Level Monitoring
- 5.1. Electronic Oil Level Sensors
- 5.1.1. How They Work
- 5.1.2. Benefits of Electronic Sensors
- 5.2. Oil Analysis Kits
- 5.2.1. Understanding Oil Analysis
- 5.2.2. What They Detect
- 5.3. Diagnostic Software (e.g., DTS-Monaco)
- 5.3.1. Capabilities of Diagnostic Software
- 5.3.2. Training and Support from DTS-MONACO.EDU.VN
- 6. Preventing Oil Level Issues
- 6.1. Regular Maintenance
- 6.1.1. Scheduled Oil Changes
- 6.1.2. Filter Replacements
- 6.1.3. Inspecting for Leaks
- 6.2. Monitoring Oil Consumption
- 6.2.1. Tracking Oil Level
- 6.2.2. Identifying Abnormal Consumption
- 6.3. Addressing Issues Promptly
- 6.3.1. Importance of Early Intervention
- 6.3.2. Seeking Professional Help
- 7. Case Studies: Real-World Examples
- 7.1. Case Study 1: The Leaky Valve Cover
- 7.2. Case Study 2: The Oil-Guzzling Engine
- 7.3. Case Study 3: The Coolant-Contaminated Oil
- 8. Advanced Techniques with DTS-Monaco Software
- 8.1. Reading and Interpreting Sensor Data
- 8.1.1. Accessing Oil Level Sensor Data
- 8.1.2. Analyzing Sensor Readings
- 8.2. Performing Diagnostic Tests
- 8.2.1. Running Oil Quality Tests
- 8.2.2. Interpreting Test Results
- 8.3. Resetting Oil Change Indicators
- 8.3.1. Resetting After Oil Change
- 8.3.2. Customizing Maintenance Intervals
- 9. FAQ: Common Questions About Engine Oil Levels
- 10. Conclusion: Maintaining Optimal Engine Oil Level
1. Understanding the Basics of Engine Oil Level
What’s the deal with engine oil and why does its level matter so much?
Engine oil is the lifeblood of your vehicle, lubricating moving parts to reduce friction and wear. Maintaining the correct oil level is crucial for optimal engine performance and longevity, as emphasized in automotive technician training programs across the USA. According to a study by the American Automobile Association (AAA), vehicles with poorly maintained oil levels are significantly more likely to experience engine damage. Regularly checking your oil level and understanding what the readings mean can prevent costly repairs.
Here is a breakdown of why engine oil level is so important:
- Lubrication: Oil creates a protective film between moving parts, preventing metal-to-metal contact.
- Cooling: Oil absorbs heat from the engine and dissipates it.
- Cleaning: Oil carries away dirt, debris, and combustion byproducts.
- Sealing: Oil helps seal the piston rings against the cylinder walls.
- Corrosion Prevention: Oil neutralizes acids that can corrode engine parts.
2. Identifying a Low Oil Level: Causes and Symptoms
What are the primary reasons your engine oil level might be too low?
A low engine oil level can be due to several factors, including oil leaks, excessive oil consumption, or infrequent oil changes. Each cause presents its own set of symptoms and requires specific diagnostic steps. For automotive technicians, understanding these nuances is essential for accurate troubleshooting.
2.1. Oil Leaks
2.1.1. Common Leak Locations
Where are the usual suspects for engine oil leaks?
Oil leaks can occur at various points in the engine. The most common leak locations include:
- Valve Cover Gaskets: These gaskets seal the valve cover to the cylinder head. Over time, they can become brittle and crack, leading to leaks.
- Oil Pan Gasket: The oil pan gasket seals the oil pan to the engine block. It’s prone to leaks due to heat and age.
- Rear Main Seal: Located between the engine and transmission, the rear main seal prevents oil from leaking out of the engine’s rear.
- Front Crankshaft Seal: This seal prevents oil from leaking out of the front of the engine around the crankshaft.
- Oil Filter Housing: Leaks can occur if the oil filter housing is cracked or the gasket is damaged.
- Drain Plug: A loose or damaged drain plug can cause oil to leak.
- Oil Cooler Lines: If your vehicle has an oil cooler, the lines connecting it to the engine can leak.
- Turbocharger Lines: For turbocharged engines, oil lines to and from the turbocharger can leak.
 Oil Leaks: Common Leak Locations
2.1.2. Diagnosing Oil Leaks
How can you pinpoint the source of an oil leak?
Diagnosing oil leaks involves a systematic approach. Start by visually inspecting the engine for any signs of oil accumulation. Look for wet spots, drips, or oil residue on engine components, the ground beneath the vehicle, and around gaskets and seals. According to ASE-certified technicians, using a UV dye and black light can help identify elusive leaks.
- Visual Inspection: Look for obvious signs of oil leaks around the engine.
- Check Oil Level: Monitor the oil level regularly to see how quickly it’s dropping.
- UV Dye Test: Add UV dye to the engine oil and use a black light to locate leaks.
- Pressure Test: Perform a pressure test to identify leaks under pressure.
- Compression Test: A compression test can help identify leaks related to piston rings.
- Inspect Hoses and Fittings: Check oil cooler lines and turbocharger lines for leaks.
2.1.3. Repairing Oil Leaks
How do you fix those pesky oil leaks?
Repairing oil leaks typically involves replacing the faulty gasket or seal. Here’s a general overview:
- Identify the Leak: Accurately determine the source of the leak.
- Gather Tools and Parts: Collect the necessary tools, gaskets, and seals.
- Prepare the Area: Clean the area around the leak to prevent contamination.
- Remove Components: Disassemble any parts needed to access the leak.
- Replace Gasket/Seal: Install the new gasket or seal, ensuring proper alignment.
- Reassemble: Reassemble all components in the reverse order of removal.
- Torque Specifications: Use a torque wrench to tighten bolts to the correct specifications.
- Check Oil Level: Refill the engine with oil and check the level.
- Test Drive: Take the vehicle for a test drive to ensure the leak is fixed.
2.2. Excessive Oil Consumption
2.2.1. Causes of Oil Consumption
Why might your engine be guzzling oil?
Excessive oil consumption refers to the engine burning oil at a higher rate than normal. Common causes include:
- Worn Piston Rings: Piston rings seal the combustion chamber. When worn, oil can seep past them and burn during combustion.
- Worn Valve Stem Seals: Valve stem seals prevent oil from entering the combustion chamber through the valve guides. When worn, oil can leak into the cylinders and burn.
- Cylinder Wear: Over time, cylinders can become worn or damaged, leading to increased oil consumption.
- PCV Valve Issues: A faulty PCV (Positive Crankcase Ventilation) valve can cause excessive vacuum in the crankcase, drawing oil into the intake manifold and burning it.
- Turbocharger Issues: In turbocharged engines, damaged turbocharger seals can allow oil to leak into the intake or exhaust.
2.2.2. Symptoms of Oil Consumption
What are the telltale signs of an engine burning too much oil?
The symptoms of excessive oil consumption can be subtle at first, but they become more noticeable over time:
- Blue Exhaust Smoke: A clear indication that oil is being burned in the combustion chamber.
- Fouled Spark Plugs: Oil residue on the spark plugs can cause them to misfire.
- Low Oil Level: Regularly finding the oil level below the recommended mark.
- Burning Oil Smell: A distinct odor coming from the engine compartment or exhaust.
- Catalytic Converter Failure: Excessive oil consumption can damage the catalytic converter.
2.2.3. Addressing Oil Consumption
How can you tackle the problem of an oil-hungry engine?
Addressing excessive oil consumption depends on the underlying cause. Here are some common solutions:
- PCV Valve Replacement: Replace a faulty PCV valve to ensure proper crankcase ventilation.
- Valve Stem Seal Replacement: Replacing worn valve stem seals can prevent oil from leaking into the combustion chamber.
- Piston Ring Replacement: This is a more extensive repair that involves removing the engine and replacing the piston rings.
- Cylinder Reconditioning: If the cylinders are worn, they may need to be re-bored or sleeved.
- Turbocharger Repair/Replacement: Repair or replace a damaged turbocharger to prevent oil leaks.
- Use High-Mileage Oil: High-mileage oils often contain additives that help reduce oil consumption.
2.3. Infrequent Oil Changes
2.3.1. Impact of Delayed Oil Changes
What happens when you skip those scheduled oil changes?
Infrequent oil changes can lead to a buildup of sludge and contaminants in the engine. This can cause increased wear and tear, leading to higher oil consumption. Regular oil changes are essential for maintaining engine health.
2.3.2. Recommended Oil Change Intervals
How often should you really be changing your oil?
The recommended oil change interval varies depending on the vehicle, driving conditions, and type of oil used. As a general guideline:
- Conventional Oil: Every 3,000 to 5,000 miles or 3 to 6 months.
- Synthetic Oil: Every 7,500 to 10,000 miles or 6 to 12 months.
- Severe Driving Conditions: Shorter intervals may be necessary for vehicles driven in harsh conditions (e.g., frequent stop-and-go traffic, extreme temperatures, towing).
2.3.3. Choosing the Right Oil
What type of oil is best for your engine?
Choosing the right oil is critical for engine health. Consider the following factors:
- Viscosity Grade: Use the viscosity grade recommended by the vehicle manufacturer (e.g., 5W-30, 10W-40).
- Oil Type: Decide between conventional, synthetic blend, or full synthetic oil. Synthetic oils offer better protection and longer intervals.
- API Certification: Look for the API (American Petroleum Institute) certification mark to ensure the oil meets industry standards.
- High-Mileage Oil: If your vehicle has over 75,000 miles, consider using a high-mileage oil with added seal conditioners.
3. Addressing a High Oil Level: Causes and Concerns
What could make your engine oil level appear too high on the dipstick?
An elevated engine oil level can be just as problematic as a low one. Common causes include coolant leaks, fuel dilution, and overfilling the engine. Each of these issues has its own set of potential consequences.
3.1. Coolant Leaks
3.1.1. How Coolant Enters the Oil
How does coolant end up mixing with your engine oil?
Coolant can leak into the engine oil through several pathways:
- Head Gasket Failure: A blown head gasket can allow coolant to mix with oil.
- Cracked Cylinder Head/Block: Cracks in the cylinder head or engine block can create pathways for coolant to enter the oil system.
- Intake Manifold Gasket Leak: On some engines, coolant passages run through the intake manifold. A leaking intake manifold gasket can allow coolant to mix with oil.
- Oil Cooler Leak: If the engine has an oil cooler, a leak in the cooler can allow coolant and oil to mix.
3.1.2. Symptoms of Coolant Leak
What are the warning signs of coolant contamination in your oil?
The symptoms of a coolant leak into the engine oil can be quite noticeable:
- Milky or Foamy Oil: The oil on the dipstick may appear milky or foamy due to the presence of coolant.
- Brown Residue: A brown, crusty residue may be present on the dipstick or under the oil filler cap.
- Rising Oil Level: The oil level may rise above the full mark on the dipstick.
- White Exhaust Smoke: White smoke with a sweet smell coming from the exhaust.
- Overheating: The engine may overheat due to the loss of coolant.
- Coolant Loss: Noticeably decreasing coolant levels in the radiator or overflow tank.
3.1.3. Addressing Coolant Leaks
How do you fix a coolant leak that’s contaminating your oil?
Addressing a coolant leak requires prompt action to prevent further engine damage:
- Identify the Leak: Determine the source of the coolant leak (e.g., head gasket, cracked head, intake manifold gasket).
- Repair/Replace: Replace the faulty component (e.g., head gasket, cylinder head, intake manifold gasket).
- Flush the System: Flush the cooling system and oil system to remove any traces of coolant.
- Oil Change: Perform an oil change to remove contaminated oil.
- Pressure Test: Pressure test the cooling system to ensure the leak is fixed.
- Monitor: Monitor the oil and coolant levels closely after the repair.
3.2. Fuel Dilution
3.2.1. Causes of Fuel Dilution
How does fuel end up mixing with your engine oil?
Fuel dilution occurs when fuel enters the engine oil. Common causes include:
- Short Trips: Frequent short trips don’t allow the engine to reach operating temperature, preventing fuel from fully vaporizing and burning.
- Leaky Fuel Injectors: Leaky fuel injectors can drip fuel into the cylinders, where it can wash past the piston rings and enter the oil pan.
- Rich Fuel Mixture: An overly rich fuel mixture can result in unburned fuel entering the oil.
- Piston Ring Issues: Worn or damaged piston rings can allow fuel to seep into the oil pan.
- Choke Issues: A malfunctioning choke can cause excessive fuel delivery during startup.
3.2.2. Symptoms of Fuel Dilution
What are the signs that fuel is mixing with your engine oil?
The symptoms of fuel dilution can be subtle but noticeable:
- High Oil Level: The oil level may rise above the full mark on the dipstick.
- Fuel Odor: The oil may have a strong fuel odor.
- Thin Oil: The oil may feel thinner than normal.
- Poor Engine Performance: The engine may run rough or have reduced power.
- Reduced Fuel Economy: Fuel dilution can lead to decreased fuel efficiency.
3.2.3. Addressing Fuel Dilution
How can you resolve the problem of fuel in your engine oil?
Addressing fuel dilution requires identifying and fixing the underlying cause:
- Identify the Cause: Determine the source of fuel dilution (e.g., leaky injectors, short trips, rich fuel mixture).
- Repair/Replace: Repair or replace the faulty component (e.g., fuel injectors, piston rings).
- Adjust Fuel Mixture: Ensure the fuel mixture is properly calibrated.
- Drive Longer Trips: Take longer trips to allow the engine to reach operating temperature.
- Oil Change: Perform an oil change to remove fuel-contaminated oil.
- Monitor: Monitor the oil level and condition closely after the repair.
3.3. Overfilling the Engine
3.3.1. Risks of Overfilling
Why is it bad to put too much oil in your engine?
Overfilling the engine with oil can lead to several problems:
- Aeration: The crankshaft can churn the oil, causing it to become aerated (filled with air bubbles). Aerated oil is less effective at lubricating and cooling.
- Foaming: Excessive aeration can lead to foaming, which further reduces the oil’s ability to protect the engine.
- Oil Leaks: Overfilling can increase pressure in the crankcase, forcing oil past seals and gaskets.
- Catalytic Converter Damage: Excess oil can be forced into the combustion chamber and damage the catalytic converter.
3.3.2. Correcting an Overfilled Engine
How do you fix an engine that has too much oil?
Correcting an overfilled engine involves removing the excess oil:
- Drain Excess Oil: Use the drain plug to carefully drain the excess oil into a container.
- Check Oil Level: Regularly check the oil level with the dipstick while draining to avoid draining too much.
- Dispose of Oil: Properly dispose of the used oil at a recycling center.
- Verify Level: Ensure the oil level is at the correct mark on the dipstick.
- Monitor: Monitor the oil level and condition closely after correcting the overfill.
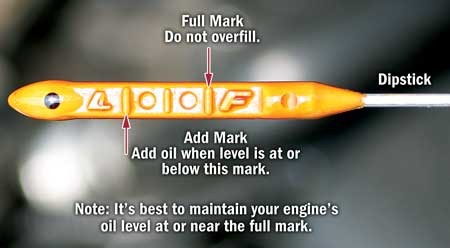
4. Factors Affecting Dipstick Readings
Why might your dipstick readings be unreliable?
Several factors can influence the accuracy of dipstick readings, leading to misinterpretations of the actual oil level.
4.1. Engine Temperature
4.1.1. Cold vs. Hot Readings
How does engine temperature affect the oil level reading?
Engine temperature affects the volume and distribution of oil within the engine.
- Cold Engine: When the engine is cold, more oil is in the oil pan, resulting in a higher reading on the dipstick.
- Hot Engine: When the engine is hot, oil is circulating throughout the engine, and some may remain on internal components, leading to a slightly lower reading on the dipstick.
4.1.2. Best Practices for Checking
What’s the best way to ensure an accurate oil level reading?
For the most accurate reading, follow these best practices:
- Warm Engine: Allow the engine to warm up to operating temperature.
- Level Surface: Park the vehicle on a level surface.
- Wait Time: Turn off the engine and wait several minutes to allow the oil to drain back into the oil pan.
- Wipe Dipstick: Remove the dipstick, wipe it clean, and reinsert it fully.
- Check Level: Remove the dipstick again and check the oil level.
4.2. Vehicle Angle
4.2.1. Impact of Slopes
How does parking on a slope affect the oil level reading?
Parking on a slope can significantly affect the oil level reading. The oil will accumulate at the lower end of the engine, resulting in an inaccurate reading.
4.2.2. Ensuring a Level Surface
Why is it so important to check your oil on a flat surface?
To ensure an accurate reading, always check the oil level on a level surface. If you’re unsure, use a leveling tool or app to confirm.
4.3. Dipstick Condition
4.3.1. Damage and Debris
How can a damaged dipstick lead to inaccurate readings?
A damaged or dirty dipstick can lead to inaccurate readings. Damage such as bends or breaks can alter the accuracy of the level markings. Debris on the dipstick can also interfere with accurate readings.
4.3.2. Maintaining Your Dipstick
How should you care for your dipstick to ensure accurate readings?
To maintain your dipstick:
- Inspect Regularly: Check the dipstick for any signs of damage or wear.
- Clean Regularly: Wipe the dipstick clean before each use to remove any debris or oil residue.
- Replace if Damaged: If the dipstick is damaged, replace it with a new one.
5. The Role of Diagnostic Tools in Oil Level Monitoring
How can advanced diagnostic tools help monitor engine oil levels and conditions?
Modern diagnostic tools can provide valuable insights into engine oil levels and conditions, offering a more comprehensive assessment than traditional dipstick readings. DTS-MONACO.EDU.VN provides extensive training on using these tools effectively.
5.1. Electronic Oil Level Sensors
5.1.1. How They Work
How do electronic oil level sensors provide accurate readings?
Electronic oil level sensors use various technologies, such as capacitance or ultrasonic sensors, to measure the oil level in real-time. These sensors provide accurate readings that can be displayed on the vehicle’s dashboard or accessed through diagnostic tools.
5.1.2. Benefits of Electronic Sensors
What advantages do electronic oil level sensors offer?
Electronic oil level sensors offer several benefits:
- Accuracy: Provide more accurate readings than traditional dipsticks.
- Real-Time Monitoring: Continuously monitor the oil level.
- Early Warning: Can provide early warning of low or high oil levels.
- Integration: Can be integrated with vehicle’s diagnostic systems.
5.2. Oil Analysis Kits
5.2.1. Understanding Oil Analysis
What can oil analysis tell you about your engine’s health?
Oil analysis involves sending a sample of used engine oil to a laboratory for testing. The analysis can reveal valuable information about the oil’s condition and the health of the engine.
5.2.2. What They Detect
What specific issues can oil analysis identify?
Oil analysis can detect:
- Contaminants: Presence of coolant, fuel, or water in the oil.
- Wear Metals: Elevated levels of wear metals (e.g., iron, copper, aluminum) indicate engine wear.
- Viscosity: Changes in oil viscosity indicate degradation or dilution.
- TBN/TAN: Measures of the oil’s ability to neutralize acids.
- Additives: Depletion of oil additives.
5.3. Diagnostic Software (e.g., DTS-Monaco)
5.3.1. Capabilities of Diagnostic Software
How can diagnostic software help with oil level and condition monitoring?
Diagnostic software, like DTS-Monaco offered by DTS-MONACO.EDU.VN, can access data from electronic oil level sensors and other engine sensors to provide a comprehensive view of the oil’s condition. It can also be used to reset oil change indicators and perform other maintenance tasks.
5.3.2. Training and Support from DTS-MONACO.EDU.VN
How can DTS-MONACO.EDU.VN help you master diagnostic software for oil-related issues?
DTS-MONACO.EDU.VN provides extensive training and support for using diagnostic software, including DTS-Monaco, to monitor oil levels and conditions. Their courses cover:
- Software Operation: Learning how to navigate and use the software effectively.
- Data Interpretation: Understanding the data provided by the software.
- Troubleshooting: Diagnosing and resolving oil-related issues using the software.
- Advanced Features: Utilizing advanced features for in-depth analysis.
6. Preventing Oil Level Issues
How can you proactively prevent oil level problems and maintain a healthy engine?
Preventing oil level issues involves a combination of regular maintenance, careful monitoring, and addressing potential problems early.
6.1. Regular Maintenance
6.1.1. Scheduled Oil Changes
Why are timely oil changes so important for preventing oil level issues?
Regular oil changes are essential for maintaining engine health and preventing oil level issues. Fresh oil provides optimal lubrication, cooling, and cleaning, which reduces wear and tear and helps prevent leaks and excessive oil consumption.
6.1.2. Filter Replacements
Why should you always replace the oil filter during an oil change?
Replacing the oil filter during each oil change ensures that contaminants are effectively removed from the oil, preventing them from circulating through the engine and causing damage.
6.1.3. Inspecting for Leaks
How often should you visually inspect your engine for oil leaks?
Regularly inspecting the engine for oil leaks can help identify and address potential problems early. Check for leaks during each oil change and whenever you notice a drop in oil level.
6.2. Monitoring Oil Consumption
6.2.1. Tracking Oil Level
How can you effectively track your vehicle’s oil consumption?
Tracking oil consumption involves regularly checking the oil level and recording how much oil is added between oil changes. This can help you identify any sudden increases in oil consumption, which may indicate a problem.
6.2.2. Identifying Abnormal Consumption
What’s considered “normal” vs. “abnormal” oil consumption?
Normal oil consumption varies depending on the vehicle, engine, and driving conditions. However, as a general guideline, consuming more than one quart of oil every 1,000 miles is considered abnormal and should be investigated.
6.3. Addressing Issues Promptly
6.3.1. Importance of Early Intervention
Why is it crucial to address oil level issues as soon as they’re detected?
Addressing oil level issues promptly can prevent more serious engine damage. Ignoring low or high oil levels can lead to increased wear and tear, overheating, and even engine failure.
6.3.2. Seeking Professional Help
When should you consult a qualified mechanic for oil-related problems?
Consult a qualified mechanic if you notice any of the following:
- Persistent Oil Leaks: You can’t identify or fix an oil leak.
- Excessive Oil Consumption: You’re adding oil frequently.
- Coolant in Oil: The oil appears milky or foamy.
- Fuel in Oil: The oil has a strong fuel odor.
- Engine Problems: You notice unusual engine noises, overheating, or reduced performance.
7. Case Studies: Real-World Examples
Let’s look at some real-world examples to illustrate common oil level issues and their solutions.
7.1. Case Study 1: The Leaky Valve Cover
Problem: A customer noticed a burning oil smell and found oil dripping onto the exhaust manifold.
Diagnosis: Visual inspection revealed a leaking valve cover gasket.
Solution: Replaced the valve cover gasket, cleaned the affected area, and performed an oil change.
Outcome: The leak was resolved, and the customer’s vehicle returned to normal operation.
7.2. Case Study 2: The Oil-Guzzling Engine
Problem: A customer was adding a quart of oil every 500 miles.
Diagnosis: Compression test and leak-down test revealed worn piston rings.
Solution: Performed an engine overhaul, including replacing the piston rings and reconditioning the cylinders.
Outcome: Oil consumption was significantly reduced, and the engine’s performance improved.
7.3. Case Study 3: The Coolant-Contaminated Oil
Problem: A customer noticed milky oil on the dipstick and white smoke coming from the exhaust.
Diagnosis: Pressure test revealed a blown head gasket.
Solution: Replaced the head gasket, flushed the cooling system and oil system, and performed an oil change.
Outcome: The coolant leak was resolved, and the engine’s oil returned to normal condition.
8. Advanced Techniques with DTS-Monaco Software
What advanced techniques can you employ using DTS-Monaco software to diagnose oil-related problems?
DTS-Monaco, a powerful diagnostic software, offers several advanced techniques for diagnosing oil-related problems. DTS-MONACO.EDU.VN provides comprehensive training on these techniques.
8.1. Reading and Interpreting Sensor Data
8.1.1. Accessing Oil Level Sensor Data
How can you access real-time oil level data using DTS-Monaco?
DTS-Monaco allows you to access real-time data from electronic oil level sensors. This data can be used to monitor the oil level and identify any fluctuations or abnormalities.
8.1.2. Analyzing Sensor Readings
How do you interpret the data provided by oil level sensors?
Interpreting sensor readings involves understanding the normal operating range for the oil level and identifying any deviations from this range. DTS-Monaco can also display historical data, allowing you to track changes over time.
8.2. Performing Diagnostic Tests
8.2.1. Running Oil Quality Tests
What oil quality tests can be performed using DTS-Monaco?
DTS-Monaco can perform various diagnostic tests related to oil quality, such as:
- Oil Degradation Test: Measures the level of oil degradation based on sensor data.
- Contamination Test: Detects the presence of contaminants in the oil.
- Viscosity Test: Estimates the oil’s viscosity based on sensor readings.
8.2.2. Interpreting Test Results
How do you interpret the results of these diagnostic tests?
Interpreting test results involves comparing the readings to reference values and identifying any anomalies. DTS-Monaco provides detailed information on each test, including the expected results and potential causes of any deviations.
8.3. Resetting Oil Change Indicators
8.3.1. Resetting After Oil Change
How do you reset the oil change indicator after performing an oil change?
DTS-Monaco allows you to reset the oil change indicator after performing an oil change. This ensures that the vehicle’s maintenance schedule is accurately tracked.
8.3.2. Customizing Maintenance Intervals
Can you customize the oil change interval using DTS-Monaco?
Yes, DTS-Monaco allows you to customize the oil change interval based on driving conditions and other factors. This can help optimize the maintenance schedule and ensure that the engine is properly protected.
9. FAQ: Common Questions About Engine Oil Levels
Have more questions about engine oil levels? Here are some frequently asked questions:
-
Q: How often should I check my oil level?
A: You should check your oil level at least once a month and before any long trips.
-
Q: Is it OK to drive with a low oil level?
A: No, driving with a low oil level can cause serious engine damage.
-
Q: Can I mix different brands of oil?
A: While it’s generally OK to mix different brands of oil, it’s best to use the same brand and type of oil recommended by the vehicle manufacturer.
-
Q: What does “synthetic blend” oil mean?
A: Synthetic blend oil is a mixture of conventional and synthetic oil, offering better protection than conventional oil but not as much as full synthetic oil.
-
Q: How do I dispose of used oil properly?
A: Take used oil to a recycling center or auto parts store that accepts used oil.
-
Q: Can I add oil additives to improve engine performance?
A: While some oil additives may offer benefits, it’s generally not recommended to use them unless specified by the vehicle manufacturer.
-
Q: What does the “W” in oil viscosity grades (e.g., 5W-30) stand for?
A: The “W” stands for Winter and indicates the oil’s viscosity at low temperatures.
-
Q: How long does engine oil last in storage?
A: Engine oil can last several years in storage if kept in a sealed container in a cool, dry place.
-
Q: Can I use a thicker oil to reduce oil consumption in an older engine?
A: Using a thicker oil may help reduce oil consumption in an older engine, but consult a mechanic to ensure it’s appropriate for your vehicle.
-
Q: What are the symptoms of a clogged oil filter?
A: Symptoms of a clogged oil filter include low oil pressure, engine noise, and reduced performance.
10. Conclusion: Maintaining Optimal Engine Oil Level
Maintaining the correct engine oil level is essential for engine health and longevity. By understanding the causes of low and high oil levels, monitoring your vehicle’s oil consumption, and addressing issues promptly, you can prevent costly repairs and keep your engine running smoothly. Remember, DTS-MONACO.EDU.VN is here to support you with comprehensive training and resources on diagnostic software and advanced techniques.
Ready to take your automotive diagnostic skills to the next level? Contact DTS-MONACO.EDU.VN today to learn more about our training programs and how we can help you master the latest diagnostic technologies. Visit our website at DTS-MONACO.EDU.VN or contact us at Whatsapp: +1 (641) 206-8880. Address: 275 N Harrison St, Chandler, AZ 85225, United States.